Manual
Page 1
HOOVER® FoldAway™ Upright Thank you for your purchase! Owner's Manual ENGLISH § pp. 1-12 ESPAÑOL § pág. 15-21 FRANÇAIS § p. 22-28 ® www.hoover.com
HOOVER® FoldAway™ Upright Thank you for your purchase! Owner's Manual ENGLISH § pp. 1-12 ESPAÑOL § pág. 15-21 FRANÇAIS § p. 22-28 ® www.hoover.com
Manual
Page 2
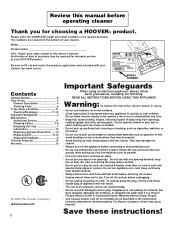
...operating cleaner Thank you for warranty service of purchase may reduce air flow. • Do not pull or carry by or near children. others may be used by cord, use with your HOOVER product. XXXXXXXXXXXX SERIAL NUMBER Contents Getting Started 3 How to use 4 Cleaner Description 4 Cleaning Tools 6 If You Have a Problem 11 Clearing Blockages 11-12 Important Safeguards 2 Maintenance Authorized Service 11 Cleaning Filters 7-8 Emptying Dirt Cup 7 Lubrication 10 Replacing Agitator Brush Roll ......10 Replacing Belt 9-10 Replacing Headlight 8 Thermal Protector 10 Warranty...
...operating cleaner Thank you for warranty service of purchase may reduce air flow. • Do not pull or carry by or near children. others may be used by cord, use with your HOOVER product. XXXXXXXXXXXX SERIAL NUMBER Contents Getting Started 3 How to use 4 Cleaner Description 4 Cleaning Tools 6 If You Have a Problem 11 Clearing Blockages 11-12 Important Safeguards 2 Maintenance Authorized Service 11 Cleaning Filters 7-8 Emptying Dirt Cup 7 Lubrication 10 Replacing Agitator Brush Roll ......10 Replacing Belt 9-10 Replacing Headlight 8 Thermal Protector 10 Warranty...
Manual
Page 3
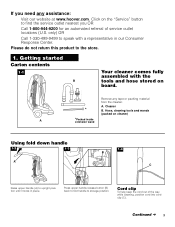
... cleaning, position cord into cord clip (C). Remove any assistance: Visit our website at www.hoover.com. Hose, cleaning tools and wands (packed on cleaner) A *Packed inside extension wand Using fold down handle 1-2 1-3 A 1-4 B C Raise upper handle (A) to storage position. Getting started Carton contents 1-1 B Your cleaner comes fully assembled with a representative in place. Please do not return this product to speak with the tools and hose stored on the "Service" button to find the service...
... cleaning, position cord into cord clip (C). Remove any assistance: Visit our website at www.hoover.com. Hose, cleaning tools and wands (packed on cleaner) A *Packed inside extension wand Using fold down handle 1-2 1-3 A 1-4 B C Raise upper handle (A) to storage position. Getting started Carton contents 1-1 B Your cleaner comes fully assembled with a representative in place. Please do not return this product to speak with the tools and hose stored on the "Service" button to find the service...
Manual
Page 4
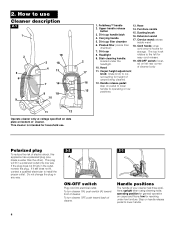
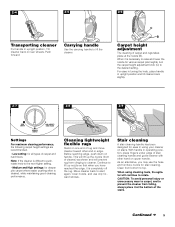
Upper handle release button 3. Dirt cup filter chamber 6. Dirt cup 8. Hose 14. Crevice wand: stores inside filter chamber) 7. This plug will fit in any way. 2-2 2-3 A ON-OFF switch Plug cord into electrical outlet. Do not change the plug in a polarized outlet only one blade is intended for storage. upright when using cleaning tools; Cord hooks: wrap cord around hooks for household use Cleaner description 2-1 1 2 5 6 9 19 3 18 4 13 7 14 8 18 10 11 12 Operate cleaner only at voltage specified on...
Upper handle release button 3. Dirt cup filter chamber 6. Dirt cup 8. Hose 14. Crevice wand: stores inside filter chamber) 7. This plug will fit in any way. 2-2 2-3 A ON-OFF switch Plug cord into electrical outlet. Do not change the plug in a polarized outlet only one blade is intended for storage. upright when using cleaning tools; Cord hooks: wrap cord around hooks for household use Cleaner description 2-1 1 2 5 6 9 19 3 18 4 13 7 14 8 18 10 11 12 Operate cleaner only at voltage specified on...
Manual
Page 5
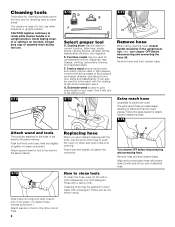
... nozzle (B). Cleaning lightweight flexible rugs Stand on one end of rug and move cleaner toward other hand on stairs. When using your cleaner on upper handle. Continue to the desired setting. Continued § 5 Tilt cleaner back on handle. Before reaching edge, push down on rear wheels. Move cleaner back to the next higher setting. • Medium and High settings: for various carpet pile heights, turn the carpet...
... nozzle (B). Cleaning lightweight flexible rugs Stand on one end of rug and move cleaner toward other hand on stairs. When using your cleaner on upper handle. Continue to the desired setting. Continued § 5 Tilt cleaner back on handle. Before reaching edge, push down on rear wheels. Move cleaner back to the next higher setting. • Medium and High settings: for various carpet pile heights, turn the carpet...
Manual
Page 6
... along edges in upright position. Remove hose end from cleaner base. Push tool firmly onto hose; G. Rinse and air dry before using. 2-11 H Remove hose When using cleaning tools, cleaner handle should be used for reaching hard to your hose. Remove hose end from cleaner base. F. Also, turn cleaner OFF before disconnecting and connecting hose. Use it into place. (To detach hose, reverse procedure.) Attach wands or tools to tighten or loosen connection. Furniture nozzle may be used to give extra...
... along edges in upright position. Remove hose end from cleaner base. Push tool firmly onto hose; G. Rinse and air dry before using. 2-11 H Remove hose When using cleaning tools, cleaner handle should be used for reaching hard to your hose. Remove hose end from cleaner base. F. Also, turn cleaner OFF before disconnecting and connecting hose. Use it into place. (To detach hose, reverse procedure.) Attach wands or tools to tighten or loosen connection. Furniture nozzle may be used to give extra...

Manual
Page 7
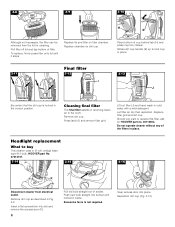
... the dirt opening on front of dust, empty the cup and clean the filters often. When using the cleaner for this type of filter chamber and remove lid. Do not use if preferred. Filter assembly How to the lid. The pleated filter is in place. Pull dirt cup handle (E) down. Maintenance Familiarize yourself with a soft brush. Dirt cup 3-1 F B E D C A When to empty 3-2 3-3 B Remove filter chamber (B) from filter. Do not rinse or wash the filter. Holding the carry handle (E), empty dirt cup...
... the dirt opening on front of dust, empty the cup and clean the filters often. When using the cleaner for this type of filter chamber and remove lid. Do not use if preferred. Filter assembly How to the lid. The pleated filter is in place. Pull dirt cup handle (E) down. Maintenance Familiarize yourself with a soft brush. Dirt cup 3-1 F B E D C A When to empty 3-2 3-3 B Remove filter chamber (B) from filter. Do not rinse or wash the filter. Holding the carry handle (E), empty dirt cup...
Manual
Page 8
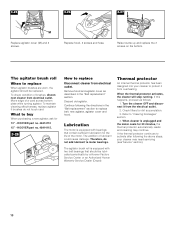
... to buy This cleaner uses a 12 volt, wedge base type 912 bulb, HOOVER part No. 27313107. 3-14 3-15 3-16 K Disconnect cleaner from the lid for HOOVER part no. 40110004. Remove dirt cup as described in cold water with a mild detergent. Snap access door into socket until it stops. Cleaning final filter The final filter assists in returning clean air to lock cup in the correct position. Replace filter grid and dirt cup. Pull filter off...
... to buy This cleaner uses a 12 volt, wedge base type 912 bulb, HOOVER part No. 27313107. 3-14 3-15 3-16 K Disconnect cleaner from the lid for HOOVER part no. 40110004. Remove dirt cup as described in cold water with a mild detergent. Snap access door into socket until it stops. Cleaning final filter The final filter assists in returning clean air to lock cup in the correct position. Replace filter grid and dirt cup. Pull filter off...
Manual
Page 9
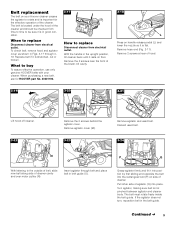
... motor pulley (N). Remove hose end (Fig. 2-11). Remove the 2 screws near the front of the cleaner. Insert agitator through 319. Turn agitator, making sure belt is stretched, cut or broken. To check belt, remove hood and agitator cover as shown in the upright position, tilt cleaner back until it rests on floor. Replace belt if it into position by first sliding end opposite the belt into place. Remove agitator cover (M). 3-23 Remove agitator and used belt...
... motor pulley (N). Remove hose end (Fig. 2-11). Remove the 2 screws near the front of the cleaner. Insert agitator through 319. Turn agitator, making sure belt is stretched, cut or broken. To check belt, remove hood and agitator cover as shown in the upright position, tilt cleaner back until it rests on floor. Replace belt if it into position by first sliding end opposite the belt into place. Remove agitator cover (M). 3-23 Remove agitator and used belt...
Manual
Page 10
To maintain cleaning effectiveness, replace agitator if brushes do not add lubricant to replace belt, new agitator, agitator cover and hood. Check filters for the life of brushes, disconnect cleaner from overheating. Replace hood, 2 screws and hose. To check condition of the motor. Remove hood and agitator cover as follows: 1. Lubrication The motor is equipped with two ball bearings that contain sufficient lubrication for dirt accumulation. 3. Thermal protector An internal thermal protector has been designed into your...
To maintain cleaning effectiveness, replace agitator if brushes do not add lubricant to replace belt, new agitator, agitator cover and hood. Check filters for the life of brushes, disconnect cleaner from overheating. Replace hood, 2 screws and hose. To check condition of the motor. Remove hood and agitator cover as follows: 1. Lubrication The motor is equipped with two ball bearings that contain sufficient lubrication for dirt accumulation. 3. Thermal protector An internal thermal protector has been designed into your...
Manual
Page 11
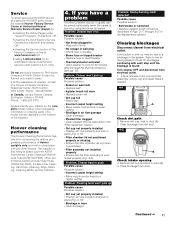
... by using the check list below. Prob Problem: Cleaner won't pick up Possible cause Possible solution • Broken or worn belt • Replace belt • Agitator brush roll worn • Replace brush roll • Dirt cup full • Empty cup • Incorrect carpet height setting • Move nozzle control knob to lower setting • Blockage in air flow passage • Clear blockage • Pleated filter clogged • Clean pleated filter as described in the "Filter assembly" section • Dirt cup not properly installed...
... by using the check list below. Prob Problem: Cleaner won't pick up Possible cause Possible solution • Broken or worn belt • Replace belt • Agitator brush roll worn • Replace brush roll • Dirt cup full • Empty cup • Incorrect carpet height setting • Move nozzle control knob to lower setting • Blockage in air flow passage • Clear blockage • Pleated filter clogged • Clean pleated filter as described in the "Filter assembly" section • Dirt cup not properly installed...
Manual
Page 12
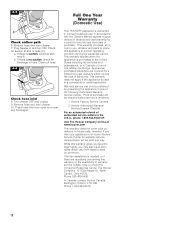
... operating condition during the warranted period. Hoover Authorized Warranty Service Dealers (Depots) For an automated referral of one way. 4-3 Full One Year Warranty (Domestic Use) C Check airflow path 6. Remove hose end from cleaner. 10. Remove hose end from cleaner. 7. Your HOOVER® appliance is needed, or if there are covered by presenting the appliance to a Hoover Factory Service Center for suction at www.hoover.com This warranty does not cover pick...
... operating condition during the warranted period. Hoover Authorized Warranty Service Dealers (Depots) For an automated referral of one way. 4-3 Full One Year Warranty (Domestic Use) C Check airflow path 6. Remove hose end from cleaner. 10. Remove hose end from cleaner. 7. Your HOOVER® appliance is needed, or if there are covered by presenting the appliance to a Hoover Factory Service Center for suction at www.hoover.com This warranty does not cover pick...


