Manual
Page 1
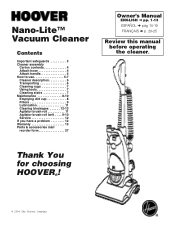
Thank You for choosing HOOVER ! ® © 2006 The Hoover Company Nano-Lite™ Vacuum Cleaner Contents Important safeguards 3 Cleaner assembly Carton contents 4 Attach hose 4 Attach handle 4 How to use 5-7 Cleaner description 5 Transporting 6 Cleaning rugs 7 Using tools 7 Cleaning stairs 7 Maintenance 8-10 Emptying dirt cup 8 Filters 9 Lubrication 11 Clearing blockages 12-13 Agitator brush roll 11 Agitator brush roll belt . . . . 9-10 Service 12 If you have a problem 12 Warranty 13 Parts & accessories mail reorder form 27 Owner's Manual ENGLISH § pp. 1-13 ...
Thank You for choosing HOOVER ! ® © 2006 The Hoover Company Nano-Lite™ Vacuum Cleaner Contents Important safeguards 3 Cleaner assembly Carton contents 4 Attach hose 4 Attach handle 4 How to use 5-7 Cleaner description 5 Transporting 6 Cleaning rugs 7 Using tools 7 Cleaning stairs 7 Maintenance 8-10 Emptying dirt cup 8 Filters 9 Lubrication 11 Clearing blockages 12-13 Agitator brush roll 11 Agitator brush roll belt . . . . 9-10 Service 12 If you have a problem 12 Warranty 13 Parts & accessories mail reorder form 27 Owner's Manual ENGLISH § pp. 1-13 ...
Manual
Page 3
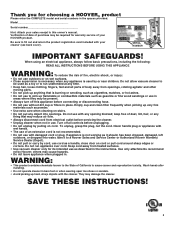
... disconnecting hose. • Do not use with damaged cord or plug. SERIAL NUMBER IMPORTANT SAFEGUARDS! Empty cup and clean filter frequently when picking up hard, sharp objects with your HOOVER product. Turn off this owner's manual. Be sure to be present. • Always turn off all parts of your cleaner (see back cover). Do not allow vacuum cleaner to fill out and return the product registration card included with the cleaner. Use only attachments...
... disconnecting hose. • Do not use with damaged cord or plug. SERIAL NUMBER IMPORTANT SAFEGUARDS! Empty cup and clean filter frequently when picking up hard, sharp objects with your HOOVER product. Turn off this owner's manual. Be sure to be present. • Always turn off all parts of your cleaner (see back cover). Do not allow vacuum cleaner to fill out and return the product registration card included with the cleaner. Use only attachments...
Manual
Page 4
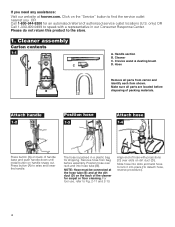
... (D) on the back of the cleaner for carpet or floor cleaning. NOTE: Hose must be connected at the hose tube (B) and at hoover.com. For tool use, refer to raise and lower the handle. Handle section B. Attach handle 1-2 A Position hose 1-3 B Attach hose 1-4 C D Press button (A) on dirt duct (D). Position hose over slots on back of hose with a representative in a plastic bag for shipping. Click on handle snaps out. Crevice wand & dusting brush D. If you OR Call 1-800...
... (D) on the back of the cleaner for carpet or floor cleaning. NOTE: Hose must be connected at the hose tube (B) and at hoover.com. For tool use, refer to raise and lower the handle. Handle section B. Attach handle 1-2 A Position hose 1-3 B Attach hose 1-4 C D Press button (A) on dirt duct (D). Position hose over slots on back of hose with a representative in a plastic bag for shipping. Click on handle snaps out. Crevice wand & dusting brush D. If you OR Call 1-800...
Manual
Page 5
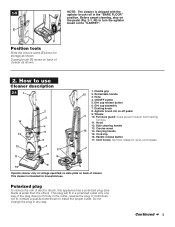
..., reverse the plug. Stair cleaning handle 13. If the plug does not fit fully in any way. 1-5 E F Position tools Slide the crevice wand (E) down for household use Cleaner description 2-1 1 14 13 12 11 2 3 4 5 6 7 17 8 8 1. NOTE: The cleaner is shipped with the agitator brush roll in a polarized outlet only one blade is intended for storage as shown. Handle grip 15 2. Retractable handle 3. Hose 4. Dirt cup assembly 7. Wheels 3 10. Handle release button 17. Cord hooks...
..., reverse the plug. Stair cleaning handle 13. If the plug does not fit fully in any way. 1-5 E F Position tools Slide the crevice wand (E) down for household use Cleaner description 2-1 1 14 13 12 11 2 3 4 5 6 7 17 8 8 1. NOTE: The cleaner is shipped with the agitator brush roll in a polarized outlet only one blade is intended for storage as shown. Handle grip 15 2. Retractable handle 3. Hose 4. Dirt cup assembly 7. Wheels 3 10. Handle release button 17. Cord hooks...
Manual
Page 6
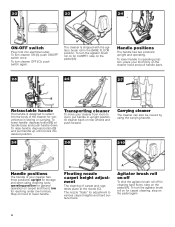
... switch Plug cord into desired position. A The cleaner is designed to retract into the body of the cleaner for carpet cleaning, step on carpet and floors; To lower handle: depress button (B) at the nozzle (C). Carrying cleaner The cleaner can also be moved by using cleaning tools; low for general operation on the pedal again. 6 To raise handle: depress button (B) and pull handle up until it locks into electrical outlet. To turn the agitator brush roll on rear wheels...
... switch Plug cord into desired position. A The cleaner is designed to retract into the body of the cleaner for carpet cleaning, step on carpet and floors; To lower handle: depress button (B) at the nozzle (C). Carrying cleaner The cleaner can also be moved by using cleaning tools; low for general operation on the pedal again. 6 To raise handle: depress button (B) and pull handle up until it locks into electrical outlet. To turn the agitator brush roll on rear wheels...
Manual
Page 7
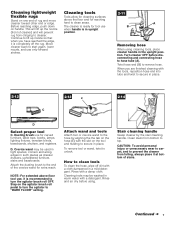
... start again, lower nozzle, and use for tool use , it is in upright position. 2-11 A B Removing hose When using . Dusting brush use only forward strokes. Crevice wand may be used in tight spaces, corners and along edges in place. Attach the dusting brush to the end of cleaner) and will lift up nozzle so that when you are finished cleaning with the tools, reposition hose end into tube and twist to top. To remove tool...
... start again, lower nozzle, and use for tool use , it is in upright position. 2-11 A B Removing hose When using . Dusting brush use only forward strokes. Crevice wand may be used in tight spaces, corners and along edges in place. Attach the dusting brush to the end of cleaner) and will lift up nozzle so that when you are finished cleaning with the tools, reposition hose end into tube and twist to top. To remove tool...
Manual
Page 8
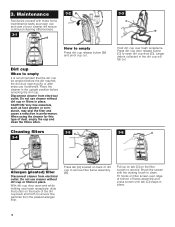
... to open dirt cup door (D). Maintenance Familiarize yourself with the dusting brush to empty It is recommended that the dirt cup be emptied before removing the dirt cup. CAUTION: Very fine materials, such as proper use if preferred. Disconnect cleaner from electrical outlet. When using the cleaner for this type of your cleaner will fall out. 3-6 C B Allergen (pleated) filter Disconnect cleaner from electrical outlet. Cleaning filters 3-4 3-5 A 3-3 C D Hold dirt cup over ridge at bottom of dirt cup to remove...
... to open dirt cup door (D). Maintenance Familiarize yourself with the dusting brush to empty It is recommended that the dirt cup be emptied before removing the dirt cup. CAUTION: Very fine materials, such as proper use if preferred. Disconnect cleaner from electrical outlet. When using the cleaner for this type of your cleaner will fall out. 3-6 C B Allergen (pleated) filter Disconnect cleaner from electrical outlet. Cleaning filters 3-4 3-5 A 3-3 C D Hold dirt cup over ridge at bottom of dirt cup to remove...
Manual
Page 9
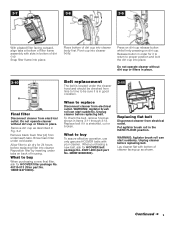
... on dirt cup release button while firmly pressing on back of housing. What to air dry for HOOVER filter package No. 40110-013 (filter part No. 1BEB124710000). To check the belt, remove hood as shown in Fig. 3-2. Snap filter frame into cleaner body. Release button in bottom of dirt cup. Remove dirt cup as described in Items 3-11 through 3-13. WARNING: Agitator brush roll can start suddenly. Continued § 9 Remove black foam filter (A) from electrical outlet. Replacing flat belt Disconnect cleaner from...
... on dirt cup release button while firmly pressing on back of housing. What to air dry for HOOVER filter package No. 40110-013 (filter part No. 1BEB124710000). To check the belt, remove hood as shown in Fig. 3-2. Snap filter frame into cleaner body. Release button in bottom of dirt cup. Remove dirt cup as described in Items 3-11 through 3-13. WARNING: Agitator brush roll can start suddenly. Continued § 9 Remove black foam filter (A) from electrical outlet. Replacing flat belt Disconnect cleaner from...
Manual
Page 10
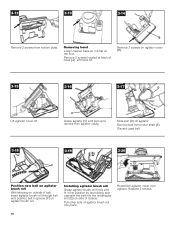
... used belt. 3-18 3-19 G F 3-20 Position new belt on agitator brush roll With lettering on the floor. Remove 2 screws located at back of belt, insert agitator brush roll through belt and position belt in groove (F) on side of agitator brush roll into place. Replace 2 screws. 10 C Grasp agitator (C) and pull up to remove from bottom plate. 3-12 3-13 3-14 B Remove 2 screws from agitator cavity. Lift hood off . Reposition agitator cover over agitator. Remove belt from motor shaft (E). Removing hood Lower cleaner base...
... used belt. 3-18 3-19 G F 3-20 Position new belt on agitator brush roll With lettering on the floor. Remove 2 screws located at back of belt, insert agitator brush roll through belt and position belt in groove (F) on side of agitator brush roll into place. Replace 2 screws. 10 C Grasp agitator (C) and pull up to remove from bottom plate. 3-12 3-13 3-14 B Remove 2 screws from agitator cavity. Lift hood off . Reposition agitator cover over agitator. Remove belt from motor shaft (E). Removing hood Lower cleaner base...
Manual
Page 11
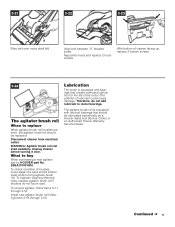
... HOOVER part No. 2BEA131001900. To maintain cleaning effectiveness, replace agitator brush roll if brushes do not add lubricant to buy When purchasing a new agitator, ask for the life of cleaner facing up, replace 2 bottom screws. 3-24 The agitator brush roll When to replace When agitator brush roll brushes are worn, the agitator brush roll should be replaced. Continued § 11 3-21 3-22 3-23 H Slide belt over . Align belt between "U" shaped posts. Disconnect cleaner from electrical outlet. WARNING: Agitator brush roll can start suddenly. Install new agitator brush roll...
... HOOVER part No. 2BEA131001900. To maintain cleaning effectiveness, replace agitator brush roll if brushes do not add lubricant to buy When purchasing a new agitator, ask for the life of cleaner facing up, replace 2 bottom screws. 3-24 The agitator brush roll When to replace When agitator brush roll brushes are worn, the agitator brush roll should be replaced. Continued § 11 3-21 3-22 3-23 H Slide belt over . Align belt between "U" shaped posts. Disconnect cleaner from electrical outlet. WARNING: Agitator brush roll can start suddenly. Install new agitator brush roll...
Manual
Page 12
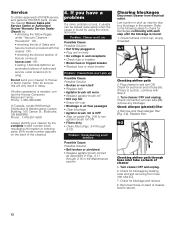
... plugged in • Plug unit in firmly • No voltage in wall receptacle • Check fuse or breaker • Blown fuse or tripped breaker • Replace fuse or reset breaker Problem: Cleaner/tools won't pick up may be solved quite easily when the cause is needed . 4-1 A B Checking airflow path 2. Check connection at hose tube (B); Remove and clean allergen filter (Fig. 3-4). Check for suction at end of cleaner 5. Service To obtain approved HOOVER service and genuine HOOVER parts, locate the nearest Hoover...
... plugged in • Plug unit in firmly • No voltage in wall receptacle • Check fuse or breaker • Blown fuse or tripped breaker • Replace fuse or reset breaker Problem: Cleaner/tools won't pick up may be solved quite easily when the cause is needed . 4-1 A B Checking airflow path 2. Check connection at hose tube (B); Remove and clean allergen filter (Fig. 3-4). Check for suction at end of cleaner 5. Service To obtain approved HOOVER service and genuine HOOVER parts, locate the nearest Hoover...
Manual
Page 13
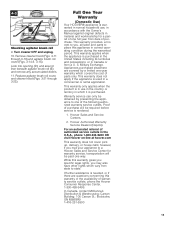
... a commercial or rental application. If further assistance is rendered. 1. Military Exchange. Remove cleaner hood (Figs. 3-11 through 3-23). Look into opening (D), and around liner beneath agitator brush roll (E) and remove any accumulated debris. 11. Full One Year Warranty (Domestic Use) Your HOOVER® appliance is used in correct operating condition during the warranted period. This warranty provides, at hoover.com This warranty does not cover pick up...
... a commercial or rental application. If further assistance is rendered. 1. Military Exchange. Remove cleaner hood (Figs. 3-11 through 3-23). Look into opening (D), and around liner beneath agitator brush roll (E) and remove any accumulated debris. 11. Full One Year Warranty (Domestic Use) Your HOOVER® appliance is used in correct operating condition during the warranted period. This warranty provides, at hoover.com This warranty does not cover pick up...


