Product Manual
Page 1
PLEASE DO NOT RETURN THIS PRODUCT TO THE STORE. THIS PRODUCT IS INTENDED FOR HOUSEHOLD USE ONLY. IF USED COMMERCIALLY WARRANTY IS VOID. ©2011 Techtronic Floor Care Technology Limited. For assistance, please call Customer Service at 1-800-944-9200 Mon-Fri 8am-7pm EST. Owner's Manual Operating and Servicing Instructions Español - Questions or concerns? All Rights Reserved. #961151024 ID103699-R0 página E1 hoover.com IMPORTANT: READ CAREFULLY BEFORE ASSEMBLY AND USE.
PLEASE DO NOT RETURN THIS PRODUCT TO THE STORE. THIS PRODUCT IS INTENDED FOR HOUSEHOLD USE ONLY. IF USED COMMERCIALLY WARRANTY IS VOID. ©2011 Techtronic Floor Care Technology Limited. For assistance, please call Customer Service at 1-800-944-9200 Mon-Fri 8am-7pm EST. Owner's Manual Operating and Servicing Instructions Español - Questions or concerns? All Rights Reserved. #961151024 ID103699-R0 página E1 hoover.com IMPORTANT: READ CAREFULLY BEFORE ASSEMBLY AND USE.

Product Manual
Page 2
... Code in Mexico Manufacturing code (Label located on bottom of canister) Contents Important Safety Instructions 3 Assembling Cleaner...5 Carton Contents...5 Connect Hose, Wand, Nozzle 5 How To Use Cleaner Description 6 Turning Cleaner On And Adjusting Power Level 7 Cord Release...7 Stair Cleaning...7 Floor Selection...7 Tools Cleaning Tools...8 Select The Proper Tool 8 Attaching Tools...8 Tool Storage...8 Cord Rewind/ Storage 8 Maintenance Filter Bag...9 Filters: Secondary And Final 10 Clearing Blockages 11 Lubrication...11 Troubleshooting...12 Service...12 Warranty...13 If you need...
... Code in Mexico Manufacturing code (Label located on bottom of canister) Contents Important Safety Instructions 3 Assembling Cleaner...5 Carton Contents...5 Connect Hose, Wand, Nozzle 5 How To Use Cleaner Description 6 Turning Cleaner On And Adjusting Power Level 7 Cord Release...7 Stair Cleaning...7 Floor Selection...7 Tools Cleaning Tools...8 Select The Proper Tool 8 Attaching Tools...8 Tool Storage...8 Cord Rewind/ Storage 8 Maintenance Filter Bag...9 Filters: Secondary And Final 10 Clearing Blockages 11 Lubrication...11 Troubleshooting...12 Service...12 Warranty...13 If you need...
Product Manual
Page 3
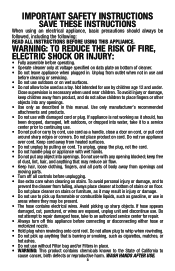
... data plate on cord. Do not run appliance over cord. Do not use without Filter bag and/or Filters in . Do not place cleaner on cord. IMPORTANT SAFETY INSTRUCTIONS SAVE THESE INSTRUCTIONS When using an electrical appliance, basic precautions should , has been dropped, damaged, left outdoors, or dropped into water, take to an authorized service center for use . keep children away from openings and moving parts. • Turn off this manual. Do...
... data plate on cord. Do not run appliance over cord. Do not use without Filter bag and/or Filters in . Do not place cleaner on cord. IMPORTANT SAFETY INSTRUCTIONS SAVE THESE INSTRUCTIONS When using an electrical appliance, basic precautions should , has been dropped, damaged, left outdoors, or dropped into water, take to an authorized service center for use . keep children away from openings and moving parts. • Turn off this manual. Do...

Product Manual
Page 4
... DAMAGE: • Avoid picking up hard, sharp objects with brushroll running to sit in one location for an extended period of electric shock, this product, as they can cause damage. • Do not allow power nozzle with this appliance has a polarized plug (one way. If it still does not fit, contact a qualified electrican to floor can result. If the...
... DAMAGE: • Avoid picking up hard, sharp objects with brushroll running to sit in one location for an extended period of electric shock, this product, as they can cause damage. • Do not allow power nozzle with this appliance has a polarized plug (one way. If it still does not fit, contact a qualified electrican to floor can result. If the...
Product Manual
Page 5
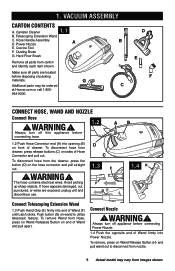
Dusting Brush G. D E F Connect hose, wand and nozzle Connect Hose ! To disconnect hose from Hose, press on Wand Releases Button on end of cleaner. The hose contains electrical wires. F G B 1.4 H Connect Telescoping Extension Wand 1.3 Push Hand Grip (E) firmly into opening (B) on sides of Wand (F) until Latch clicks. WARNING ! Canister Cleaner 1.1 B. Telescoping Extension Wand C. Hose Handle Assembly D. D C 1.3 E ! If hose appears damaged, cut, punctured, or wires are located before disposing of Wand firmly into Power Nozzle. Crevice Tool F. Make sure all...
Dusting Brush G. D E F Connect hose, wand and nozzle Connect Hose ! To disconnect hose from Hose, press on Wand Releases Button on end of cleaner. The hose contains electrical wires. F G B 1.4 H Connect Telescoping Extension Wand 1.3 Push Hand Grip (E) firmly into opening (B) on sides of Wand (F) until Latch clicks. WARNING ! Canister Cleaner 1.1 B. Telescoping Extension Wand C. Hose Handle Assembly D. D C 1.3 E ! If hose appears damaged, cut, punctured, or wires are located before disposing of Wand firmly into Power Nozzle. Crevice Tool F. Make sure all...
Product Manual
Page 6
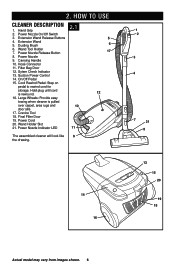
.... Sytem Check Indicator 13. Final Filter Door 19. HOW TO USE CLEANER Description 1. Power Nozzle 9. Suction Power Control 14. Cord Rewind Pedal: Step on pedal to rewind cord for storage. Dusting Brush 6. Hand Grip 2. Hose Connector 11. Wand Tool Holder 7. Large Wheels: Provide easy towing when cleaner is rewound. 16. Power Cord 20. Extension Wand Release Buttons 4. Hold plug until cord is pulled over carpet, area rugs and door sills 17. Crevice Tool 18. Carrying Handle 10. Power Nozzle On/Off Switch 3. 2. Extension Wand 5.
.... Sytem Check Indicator 13. Final Filter Door 19. HOW TO USE CLEANER Description 1. Power Nozzle 9. Suction Power Control 14. Cord Rewind Pedal: Step on pedal to rewind cord for storage. Dusting Brush 6. Hand Grip 2. Hose Connector 11. Wand Tool Holder 7. Large Wheels: Provide easy towing when cleaner is rewound. 16. Power Cord 20. Extension Wand Release Buttons 4. Hold plug until cord is pulled over carpet, area rugs and door sills 17. Crevice Tool 18. Carrying Handle 10. Power Nozzle On/Off Switch 3. 2. Extension Wand 5.

Product Manual
Page 7
... by placing cleaner on floor. WARNING ! To turn brushroll On and Off. 2.4 Brushroll on the pedal. Use extra care when cleaning on and adjusting power level 2.2 After assembling cleaner, plug cord into electrical outlet. Do not place cleaner on stairs or furniture, as it may result in injury or damage. 7 Actual model may vary from bottom to top. 2.3 FLOOR SELECTION 2.4 Push brushroll button (A) to release cord from...
... by placing cleaner on floor. WARNING ! To turn brushroll On and Off. 2.4 Brushroll on the pedal. Use extra care when cleaning on and adjusting power level 2.2 After assembling cleaner, plug cord into electrical outlet. Do not place cleaner on stairs or furniture, as it may result in injury or damage. 7 Actual model may vary from bottom to top. 2.3 FLOOR SELECTION 2.4 Push brushroll button (A) to release cord from...
Product Manual
Page 8
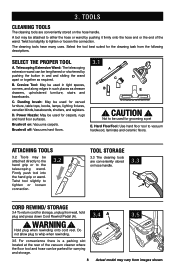
... connection. Hold plug when rewinding onto cord reel. The cleaning tools have many uses. C. Power Nozzle: May be used for carved furniture, table tops, books, lamps, lighting fixtures, venetian blinds, baseboards, shutters, and registers. Brushroll off: Vacuums hard floors. 3.1 A C B D E ! Telescoping Extension Wand: The telescoping extension wand can be used for carpets, rugs and hard floor surfaces. Brushroll on hose handle. 3.3 Cord Rewind/ Storage 3.4 To return cord for grooming a pet E. Do not allow plug to be...
... connection. Hold plug when rewinding onto cord reel. The cleaning tools have many uses. C. Power Nozzle: May be used for carved furniture, table tops, books, lamps, lighting fixtures, venetian blinds, baseboards, shutters, and registers. Brushroll off: Vacuums hard floors. 3.1 A C B D E ! Telescoping Extension Wand: The telescoping extension wand can be used for carpets, rugs and hard floor surfaces. Brushroll on hose handle. 3.3 Cord Rewind/ Storage 3.4 To return cord for grooming a pet E. Do not allow plug to be...
Product Manual
Page 9
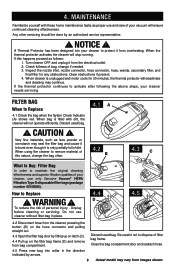
... used bag. Check fullness of your cleaner needs servicing. CAUTION ! How to maintain the original cleaning effectiveness and superior filtration qualities of bag, change the bag often. 4.1 A 4.2 B 4.3 C What to Buy: Filter Bag In order to Replace ! When bag is unplugged and motor cools for any obstructions. Filter bag When to Replace 4.1 Check the bag when the Sytem Check Indicator (A) shows red. MAINTENANCE Familiarize yourself with dirt, the cleaner will stop running. Close the bag compartment door and reattach hose. 4.5 Press new bag...
... used bag. Check fullness of your cleaner needs servicing. CAUTION ! How to maintain the original cleaning effectiveness and superior filtration qualities of bag, change the bag often. 4.1 A 4.2 B 4.3 C What to Buy: Filter Bag In order to Replace ! When bag is unplugged and motor cools for any obstructions. Filter bag When to Replace 4.1 Check the bag when the Sytem Check Indicator (A) shows red. MAINTENANCE Familiarize yourself with dirt, the cleaner will stop running. Close the bag compartment door and reattach hose. 4.5 Press new bag...
Product Manual
Page 10
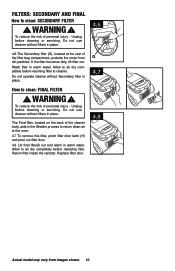
... to cleaner. G 4.7 How to clean: SECONDARY FILTER ! Unplug before replacing filter. Do not use cleaner without filters in place. 4.6 4.6 The Secondary filter (G), located at the rear of the cleaner body, aids in the filtration process to return clean air to air dry completely before cleaning or servicing. Do not use cleaner without Secondary filter in warm water. Do not operate cleaner without filters in warm water. Wash filter in place. Return filter inside the canister. WARNING ! If the filter becomes...
... to cleaner. G 4.7 How to clean: SECONDARY FILTER ! Unplug before replacing filter. Do not use cleaner without filters in place. 4.6 4.6 The Secondary filter (G), located at the rear of the cleaner body, aids in the filtration process to return clean air to air dry completely before cleaning or servicing. Do not use cleaner without Secondary filter in warm water. Do not operate cleaner without filters in warm water. Wash filter in place. Return filter inside the canister. WARNING ! If the filter becomes...
Product Manual
Page 11
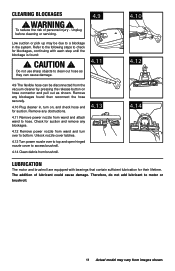
... is found then reconnect the hose securely. 4.10 Plug cleaner in the system. Remove any blockages. 4.12 Remove power nozzle from images shown. Therefore, do not add lubricant to check for blockages, continuing with bearings that contain sufficient lubrication for their lifetime. Check for suction. Unplug before cleaning or servicing. 4.9 Low suction or pick up may vary from wand and turn on hose connector and pull out as...
... is found then reconnect the hose securely. 4.10 Plug cleaner in the system. Remove any blockages. 4.12 Remove power nozzle from images shown. Therefore, do not add lubricant to check for blockages, continuing with bearings that contain sufficient lubrication for their lifetime. Check for suction. Unplug before cleaning or servicing. 4.9 Low suction or pick up may vary from wand and turn on hose connector and pull out as...
Product Manual
Page 12
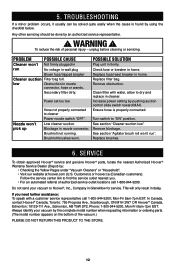
... ! unplug before cleaning or servicing. Power set too low. Remove obstruction. Service To obtain approved Hoover® service and genuine Hoover® parts, locate the nearest Authorized Hoover® Warranty Service Dealer (Depot) by pushing suction control slide switch toward MAX. Mon-Fri 8am-7pm EST. Always identify your vacuum to dry and replace in run ". 5. Blockage in firmly. POSSIBLE SOLUTION Plug unit in nozzle connector. Replace filter bag. Ensure hose is found by using the checklist below...
... ! unplug before cleaning or servicing. Power set too low. Remove obstruction. Service To obtain approved Hoover® service and genuine Hoover® parts, locate the nearest Authorized Hoover® Warranty Service Dealer (Depot) by pushing suction control slide switch toward MAX. Mon-Fri 8am-7pm EST. Always identify your vacuum to dry and replace in run ". 5. Blockage in firmly. POSSIBLE SOLUTION Plug unit in nozzle connector. Replace filter bag. Ensure hose is found by using the checklist below...
Product Manual
Page 13
... the Warranty Period, Hoover® will be extended by the original owner. For additional assistance or information concerning this product is not as maid, janitorial and equipment rental services), improper maintenance of Ohio. Some states do not allow the exclusion of consequential damages, so the above exclusion may not apply to correct any replacement or repair performed under...
... the Warranty Period, Hoover® will be extended by the original owner. For additional assistance or information concerning this product is not as maid, janitorial and equipment rental services), improper maintenance of Ohio. Some states do not allow the exclusion of consequential damages, so the above exclusion may not apply to correct any replacement or repair performed under...


