Product Manual
Page 1
OWNER'S MANUAL Operating and Servicing Instructions www.hoover.com PRO CLEAN PET Carpet Washer Please visit Hoover.com for video instructions for this product to the store. For assistance, please call Customer Service at 1-800-944-9200 Mon-Fri 9am-6pm EST before returning this cleaner. THIS PRODUCT IS INTENDED FOR HOUSEHOLD USE ONLY. All rights reserved. #961152152-R0 IF USED COMMERCIALLY WARRANTY IS VOID. ©2020 Techtronic Floor Care Technology Limited. Questions or concerns? IMPORTANT: READ CAREFULLY BEFORE ASSEMBLY AND USE.
OWNER'S MANUAL Operating and Servicing Instructions www.hoover.com PRO CLEAN PET Carpet Washer Please visit Hoover.com for video instructions for this product to the store. For assistance, please call Customer Service at 1-800-944-9200 Mon-Fri 9am-6pm EST before returning this cleaner. THIS PRODUCT IS INTENDED FOR HOUSEHOLD USE ONLY. All rights reserved. #961152152-R0 IF USED COMMERCIALLY WARRANTY IS VOID. ©2020 Techtronic Floor Care Technology Limited. Questions or concerns? IMPORTANT: READ CAREFULLY BEFORE ASSEMBLY AND USE.
Product Manual
Page 2
... RETURN THIS PRODUCT TO THE STORE. 2 CODE Hint: Attach your HOOVER® product. Be sure to this owner's manual. Always identify your vacuum by phone. Mon-Fri 9am-6pm EST. Thank you for warranty service of cleaner) CONTENTS Important Safety Instructions...3 Features...5 Cleaner Assembly...6 How To Assemble...6 General Operation...7 Clean Water/Solution Tank...7 On-Off Switch...7 Dirty Water Tank...8 Tools...9 Maintenance...12 Tanks...12 Nozzle...12 Belt/Brushes...13 Troubleshooting...14 Cleaning Products...15 Warranty...16 If you need assistance...
... RETURN THIS PRODUCT TO THE STORE. 2 CODE Hint: Attach your HOOVER® product. Be sure to this owner's manual. Always identify your vacuum by phone. Mon-Fri 9am-6pm EST. Thank you for warranty service of cleaner) CONTENTS Important Safety Instructions...3 Features...5 Cleaner Assembly...6 How To Assemble...6 General Operation...7 Clean Water/Solution Tank...7 On-Off Switch...7 Dirty Water Tank...8 Tools...9 Maintenance...12 Tanks...12 Nozzle...12 Belt/Brushes...13 Troubleshooting...14 Cleaning Products...15 Warranty...16 If you need assistance...
Product Manual
Page 3
... manual. Do not run appliance over floor electrical outlets. • WARNING: This product contains chemicals known to the State of body away from openings and moving parts. • Turn off all parts of California to be followed, including the following: READ ALL INSTRUCTIONS BEFORE USING THIS APPLIANCE. WASH HANDS AFTER HANDLING. 3 Do not use and before operating. • Operate cleaner only at bottom of this machine. (See the "Cleaning Products...
... manual. Do not run appliance over floor electrical outlets. • WARNING: This product contains chemicals known to the State of body away from openings and moving parts. • Turn off all parts of California to be followed, including the following: READ ALL INSTRUCTIONS BEFORE USING THIS APPLIANCE. WASH HANDS AFTER HANDLING. 3 Do not use and before operating. • Operate cleaner only at bottom of this machine. (See the "Cleaning Products...
Product Manual
Page 4
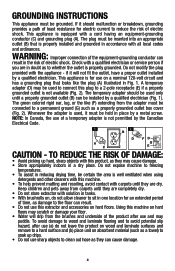
... place by the Canadian Electrical Code. 1 2 B A C D FD G E CAUTION - Check with a qualified electrician or service person if you are completely dry. • Do not store extractor with solution in accordance with this machine on hard floors may cause damage. • Store appropriately indoors in the risk of the product after use sharp objects to clean out hose as they are in...
... place by the Canadian Electrical Code. 1 2 B A C D FD G E CAUTION - Check with a qualified electrician or service person if you are completely dry. • Do not store extractor with solution in accordance with this machine on hard floors may cause damage. • Store appropriately indoors in the risk of the product after use sharp objects to clean out hose as they are in...

Product Manual
Page 5
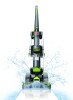
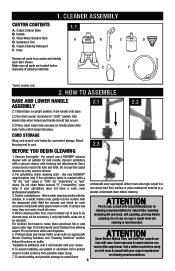
Solution Trigger 3. Clean Water/Solution Tank 7. Handle Lock 16. Carry Handle 6. Dirty Water Tank 9. ON/OFF Pedal 13. Handle Grip 2. Dirty Water Tank Release Latch 8. Cord Clip 14. Mesh Tool Storage Bag 5 Clean Boost™ Trigger 4. Accessory Hose Connection Port 10. Cord Storage Hook 15. Handle Release Pedal 17. FEATURES 3 1 17 2 4 13 5 6 7 14 15 8 9 10 12 12 16 11 FRONT BACK FEATURES 1. Clean Water/Solution Tank Release Button 5. Solution Tube Connection Port 11. Removable Nozzle 12.
Solution Trigger 3. Clean Water/Solution Tank 7. Handle Lock 16. Carry Handle 6. Dirty Water Tank 9. ON/OFF Pedal 13. Handle Grip 2. Dirty Water Tank Release Latch 8. Cord Clip 14. Mesh Tool Storage Bag 5 Clean Boost™ Trigger 4. Accessory Hose Connection Port 10. Cord Storage Hook 15. Handle Release Pedal 17. FEATURES 3 1 17 2 4 13 5 6 7 14 15 8 9 10 12 12 16 11 FRONT BACK FEATURES 1. Clean Water/Solution Tank Release Button 5. Solution Tube Connection Port 11. Removable Nozzle 12.
Product Manual
Page 6
... folds. Push handle onto base. 2.2 Turn dial counter clockwise to cord. 2.3 BEFORE YOU BEGIN CLEANING 1. For carpet, use the carpet cleaner as a dry vacuum cleaner. 2. Do not use plastic or aluminum foil to wood floors 6 fuzz with a "W" (for "wet" clean) or "S/W" (for natural fiber carpeting (including silk and wool), soft carpeting, and loop Berber carpeting. Hose B C D Remove all colors. 4. Dial should stop when locked and handle should feel secure. 2.3 Place clean water tank securely...
... folds. Push handle onto base. 2.2 Turn dial counter clockwise to cord. 2.3 BEFORE YOU BEGIN CLEANING 1. For carpet, use the carpet cleaner as a dry vacuum cleaner. 2. Do not use plastic or aluminum foil to wood floors 6 fuzz with a "W" (for "wet" clean) or "S/W" (for natural fiber carpeting (including silk and wool), soft carpeting, and loop Berber carpeting. Hose B C D Remove all colors. 4. Dial should stop when locked and handle should feel secure. 2.3 Place clean water tank securely...
Product Manual
Page 7
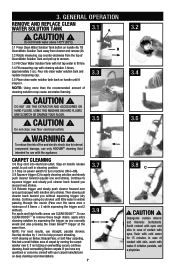
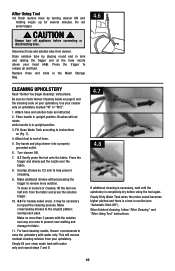
... time. Continue to remove those tough stains, apply extra cleaning solution by running the carpet washer over it snaps in cleaning position. 3.7 Step on power switch to turn machine ON (I=ON). 3.8 Squeeze trigger (C) to help prevent streaking. 4.0 If cleaning on handle until little water is visible passing through the nozzle (Pass over floor electrical outlets. ! CAUTION ! Continue using dry strokes until it . Pour into electrical outlet. To reduce...
... time. Continue to remove those tough stains, apply extra cleaning solution by running the carpet washer over it snaps in cleaning position. 3.7 Step on power switch to turn machine ON (I=ON). 3.8 Squeeze trigger (C) to help prevent streaking. 4.0 If cleaning on handle until little water is visible passing through the nozzle (Pass over floor electrical outlets. ! CAUTION ! Continue using dry strokes until it . Pour into electrical outlet. To reduce...

Product Manual
Page 8
... 4 wet strokes over one area. For best results, use more dry strokes. (Continue using dry strokes until it snaps into place. Attach the plug end to avoid potential slip hazard, after cleaning. Keeping the filter clean is a loss in the screen above . DIRTY WATER TANK Your carpet washer is critical to keep the filter clean to maintain strong suction performance 3.13 Replace tank lid with solution in Clean Water Solution...
... 4 wet strokes over one area. For best results, use more dry strokes. (Continue using dry strokes until it snaps into place. Attach the plug end to avoid potential slip hazard, after cleaning. Keeping the filter clean is a loss in the screen above . DIRTY WATER TANK Your carpet washer is critical to keep the filter clean to maintain strong suction performance 3.13 Replace tank lid with solution in Clean Water Solution...
Product Manual
Page 9
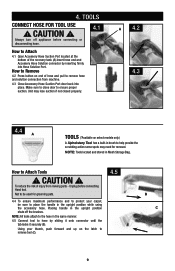
... Hose Suction Port door back into Hose Solution Port. NOTE: Tools located and stored in the upright position shuts off appliance before connecting Hand tool. Using your carpet, be sure to hose by inserting firmly into place. A 4.2 4.3 4.4 A TOOLS (*Available on select models only.) A. NOTE: All tools attach to the hose in the same manner: 4.5 Connect tool to place the handle in brush to remove hose and solution connection from moving parts - Upholstery Tool...
... Hose Suction Port door back into Hose Solution Port. NOTE: Tools located and stored in the upright position shuts off appliance before connecting Hand tool. Using your carpet, be sure to hose by inserting firmly into place. A 4.2 4.3 4.4 A TOOLS (*Available on select models only.) A. NOTE: All tools attach to the hose in the same manner: 4.5 Connect tool to place the handle in brush to remove hose and solution connection from moving parts - Upholstery Tool...
Product Manual
Page 10
... upright position. 3. Always turn off appliance before using the tool again. Place handle in the Mesh Storage Bag. 4.6 CLEANING UPHOLSTERY Read "Before You Begin Cleaning" instructions. Attach tool to end of hose. 5. Overlap strokes by turning cleaner ON and holding nozzle up for several minutes. When finished cleaning, follow "After Cleaning" and "After Using Tool" instructions. 10 Be sure to check Hoover Cleaning Guide on page 6 and the cleaning code on upholstery marked "W" or "W/S". 1. Attach hose and solution tube...
... upright position. 3. Always turn off appliance before using the tool again. Place handle in the Mesh Storage Bag. 4.6 CLEANING UPHOLSTERY Read "Before You Begin Cleaning" instructions. Attach tool to end of hose. 5. Overlap strokes by turning cleaner ON and holding nozzle up for several minutes. When finished cleaning, follow "After Cleaning" and "After Using Tool" instructions. 10 Be sure to check Hoover Cleaning Guide on page 6 and the cleaning code on upholstery marked "W" or "W/S". 1. Attach hose and solution tube...
Product Manual
Page 11
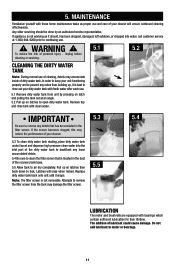
... latches then back down to air dry completely. Do not add lubricant to rinse out your dirty water tank with these home maintenance tasks as it snaps. IMPORTANT Be sure to remove any loose accumulated debris. 5.4 Be sure to clean the filter screen that has accumulated in the duct of your cleaner. 5.3 To clean dirty water tank ducting, place dirty...
... latches then back down to air dry completely. Do not add lubricant to rinse out your dirty water tank with these home maintenance tasks as it snaps. IMPORTANT Be sure to remove any loose accumulated debris. 5.4 Be sure to clean the filter screen that has accumulated in the duct of your cleaner. 5.3 To clean dirty water tank ducting, place dirty...
Product Manual
Page 12
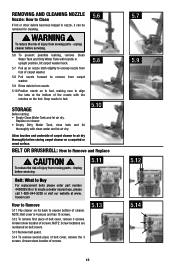
... of cleaner. hoover.com How to Remove 5.11 Flip cleaner on a carpeted or wood surface. NOTE: Screw locations are numbered on cleaner. • Empty Dirty Water Tank, rinse tank and lid thoroughly with clean water and let air dry. 5.8 5.10 Allow brushes and underside of the nozzle with handle in nozzle, it can be removed for cleaning. ! Snap nozzle to air dry thoroughly before servicing. 5.6 To prevent possible leaking, remove Clean Water Tank and Dirty Water Tank...
... of cleaner. hoover.com How to Remove 5.11 Flip cleaner on a carpeted or wood surface. NOTE: Screw locations are numbered on cleaner. • Empty Dirty Water Tank, rinse tank and lid thoroughly with clean water and let air dry. 5.8 5.10 Allow brushes and underside of the nozzle with handle in nozzle, it can be removed for cleaning. ! Snap nozzle to air dry thoroughly before servicing. 5.6 To prevent possible leaking, remove Clean Water Tank and Dirty Water Tank...
Product Manual
Page 13
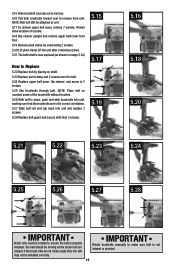
... cleaner upright and remove upper belt cover from unit. The belt should be attached to ensure the belt is properly installed. NOTE: Place belt on shaft. 5.23 Replace pivot clamp and 2 screws over the belt. 5.24 Replace upper belt cover, flip cleaner, and screw in the correct orientation. 5.27 Slide belt roll end cap back into unit, making sure that the brushrolls are rotated. Arrows show location...
... cleaner upright and remove upper belt cover from unit. The belt should be attached to ensure the belt is properly installed. NOTE: Place belt on shaft. 5.23 Replace pivot clamp and 2 screws over the belt. 5.24 Replace upper belt cover, flip cleaner, and screw in the correct orientation. 5.27 Slide belt roll end cap back into unit, making sure that the brushrolls are rotated. Arrows show location...
Product Manual
Page 14
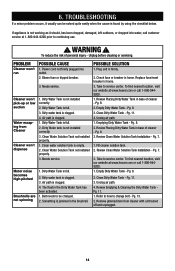
... not working as it usually can be changed. 2. Unplug before cleaning or servicing. Air path is not installed correctly. 3. Dirty Water tank is clogged. 1. Clean Water Solution Tank not installed properly. 1. Belt needs to be solved quite easily when the cause is clogged. 4. Pg. 7. 3. Review Emptying & Cleaning the Dirty Water Tank Pg. 11. 1. Pg. 13. 2. WARNING ! PROBLEM Cleaner won't run Cleaner won't pick-up or low suction Water escaping from cleaner with unit turned off and unplugged. 14 Clean Water...
... not working as it usually can be changed. 2. Unplug before cleaning or servicing. Air path is not installed correctly. 3. Dirty Water tank is clogged. 1. Clean Water Solution Tank not installed properly. 1. Belt needs to be solved quite easily when the cause is clogged. 4. Pg. 7. 3. Review Emptying & Cleaning the Dirty Water Tank Pg. 11. 1. Pg. 13. 2. WARNING ! PROBLEM Cleaner won't run Cleaner won't pick-up or low suction Water escaping from cleaner with unit turned off and unplugged. 14 Clean Water...
Product Manual
Page 15
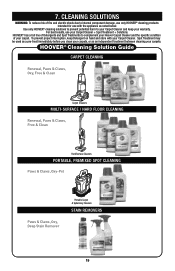
... your Carpet Cleaner and keep Detergent on hand and store with the appliance as an independent treatment between cleaning your Carpet Cleaner + Spot Treatment + Solutions. HOOVER ® Cleaning Solution Guide CARPET CLEANING Renewal, Paws & Claws, Oxy, Free & Clean Carpet Cleaners MULTI-SURFACE / HARD FLOOR CLEANING Renewal, Paws & Claws, Free & Clean Hard Surface Cleaners PORTABLE, PREMIXED SPOT CLEANING Paws & Claws, Oxy-Pet Paws & Claws, Oxy, Deep Stain Remover Portable Carpet & Upholstery Cleaners STAIN REMOVERS 15 Spot Treatment may be used...
... your Carpet Cleaner and keep Detergent on hand and store with the appliance as an independent treatment between cleaning your Carpet Cleaner + Spot Treatment + Solutions. HOOVER ® Cleaning Solution Guide CARPET CLEANING Renewal, Paws & Claws, Oxy, Free & Clean Carpet Cleaners MULTI-SURFACE / HARD FLOOR CLEANING Renewal, Paws & Claws, Free & Clean Hard Surface Cleaners PORTABLE, PREMIXED SPOT CLEANING Paws & Claws, Oxy-Pet Paws & Claws, Oxy, Deep Stain Remover Portable Carpet & Upholstery Cleaners STAIN REMOVERS 15 Spot Treatment may be used...
Product Manual
Page 16
... hereafter as warranted, contact TTI Floor Care North America Customer Service at our sole discretion and free of charge (subject to , belts, filters, brush rolls, blower fans, blower and vacuum tubes, and vacuum bags and straps. Military Exchange, or Canada. Depending on the data plate of implied warranties, or limitations on the original sales receipt. Please have other products, parts, or accessories which vary from...
... hereafter as warranted, contact TTI Floor Care North America Customer Service at our sole discretion and free of charge (subject to , belts, filters, brush rolls, blower fans, blower and vacuum tubes, and vacuum bags and straps. Military Exchange, or Canada. Depending on the data plate of implied warranties, or limitations on the original sales receipt. Please have other products, parts, or accessories which vary from...


