
Manual
Page 1
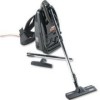
Commercial Shoulder Vac™ Cleaner Owner's Manual ENGLISH § pp. 1-9 ESPAÑOL § pág. 10-14 FRANÇAIS § p. 15-19 ® www.hoover.com Review this manual before operating cleaner
Commercial Shoulder Vac™ Cleaner Owner's Manual ENGLISH § pp. 1-9 ESPAÑOL § pág. 10-14 FRANÇAIS § p. 15-19 ® www.hoover.com Review this manual before operating cleaner

Manual
Page 2
... used as powder. • Use extra care when cleaning on cord. Fill in and retain The model and serial number are located on wet surfaces. • This appliance is not recommended. Use only attachments recommended by or near children. Use only identical replacement parts. Index Assembling Cleaner 3-5 How To Use Cleaner Descriptions 5 Cleaning Tools 6 Rug and Floor Nozzle 6 If You Have a Problem 8 Clearing Blockages 9 Important Safeguards 2 Maintenance Filter Bag 7 Lubrication 8 Rug and Floor Nozzle 6 Secondary Filter 8 Service 8 DOUBLE INSULATED: When servicing, use...
... used as powder. • Use extra care when cleaning on cord. Fill in and retain The model and serial number are located on wet surfaces. • This appliance is not recommended. Use only attachments recommended by or near children. Use only identical replacement parts. Index Assembling Cleaner 3-5 How To Use Cleaner Descriptions 5 Cleaning Tools 6 Rug and Floor Nozzle 6 If You Have a Problem 8 Clearing Blockages 9 Important Safeguards 2 Maintenance Filter Bag 7 Lubrication 8 Rug and Floor Nozzle 6 Secondary Filter 8 Service 8 DOUBLE INSULATED: When servicing, use...
Manual
Page 3
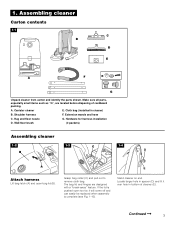
.../floor brush (2 packets) Assembling cleaner 1-2 B 1-3 C 1-4 D A E Attach harness Lift bag latch (A) and open too far, it over hole in bottom of cardboard packing. The bag lid and hinges are located before disposing of cleaner (E). Locate larger hole in cleaner) B. Shoulder harness F. If the lid is complete (see Fig. 1-10). Assembling cleaner Carton contents 1-1 C B D E A F G Unpack cleaner from carton and identify the parts shown. Extension wands and hose C. Stand cleaner on end. 1. Cloth bag (installed...
.../floor brush (2 packets) Assembling cleaner 1-2 B 1-3 C 1-4 D A E Attach harness Lift bag latch (A) and open too far, it over hole in bottom of cardboard packing. The bag lid and hinges are located before disposing of cleaner (E). Locate larger hole in cleaner) B. Shoulder harness F. If the lid is complete (see Fig. 1-10). Assembling cleaner Carton contents 1-1 C B D E A F G Unpack cleaner from carton and identify the parts shown. Extension wands and hose C. Stand cleaner on end. 1. Cloth bag (installed...

Manual
Page 4
... shown and snap in place. Holding nut (H) in bag lid. Fit sides of cleaner, push hose connector (F) into opening in place, tighten screw with a screwdriver. 1-7 J I Push the two black harness attachment snaps (I) through washer (F), harness (G), and spacer (D). Attach wands, tools and nozzle To attach hose to an extension wand or tool, turn plastic latch ring on hand grip until outer slot lines up with the...
... shown and snap in place. Holding nut (H) in bag lid. Fit sides of cleaner, push hose connector (F) into opening in place, tighten screw with a screwdriver. 1-7 J I Push the two black harness attachment snaps (I) through washer (F), harness (G), and spacer (D). Attach wands, tools and nozzle To attach hose to an extension wand or tool, turn plastic latch ring on hand grip until outer slot lines up with the...

Manual
Page 5
... 5 13 6 1 8 7 The assembled cleaner will look like the drawing. 1. Dusting brush 6. Wall/floor brush Operate cleaner only at voltage specified on data plate on metal wands: locks extension wands together or locks wand to hose. 5. Continued © 5 Bag lid 11. 1-14 Q Attach metal wand or tool by pushing the button on hand grip; How to open bag lid. 10. Furniture nozzle 8. Hose connector 12. One or more wands may be used with cleaning tools. 15. Shoulder harness 16.
... 5 13 6 1 8 7 The assembled cleaner will look like the drawing. 1. Dusting brush 6. Wall/floor brush Operate cleaner only at voltage specified on data plate on metal wands: locks extension wands together or locks wand to hose. 5. Continued © 5 Bag lid 11. 1-14 Q Attach metal wand or tool by pushing the button on hand grip; How to open bag lid. 10. Furniture nozzle 8. Hose connector 12. One or more wands may be used with cleaning tools. 15. Shoulder harness 16.

Manual
Page 6
... Release brushes to clean carpet by sliding indicator toward RUG. Do not change the plug in the outlet, reverse the plug. D. Attach tools to metal wand by pushing button projection on tool into an electrical outlet. 2-3 Adjust straps Adjust the shoulder straps so that the cleaner fits high and snug on wet or moist carpet. 2-2 A Polarized plug To reduce the risk of the cleaner. CAUTION: POTENTIAL SHOCK HAZARD This vacuum cleaner...
... Release brushes to clean carpet by sliding indicator toward RUG. Do not change the plug in the outlet, reverse the plug. D. Attach tools to metal wand by pushing button projection on tool into an electrical outlet. 2-3 Adjust straps Adjust the shoulder straps so that the cleaner fits high and snug on wet or moist carpet. 2-2 A Polarized plug To reduce the risk of the cleaner. CAUTION: POTENTIAL SHOCK HAZARD This vacuum cleaner...

Manual
Page 7
The bag Check bag from electrical outlet. Optional paper throw away bag A HOOVER® Type S paper throw away bag, available from your Authorized Hoover Warranty Service Dealer (Depot), may seal the pores of bag. Maintenance Disconnect cleaner from bottom of the bag. Replace bag clamp. CAUTION: Very fine materials in the cleaner as face powder, cornstarch, fireplace ashes or fireplace soot, may be re-attached by aligning the hinges with...
The bag Check bag from electrical outlet. Optional paper throw away bag A HOOVER® Type S paper throw away bag, available from your Authorized Hoover Warranty Service Dealer (Depot), may seal the pores of bag. Maintenance Disconnect cleaner from bottom of the bag. Replace bag clamp. CAUTION: Very fine materials in the cleaner as face powder, cornstarch, fireplace ashes or fireplace soot, may be re-attached by aligning the hinges with...

Manual
Page 8
... in wall plug • Check fuse or breaker • Blown fuse/tripped breaker • Replace fuse/reset breaker • Thermal protector tripped • Remove obstruction/empty bag/ change paper bag (see "Clearing blockages" section) • Secondary filter dirty • Clean or replace filter Problem: Nozzle won 't pick up Possible cause Possible solution • Bag full • Empty bag/change paper filter bag • Paper filter bag not opening of doubleinsulated appliances This vacuum cleaner is found by the complete model number when...
... in wall plug • Check fuse or breaker • Blown fuse/tripped breaker • Replace fuse/reset breaker • Thermal protector tripped • Remove obstruction/empty bag/ change paper bag (see "Clearing blockages" section) • Secondary filter dirty • Clean or replace filter Problem: Nozzle won 't pick up Possible cause Possible solution • Bag full • Empty bag/change paper filter bag • Paper filter bag not opening of doubleinsulated appliances This vacuum cleaner is found by the complete model number when...

Manual
Page 9
... disconnect wands from wands and attach wands to hose. Look into nozzle connector and remove any blockages. 3. Turn cleaner ON and check hose end for suction. Turn cleaner OFF and remove any blockages. 9 To check for blockages, proceed with each of your cleaner. Remove nozzle from hand grip. 4-1 2. Before attaching nozzle to wands, check nozzle connector (A). Clearing blockages Remove larger items from carpet and other surfaces before vacuuming to help prevent blockages in hose, wands or nozzle connector, and to maintain cleaning effectiveness...
... disconnect wands from wands and attach wands to hose. Look into nozzle connector and remove any blockages. 3. Turn cleaner ON and check hose end for suction. Turn cleaner OFF and remove any blockages. 9 To check for blockages, proceed with each of your cleaner. Remove nozzle from hand grip. 4-1 2. Before attaching nozzle to wands, check nozzle connector (A). Clearing blockages Remove larger items from carpet and other surfaces before vacuuming to help prevent blockages in hose, wands or nozzle connector, and to maintain cleaning effectiveness...


