Manual
Page 2
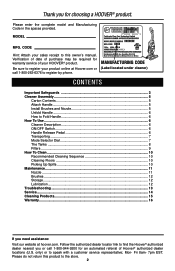
... this owner's manual. Follow the authorized dealer locator link to register by phone. only) or to register your product online at hoover.com. Model MFG. Manufacturing code (Label located under cleaner) Contents Important Safeguards 3 Cleaner Assembly...5 Carton Contents 5 Attach Handle...5 ... How To Use...6 Cleaner Description 6 ON/OFF Switch...6 Handle Release Pedal 6 Transporting...7 Mode Selector Dial 7 The Tanks ...8 Filters...9 How To Clean...10 Recommended Cleaning Sequence 10 Cleaning Floors 10 Picking Up Spills 10 Maintenance...11 Nozzle...11 Brushes...12 Storage...12...
... this owner's manual. Follow the authorized dealer locator link to register by phone. only) or to register your product online at hoover.com. Model MFG. Manufacturing code (Label located under cleaner) Contents Important Safeguards 3 Cleaner Assembly...5 Carton Contents 5 Attach Handle...5 ... How To Use...6 Cleaner Description 6 ON/OFF Switch...6 Handle Release Pedal 6 Transporting...7 Mode Selector Dial 7 The Tanks ...8 Filters...9 How To Clean...10 Recommended Cleaning Sequence 10 Cleaning Floors 10 Picking Up Spills 10 Maintenance...11 Nozzle...11 Brushes...12 Storage...12...
Manual
Page 6
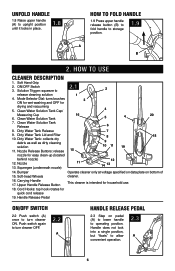
.... HOW TO USE Cleaner Description 1. Solution Trigger: squeeze to turn cleaner OFF. 2.2 A Handle release pedal 2.3 Step on bottom of 15. Dirty Water Tank Lid and Filter 10. Bumper Operate cleaner only at voltage specified on data plate on pedal (A) to lower handle to turn cleaner ON. Nozzle Release Buttons: release 15...
.... HOW TO USE Cleaner Description 1. Solution Trigger: squeeze to turn cleaner OFF. 2.2 A Handle release pedal 2.3 Step on bottom of 15. Dirty Water Tank Lid and Filter 10. Bumper Operate cleaner only at voltage specified on data plate on pedal (A) to lower handle to turn cleaner ON. Nozzle Release Buttons: release 15...

Manual
Page 9
...to Clean Turn cleaner off and disconnect from electrical outlet. 2.17 Remove Dirty Water Tank and lid (Figs. 2.15 & 2.16). Remove filter lid (A), then remove filter (B). Press down firmly until snapped in lid. Remove debris from electrical outlet. The Dirty Water Tank is low or reduced. 2.17 How... will also collect on release button (G) and pull tank straight out. 2.16 Remove tank lid (H). Replace lid onto Dirty Water Tank, pressing down on the filter screen located in place. B 2.19 9 2.16 H 2.18 A C 2.20 E Dry or loose debris will not pick up debris and the sound of...
...to Clean Turn cleaner off and disconnect from electrical outlet. 2.17 Remove Dirty Water Tank and lid (Figs. 2.15 & 2.16). Remove filter lid (A), then remove filter (B). Press down firmly until snapped in lid. Remove debris from electrical outlet. The Dirty Water Tank is low or reduced. 2.17 How... will also collect on release button (G) and pull tank straight out. 2.16 Remove tank lid (H). Replace lid onto Dirty Water Tank, pressing down on the filter screen located in place. B 2.19 9 2.16 H 2.18 A C 2.20 E Dry or loose debris will not pick up debris and the sound of...
Manual
Page 10
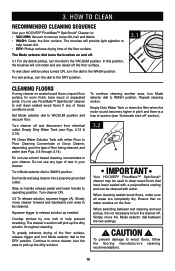
... if any type of these conditions exist. Empty Dirty Water Tank (see Figs. 2.8 through 2.14). Do not use solvent based cleaning concentrates in your HOOVER® FloorMate™ SpinScrub® Cleaner to: • VACUUM: Vacuum to WASH position. Turn cleaner ON. 3.2 To release solution, squeeze trigger (A)....and can be cleaned with either Floor to be used to turn the dial to operating position. Empty Dirty Water Tank or clean the filter when the motor sound becomes higher in your cleaner. For wet pickup, turn Mode selector dial to the DRY position. 3.1 VACUWUAMSDHRY ...
... if any type of these conditions exist. Empty Dirty Water Tank (see Figs. 2.8 through 2.14). Do not use solvent based cleaning concentrates in your HOOVER® FloorMate™ SpinScrub® Cleaner to: • VACUUM: Vacuum to WASH position. Turn cleaner ON. 3.2 To release solution, squeeze trigger (A)....and can be cleaned with either Floor to be used to turn the dial to operating position. Empty Dirty Water Tank or clean the filter when the motor sound becomes higher in your cleaner. For wet pickup, turn Mode selector dial to the DRY position. 3.1 VACUWUAMSDHRY ...
Manual
Page 13
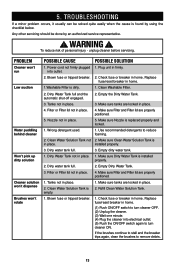
...Tanks not in home. Dirty water tank full. 3. Make sure Filter and Filter lid are locked in place. Check fuse or breaker in place. 5. Low suction 1.Washable Filter is installed properly. 2. Filter or Filter lid not in home. Make sure tanks are properly positioned. ... done by using the checklist below. PROBLEM POSSIBLE CAUSE POSSIBLE SOLUTION Cleaner won 't rotate 1. Clean Washable Filter. 2. Empty the Dirty Water Tank. 3. Make sure Filter and Filter lid are locked in home. (1) Push ON/OFF switch to turn cleaner OFF. (2) Unplug the cleaner...
...Tanks not in home. Dirty water tank full. 3. Make sure Filter and Filter lid are locked in place. Check fuse or breaker in place. 5. Low suction 1.Washable Filter is installed properly. 2. Filter or Filter lid not in home. Make sure tanks are properly positioned. ... done by using the checklist below. PROBLEM POSSIBLE CAUSE POSSIBLE SOLUTION Cleaner won 't rotate 1. Clean Washable Filter. 2. Empty the Dirty Water Tank. 3. Make sure Filter and Filter lid are locked in home. (1) Push ON/OFF switch to turn cleaner OFF. (2) Unplug the cleaner...


