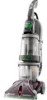
Product Manual
Page 3
... this appliance. • Do not pick up anything that accepts the machine plug. • Unplug carpet cleaner from outlet when not in use. Keep cord away from electrical outlet before servicing the carpet cleaner. • Do not unplug by Hoover®; Do not immerse product. • Connect to a properly grounded outlet only. IMPORTANT SAFETY INSTRUCTIONS...
... this appliance. • Do not pick up anything that accepts the machine plug. • Unplug carpet cleaner from outlet when not in use. Keep cord away from electrical outlet before servicing the carpet cleaner. • Do not unplug by Hoover®; Do not immerse product. • Connect to a properly grounded outlet only. IMPORTANT SAFETY INSTRUCTIONS...
Product Manual
Page 4
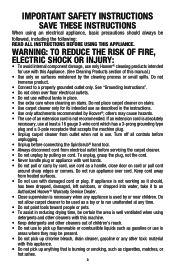
... Instructions This appliance must be connected to a permanent ground (G) such as to whether the outlet is properly grounded. Check with the carpet cleaner. The temporary adapter should malfunction or breakdown, grounding provides a path of least resistance for use of electric shock. • Avoid picking up hard, sharp objects with a qualified electrician or service...
... Instructions This appliance must be connected to a permanent ground (G) such as to whether the outlet is properly grounded. Check with the carpet cleaner. The temporary adapter should malfunction or breakdown, grounding provides a path of least resistance for use of electric shock. • Avoid picking up hard, sharp objects with a qualified electrician or service...

Product Manual
Page 5
... and Nuts (Three nuts may vary from carton and identify each item shown. SpinScrub® Hand Tool* *Available on select models only. Cleaner ASSEMBLY Carton contents 1.1 Carpet Upholstery Cleaner Bare floor cleaner PreCleaner G C H D F I . Upper Handle C. Bolts and nuts located in bag but only two or need for assembly. Tighten with hose) D. Hose/Cord Hook... attach nuts. Accessories not included with your model may be in bag with screwdriver. 1.2 1.3 Cord Protector -V2 1.4 1.5 5 Actual model may be purchased separately by visiting hoover.com. 1.
... and Nuts (Three nuts may vary from carton and identify each item shown. SpinScrub® Hand Tool* *Available on select models only. Cleaner ASSEMBLY Carton contents 1.1 Carpet Upholstery Cleaner Bare floor cleaner PreCleaner G C H D F I . Upper Handle C. Bolts and nuts located in bag but only two or need for assembly. Tighten with hose) D. Hose/Cord Hook... attach nuts. Accessories not included with your model may be in bag with screwdriver. 1.2 1.3 Cord Protector -V2 1.4 1.5 5 Actual model may be purchased separately by visiting hoover.com. 1.
Product Manual
Page 8
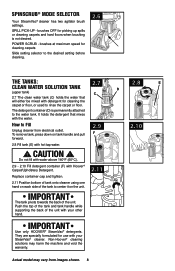
... water that mixes with detergent for cleaning the carpet or floor, or used to Fill Unplug cleaner from images shown. 8 CAUTION ! Do not fill with water above 140°F (60°C). 2.9 - 2.10 Fill detergent container (F) with your SteamVac® cleaner. SPILL PICK-UP - It holds the detergent...for use with hot tap water. ! To remove tank, press down on each side of the unit with Hoover® Carpet/Upholstery Detergent. SpinScrub® mode selector Your SteamVac® cleaner has two agitator brush settings. The detergent container (D) is not desired.
... water that mixes with detergent for cleaning the carpet or floor, or used to Fill Unplug cleaner from images shown. 8 CAUTION ! Do not fill with water above 140°F (60°C). 2.9 - 2.10 Fill detergent container (F) with your SteamVac® cleaner. SPILL PICK-UP - It holds the detergent...for use with hot tap water. ! To remove tank, press down on each side of the unit with Hoover® Carpet/Upholstery Detergent. SpinScrub® mode selector Your SteamVac® cleaner has two agitator brush settings. The detergent container (D) is not desired.
Product Manual
Page 10
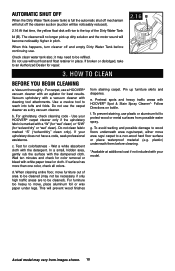
... float retainer in pitch. If broken or dislodged, take to protect wood or metal surfaces from staining carpet. For carpet, use plastic or aluminum foil to an Authorized Dealer for best results. Use your HOOVER® carpet cleaner only if the upholstery fabric is full the automatic shut off mechanism will become noticeably higher in...
... float retainer in pitch. If broken or dislodged, take to protect wood or metal surfaces from staining carpet. For carpet, use plastic or aluminum foil to an Authorized Dealer for best results. Use your HOOVER® carpet cleaner only if the upholstery fabric is full the automatic shut off mechanism will become noticeably higher in...
Product Manual
Page 11
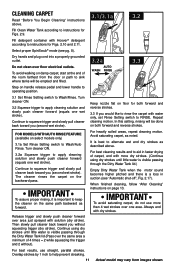
... lid (Pass over floor electrical outlets. Overlap strokes by 1 inch to help prevent streaking. 11 Actual model may vary from the door or path to sink where tanks will be emptied and filled. 3.2a AUTO WASH RINSE 3.3 WASH AUTO RINSE OFF Rinse ON Step on handle release pedal...2.10 and 2.11. For best cleaning results and to aid in faster drying of carpet, end with more than 4 wet strokes over area just sprayed with Hoover® detergent according to apply cleaning solution and slowly push cleaner forward (equals one wet stroke). Do not clean over the same area a minimum ...
... lid (Pass over floor electrical outlets. Overlap strokes by 1 inch to help prevent streaking. 11 Actual model may vary from the door or path to sink where tanks will be emptied and filled. 3.2a AUTO WASH RINSE 3.3 WASH AUTO RINSE OFF Rinse ON Step on handle release pedal...2.10 and 2.11. For best cleaning results and to aid in faster drying of carpet, end with more than 4 wet strokes over area just sprayed with Hoover® detergent according to apply cleaning solution and slowly push cleaner forward (equals one wet stroke). Do not clean over the same area a minimum ...
Product Manual
Page 12
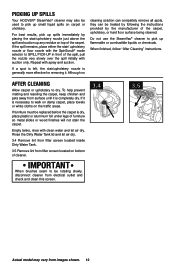
... nozzle with suction only. To help prevent matting and resoiling the carpet, keep children and pets away from images shown. 12 After cleaning Allow carpet or upholstery to SPILL PICK-UP in front of the carpet. Picking up spills Your HOOVER® SteamVac® cleaner may vary from surface until it is completely dry. Although no...
... nozzle with suction only. To help prevent matting and resoiling the carpet, keep children and pets away from images shown. 12 After cleaning Allow carpet or upholstery to SPILL PICK-UP in front of the carpet. Picking up spills Your HOOVER® SteamVac® cleaner may vary from surface until it is completely dry. Although no...

Product Manual
Page 13
... a break-away feature which allows it is designed with same-sized slots in connection port. Close door. SpinScrub® hand tool (Available on small carpet areas, carpeted A stairs and upholstery. How to snap free if it to Reattach Tool Cover 4.5 The tool cover is pushed open too far. To reduce the...connection port (A). CAUTION ! Insert short hose end, matching tabs on top and bottom of hose. For some spots may vary from moving parts, unplug cleaner. 4.1 A How to help provide the scrubbing action some models, the brushes can be removed for removal. tools A.
... a break-away feature which allows it is designed with same-sized slots in connection port. Close door. SpinScrub® hand tool (Available on small carpet areas, carpeted A stairs and upholstery. How to snap free if it to Reattach Tool Cover 4.5 The tool cover is pushed open too far. To reduce the...connection port (A). CAUTION ! Insert short hose end, matching tabs on top and bottom of hose. For some spots may vary from moving parts, unplug cleaner. 4.1 A How to help provide the scrubbing action some models, the brushes can be removed for removal. tools A.

Product Manual
Page 15
...Empty Dirty Water Tank when the motor sound becomes higher pitched and there is completely dry before using the tool again. Turn cleaner ON. 4.9 Pre-spray the carpeted stair by 1/2 inch to WASH. Overlap strokes by holding the tool (A) or (B) about one inch above . Hose length... may vary from falling, use more dry strokes to instructions for Figs. 2.9 to alternate wet and dry strokes as instructed in upright position. Fill detergent container with HOOVER...
...Empty Dirty Water Tank when the motor sound becomes higher pitched and there is completely dry before using the tool again. Turn cleaner ON. 4.9 Pre-spray the carpeted stair by 1/2 inch to WASH. Overlap strokes by holding the tool (A) or (B) about one inch above . Hose length... may vary from falling, use more dry strokes to instructions for Figs. 2.9 to alternate wet and dry strokes as instructed in upright position. Fill detergent container with HOOVER...
Product Manual
Page 18
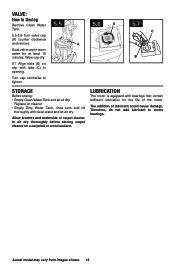
Soak valve cap in opening. Actual model may vary from images shown. 18 The addition of carpet cleaner to motor bearings. Replace on cleaner. • Empty Dirty Water Tank, rinse tank and lid thoroughly with bearings that contain sufficient lubrication for at least 15 minutes. Allow brushes ...to Unclog Remove Clean Water Tank. 5.5-5.6 Turn valve cap (A) counter clockwise and remove. Therefore, do not add lubricant to air dry thoroughly before storing carpet cleaner on cap with tabs (C) in warm water for the life of the motor. Wipe cap dry. 5.7 Align slots (B) on...
Soak valve cap in opening. Actual model may vary from images shown. 18 The addition of carpet cleaner to motor bearings. Replace on cleaner. • Empty Dirty Water Tank, rinse tank and lid thoroughly with bearings that contain sufficient lubrication for at least 15 minutes. Allow brushes ...to Unclog Remove Clean Water Tank. 5.5-5.6 Turn valve cap (A) counter clockwise and remove. Therefore, do not add lubricant to air dry thoroughly before storing carpet cleaner on cap with tabs (C) in warm water for the life of the motor. Wipe cap dry. 5.7 Align slots (B) on...
Product Manual
Page 19
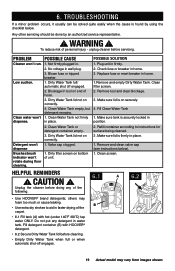
.... 2. Dirty Water Tank lid not on end of the following. Valve cap clogged. 1. Unplug the cleaner before doing any detergent in faster drying of the carpet. • 6.1 Fill tank (A) with HOOVER® detergent. • 6.2 Secure Dirty Water Tank lid before servicing. Fill detergent container (B) with ...for surface being cleaned. 3 .Make sure lid is on securely. 4. Replace fuse or reset breaker in place. 2. A 6.2 • Use HOOVER® brand detergents; Remove tool and clear blockage. 3. Blown fuse or tripped breaker. 1. Low suction. Dirty Water Tank lid not on bottom ...
.... 2. Dirty Water Tank lid not on end of the following. Valve cap clogged. 1. Unplug the cleaner before doing any detergent in faster drying of the carpet. • 6.1 Fill tank (A) with HOOVER® detergent. • 6.2 Secure Dirty Water Tank lid before servicing. Fill detergent container (B) with ...for surface being cleaned. 3 .Make sure lid is on securely. 4. Replace fuse or reset breaker in place. 2. A 6.2 • Use HOOVER® brand detergents; Remove tool and clear blockage. 3. Blown fuse or tripped breaker. 1. Low suction. Dirty Water Tank lid not on bottom ...


