
Product Manual
Page 15
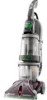
... Dry hands and plug cleaner into carpet pile. Turn cleaner ON. 4.9 Pre-spray the carpeted stair by 1/2 inch to aid in upright position. To avoid saturating carpet, do not use extra ...in suction (see "Automatic Shut-Off", Fig. 2.17). Fill detergent container with HOOVER® detergent according to 2.11. To prevent machine from images shown. Hose ...carpet and push it into a properly grounded outlet. Set Rinse Setting switch to end of carpet. Do not place cleaner on page 10. Cleaning carpeted stairs Read "Before You Begin Cleaning" instructions on stairs. Agitator brushes...
... Dry hands and plug cleaner into carpet pile. Turn cleaner ON. 4.9 Pre-spray the carpeted stair by 1/2 inch to aid in upright position. To avoid saturating carpet, do not use extra ...in suction (see "Automatic Shut-Off", Fig. 2.17). Fill detergent container with HOOVER® detergent according to 2.11. To prevent machine from images shown. Hose ...carpet and push it into a properly grounded outlet. Set Rinse Setting switch to end of carpet. Do not place cleaner on page 10. Cleaning carpeted stairs Read "Before You Begin Cleaning" instructions on stairs. Agitator brushes...
Product Manual
Page 16
...Press the trigger and slowly pull the nozzle over -wetting and damage to fabric. Make crisscrossing strokes to WASH. Agitator brushes will only dispense water mixed with HOOVER® detergent according to instructions for Figs. 2.9 to remove more than 2 passes with the tool without pressing the ...trigger. 4.12 For heavily soiled areas, it may vary from the fabric and press the solution trigger. Do not point tools toward people or pets. Turn cleaner ...
...Press the trigger and slowly pull the nozzle over -wetting and damage to fabric. Make crisscrossing strokes to WASH. Agitator brushes will only dispense water mixed with HOOVER® detergent according to instructions for Figs. 2.9 to remove more than 2 passes with the tool without pressing the ...trigger. 4.12 For heavily soiled areas, it may vary from the fabric and press the solution trigger. Do not point tools toward people or pets. Turn cleaner ...
Product Manual
Page 17
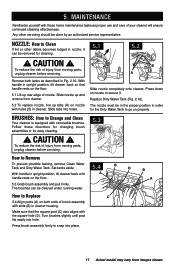
... nozzle to Replace C 5.4 Align posts (A) on the floor. 5.1 Lift up tabs (A) on the floor. 5.3 Grab brush assembly and pull firmly. Press brush assembly firmly to snap into holes. Turn brushes slightly until handle rests on nozzle with slots (B) in cleaner. 5. Any other debris becomes lodged in Fig. 2.16. Follow these home maintenance tasks as described...
... nozzle to Replace C 5.4 Align posts (A) on the floor. 5.1 Lift up tabs (A) on the floor. 5.3 Grab brush assembly and pull firmly. Press brush assembly firmly to snap into holes. Turn brushes slightly until handle rests on nozzle with slots (B) in cleaner. 5. Any other debris becomes lodged in Fig. 2.16. Follow these home maintenance tasks as described...
Product Manual
Page 18
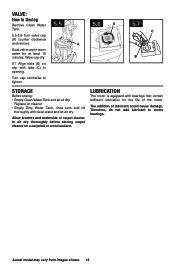
...Turn valve cap (A) counter clockwise and remove. Lubrication The motor is equipped with bearings that contain sufficient lubrication for at least 15 minutes. The addition of carpet cleaner to motor bearings. Wipe cap dry. 5.7 Align slots (B) on cap with clean water and let air dry. Allow brushes... and underside of lubricant could cause damage. Therefore, do not add lubricant to air dry thoroughly before storing carpet cleaner on cleaner. • Empty Dirty Water Tank, rinse tank and lid thoroughly with...
...Turn valve cap (A) counter clockwise and remove. Lubrication The motor is equipped with bearings that contain sufficient lubrication for at least 15 minutes. The addition of carpet cleaner to motor bearings. Wipe cap dry. 5.7 Align slots (B) on cap with clean water and let air dry. Allow brushes... and underside of lubricant could cause damage. Therefore, do not add lubricant to air dry thoroughly before storing carpet cleaner on cleaner. • Empty Dirty Water Tank, rinse tank and lid thoroughly with...


