Manual
Page 1
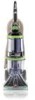
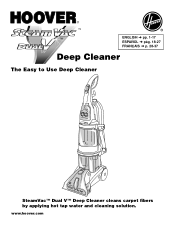
www.hoover.com ™ ™ ® ENGLISH § pp. 1-17 ESPAÑOL § pág. 18-27 FRANÇAIS § p. 28-37 Deep Cleaner The Easy to Use Deep Cleaner SteamVac™ Dual V™ Deep Cleaner cleans carpet fibers by applying hot tap water and cleaning solution.
www.hoover.com ™ ™ ® ENGLISH § pp. 1-17 ESPAÑOL § pág. 18-27 FRANÇAIS § p. 28-37 Deep Cleaner The Easy to Use Deep Cleaner SteamVac™ Dual V™ Deep Cleaner cleans carpet fibers by applying hot tap water and cleaning solution.

Manual
Page 2
... plug, not the cord. • Never handle plug or appliance with water above 140˚F (60˚C). • Do not point tools toward people or pets. • Use extra care when cleaning on stairs. keep free of dust, lint, hair, and anything that may be connected to a Hoover Factory Service Center or Authorized Hoover Warranty Service Dealer. • Close supervision is necessary when any other cleaners out of electric...
... plug, not the cord. • Never handle plug or appliance with water above 140˚F (60˚C). • Do not point tools toward people or pets. • Use extra care when cleaning on stairs. keep free of dust, lint, hair, and anything that may be connected to a Hoover Factory Service Center or Authorized Hoover Warranty Service Dealer. • Close supervision is necessary when any other cleaners out of electric...
Manual
Page 3
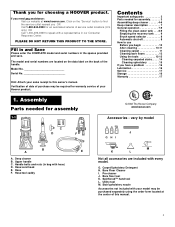
... owner's manual. Assembly Parts needed for warranty service of the handle. Hose F. Utility tool M. The model and serial numbers are included with hose) D. vary by model C D F Carpet Upholstery Cleaner Bare floor cleaner PreCleaner G HI J B A A. Handle bolts and nuts (in bag with every model. Bare Floor Cleaner I. Pre-cleaner J. Stair/upholstery nozzle Accessories not included with a representative in the spaces provided and save. Click on the back of your sales receipt to use Before you begin 10 After cleaning...
... owner's manual. Assembly Parts needed for warranty service of the handle. Hose F. Utility tool M. The model and serial numbers are included with hose) D. vary by model C D F Carpet Upholstery Cleaner Bare floor cleaner PreCleaner G HI J B A A. Handle bolts and nuts (in bag with every model. Bare Floor Cleaner I. Pre-cleaner J. Stair/upholstery nozzle Accessories not included with a representative in the spaces provided and save. Click on the back of your sales receipt to use Before you begin 10 After cleaning...
Manual
Page 4
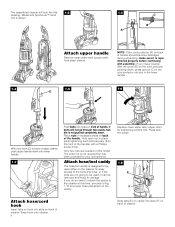
... 1-2 drawing. Replace clean water tank (upper tank) by positioning bottom first. Press tank into place. 1-8 E F Attach hose/cord hook Insert tabs on hook into slots (F) on back of the handle. The assembled cleaner will not go through hole easily, handle is shown. 1-3 C B A Attach upper handle Remove clean water tank (upper tank) from the front of the handle) with assembly of your convenience. Model with SpinScrub™ hand tool is not...
... 1-2 drawing. Replace clean water tank (upper tank) by positioning bottom first. Press tank into place. 1-8 E F Attach hose/cord hook Insert tabs on hook into slots (F) on back of the handle. The assembled cleaner will not go through hole easily, handle is shown. 1-3 C B A Attach upper handle Remove clean water tank (upper tank) from the front of the handle) with assembly of your convenience. Model with SpinScrub™ hand tool is not...

Manual
Page 5
... cleaner. Slide tool down so notch (G) on caddy. SpinScrub™ hand tool (not included with your cleaner) through "loop" on caddy rests in a plastic bag for protection. Solution tube I Storing hose and tools Press hose, a few inches from nozzle connector end (I . J Repeat on hose connector into top of bare floor tool (available at bottom of cleaner and press into hose clip. J Identify the hose parts before using the tool, open tool door. 5 Nozzle...
... cleaner. Slide tool down so notch (G) on caddy. SpinScrub™ hand tool (not included with your cleaner) through "loop" on caddy rests in a plastic bag for protection. Solution tube I Storing hose and tools Press hose, a few inches from nozzle connector end (I . J Repeat on hose connector into top of bare floor tool (available at bottom of cleaner and press into hose clip. J Identify the hose parts before using the tool, open tool door. 5 Nozzle...

Manual
Page 6
1-18 1-19 Pull tool down and outward. To reattach, align hinges of cover with a breakaway feature which allows it to snap free if it is pushed open too far. To reposition the tool, reverse this procedure. Snap door into place. 6 How to reattach tool cover The tool cover is designed with holes on sides of tool storage area.
1-18 1-19 Pull tool down and outward. To reattach, align hinges of cover with a breakaway feature which allows it to snap free if it is pushed open too far. To reposition the tool, reverse this procedure. Snap door into place. 6 How to reattach tool cover The tool cover is designed with holes on sides of tool storage area.
Manual
Page 7
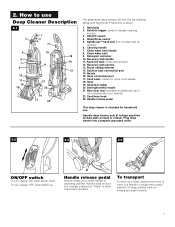
... floor tool (available at voltage specified on data plate on pedal (A) to lower handle to operating position. 2. How to release cleaning solution 3. Hand grip 2. Wash/Rinse switch 5. Carrying handle 7. Clean water tank 9. Recovery tank handle 11. Brush setting selector 14. Hose/tool caddy 20. Cord/hose hook 23. Handle release pedal This deep cleaner is shown. 1. Plug deep cleaner into a single position but "floats" to room, put handle in upright and locked position, tilt deep cleaner back on wheels...
... floor tool (available at voltage specified on data plate on pedal (A) to lower handle to operating position. 2. How to release cleaning solution 3. Hand grip 2. Wash/Rinse switch 5. Carrying handle 7. Clean water tank 9. Recovery tank handle 11. Brush setting selector 14. Hose/tool caddy 20. Cord/hose hook 23. Handle release pedal This deep cleaner is shown. 1. Plug deep cleaner into a single position but "floats" to room, put handle in upright and locked position, tilt deep cleaner back on wheels...

Manual
Page 8
... change from electrical outlet. How to fill Unplug deep cleaner from cleaning your carpet or floor with a detergent/water mix to the top of carpet and bare floors OFF - 2-5 2-6 2-7 B Carrying handle The deep cleaner may need to use water only. At that will rise to rinsing with detergent and water. Check clean water tank also; Brush setting selector Your 'SteamVac' deep cleaner has two agitator brush settings. Slide selector button to the desired setting before continuing use...
... change from electrical outlet. How to fill Unplug deep cleaner from cleaning your carpet or floor with a detergent/water mix to the top of carpet and bare floors OFF - 2-5 2-6 2-7 B Carrying handle The deep cleaner may need to use water only. At that will rise to rinsing with detergent and water. Check clean water tank also; Brush setting selector Your 'SteamVac' deep cleaner has two agitator brush settings. Slide selector button to the desired setting before continuing use...

Manual
Page 9
... the surface being cleaned. Turn tank cap counterclockwise and remove cap. 2-14 Fill container (16 oz.) with water above 140˚F (60˚C). When the recovery tank is full, the automatic shut-off cleaner. CAUTION: Do not fill with HOOVER Carpet/Upholstery Detergent or HOOVER Bare Floor Cleaner. Do not use Bare Floor Cleaner on each side of contact with skin, wash with eyes...
... the surface being cleaned. Turn tank cap counterclockwise and remove cap. 2-14 Fill container (16 oz.) with water above 140˚F (60˚C). When the recovery tank is full, the automatic shut-off cleaner. CAUTION: Do not fill with HOOVER Carpet/Upholstery Detergent or HOOVER Bare Floor Cleaner. Do not use Bare Floor Cleaner on each side of contact with skin, wash with eyes...
Manual
Page 10
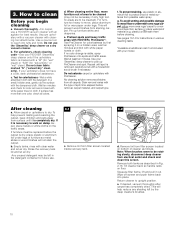
... dry. Remove lint from filter screen located on various cleaning tasks. *Available at least ten minutes. Tilt cleaner back so handle rests on a hidden area; e. Do not use . 3-1 c. For upholstery, check cleaning code - If your 'SteamVac' deep cleaner to a nonwood bare floor surface or place waterproof material (e.g. Wet a white absorbent cloth with white paper towels or cloth. d. This will help prevent matting and resoiling the carpet, keep...
... dry. Remove lint from filter screen located on various cleaning tasks. *Available at least ten minutes. Tilt cleaner back so handle rests on a hidden area; e. Do not use . 3-1 c. For upholstery, check cleaning code - If your 'SteamVac' deep cleaner to a nonwood bare floor surface or place waterproof material (e.g. Wet a white absorbent cloth with white paper towels or cloth. d. This will help prevent matting and resoiling the carpet, keep...

Manual
Page 11
... farthest from cleaner. Turn brushes ON or OFF as described above. Dry hands and plug cord into holes. Set Wash/Rinse switch to upright position and replace clean water tank (Fig. 2-15). Release trigger and slowly push deep cleaner forward over floor electrical outlets. 5. Overlap strokes by 1 inch to 2-15. 3. For heavily soiled areas, repeat steps 6-9. Slide nozzle completely onto cleaner. The nozzle must be removed for Figs. 2-13 to help your carpet look...
... farthest from cleaner. Turn brushes ON or OFF as described above. Dry hands and plug cord into holes. Set Wash/Rinse switch to upright position and replace clean water tank (Fig. 2-15). Release trigger and slowly push deep cleaner forward over floor electrical outlets. 5. Overlap strokes by 1 inch to 2-15. 3. For heavily soiled areas, repeat steps 6-9. Slide nozzle completely onto cleaner. The nozzle must be removed for Figs. 2-13 to help your carpet look...
Manual
Page 12
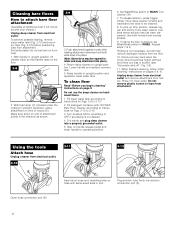
... handle in the direction as shown, place attachment on furniture). 1. Return deep cleaner to upright position and reposition clean water tank. To pick up dirty solution, release trigger and slowly move deep cleaner forward and backward over area where solution has just been dispersed. Use both ends snap into place.) 4. If rinsing the floor is not desired. 4. Using the tools Attach hose Unplug cleaner from electrical outlet. Raise handle to upright...
... handle in the direction as shown, place attachment on furniture). 1. Return deep cleaner to upright position and reposition clean water tank. To pick up dirty solution, release trigger and slowly move deep cleaner forward and backward over area where solution has just been dispersed. Use both ends snap into place.) 4. If rinsing the floor is not desired. 4. Using the tools Attach hose Unplug cleaner from electrical outlet. Raise handle to upright...

Manual
Page 13
.... 3-13 H G I . Can be removed for converting to the hose in place of brush module). All tools attach to the scrub module. Connect tool to hose by turning deep cleaner ON and holding nozzle up on small carpet areas, carpeted stairs and upholstery. Unplug deep cleaner from electrical outlet. 1. Disconnect hose and solution tube from deep cleaner. 3-15 3-16 The tool caddy can be used to remove tool. Press the trigger. Note...
.... 3-13 H G I . Can be removed for converting to the hose in place of brush module). All tools attach to the scrub module. Connect tool to hose by turning deep cleaner ON and holding nozzle up on small carpet areas, carpeted stairs and upholstery. Unplug deep cleaner from electrical outlet. 1. Disconnect hose and solution tube from deep cleaner. 3-15 3-16 The tool caddy can be used to remove tool. Press the trigger. Note...

Manual
Page 14
... above. 3-18 After using scrub tool To clean scrub pad, pull it off ", Fig. 2-6). Ask for HOOVER part no surface change is visible, continue to alternate wet and dry strokes as described below. 1. Fill detergent container with tool. Attach tool to 3-12. 2. Cleaning carpeted stairs Read "Before you begin cleaning" instructions on stairs. Replacement pads may require that machine be purchased. Attach hose and solution tube as shown. To...
... above. 3-18 After using scrub tool To clean scrub pad, pull it off ", Fig. 2-6). Ask for HOOVER part no surface change is visible, continue to alternate wet and dry strokes as described below. 1. Fill detergent container with tool. Attach tool to 3-12. 2. Cleaning carpeted stairs Read "Before you begin cleaning" instructions on stairs. Replacement pads may require that machine be purchased. Attach hose and solution tube as shown. To...
Manual
Page 15
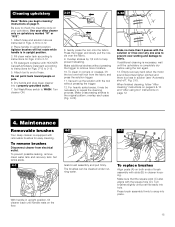
..., remove clean water tank and recovery tank. Use your upholstery. Dry hands and plug deep cleaner into hole. For heavily soiled areas, it may be cleaned under running water. 4-3 B A DB A C To replace brushes Align posts (A) on page 12. 4. The brushes can be necessary to 3-12. 2. Attach tool to fabric. Turn cleaner ON. 3-21 8. Vacuum up the solution with HOOVER Carpet/Upholstery Detergent according to instructions for Figs. 2-9 to WASH. Attach hose and solution tube as instructed in suction...
..., remove clean water tank and recovery tank. Use your upholstery. Dry hands and plug deep cleaner into hole. For heavily soiled areas, it may be cleaned under running water. 4-3 B A DB A C To replace brushes Align posts (A) on page 12. 4. The brushes can be necessary to 3-12. 2. Attach tool to fabric. Turn cleaner ON. 3-21 8. Vacuum up the solution with HOOVER Carpet/Upholstery Detergent according to instructions for Figs. 2-9 to WASH. Attach hose and solution tube as instructed in suction...
Manual
Page 16
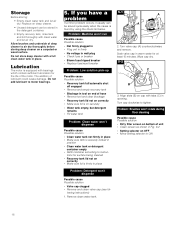
... water tank Problem: Clean water won 't run Possible cause Possible solution • Not firmly plugged in • Plug unit in firmly • No voltage in wall plug • Check fuse or breaker • Blown fuse/tripped breaker • Replace fuse/reset breaker Problem: Low solution pick-up Possible cause Possible solution • Recovery tank full/automatic shut off engaged • Remove and empty recovery tank • Blockage in tool...
... water tank Problem: Clean water won 't run Possible cause Possible solution • Not firmly plugged in • Plug unit in firmly • No voltage in wall plug • Check fuse or breaker • Blown fuse/tripped breaker • Replace fuse/reset breaker Problem: Low solution pick-up Possible cause Possible solution • Recovery tank full/automatic shut off engaged • Remove and empty recovery tank • Blockage in tool...
Manual
Page 17
... in normal household use, in correct operating condition during the warranted period. Always identify your cleaner by presenting the appliance to place this appliance in accordance with this will be obtained by the complete model number when requesting information or ordering parts. (The model number appears on -line at www.hoover.com OR • checking the list of warranty service outlets, write or...
... in normal household use, in correct operating condition during the warranted period. Always identify your cleaner by presenting the appliance to place this appliance in accordance with this will be obtained by the complete model number when requesting information or ordering parts. (The model number appears on -line at www.hoover.com OR • checking the list of warranty service outlets, write or...


