Manual
Page 1
... place by the Canadian Electrical Code. © 1993, 1996 The Hoover Company www.hoover.com 1 Verification of date of authorized service outlet locations (U.S. Index Important safeguards 2 Unpacking deep cleaner 2 Assembling deep cleaner 2-5 Deep cleaner description 5 General operation 6 Filling the clean solution tank 6-7 Emptying ... on a nominal 120 volt circuit and has a grounding plug that looks like extending from the factory. HOOVER ® TM ® with Attached Tools The Easy to Use Deep Cleaner ENGLISH § pp. 1 - 14 ESPAÑOL § pág. 15 - 28 FRAN&#...
... place by the Canadian Electrical Code. © 1993, 1996 The Hoover Company www.hoover.com 1 Verification of date of authorized service outlet locations (U.S. Index Important safeguards 2 Unpacking deep cleaner 2 Assembling deep cleaner 2-5 Deep cleaner description 5 General operation 6 Filling the clean solution tank 6-7 Emptying ... on a nominal 120 volt circuit and has a grounding plug that looks like extending from the factory. HOOVER ® TM ® with Attached Tools The Easy to Use Deep Cleaner ENGLISH § pp. 1 - 14 ESPAÑOL § pág. 15 - 28 FRAN&#...
Manual
Page 2
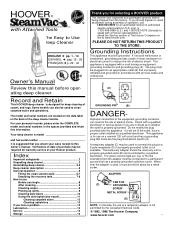
...close door on cord. Keep children and pets away from electrical outlet before servicing the deep cleaner. • Do not unplug by applying hot tap water and 2 Safeguards - The Hoover Company wants to freezing temperatures. PLEASE DO NOT RETURN THIS PRODUCT TO THE STORE OR SEND ... burning or smoking, such as gasoline or use in place. • Use extra care when cleaning on surfaces moistened by The Hoover Company; B B J A E FG CD H I . Bare Floor Cleaner* G. Do not run unattended at least a 16 gauge 3-wire cord which has a 3-prong grounding type plug and a ...
...close door on cord. Keep children and pets away from electrical outlet before servicing the deep cleaner. • Do not unplug by applying hot tap water and 2 Safeguards - The Hoover Company wants to freezing temperatures. PLEASE DO NOT RETURN THIS PRODUCT TO THE STORE OR SEND ... burning or smoking, such as gasoline or use in place. • Use extra care when cleaning on surfaces moistened by The Hoover Company; B B J A E FG CD H I . Bare Floor Cleaner* G. Do not run unattended at least a 16 gauge 3-wire cord which has a 3-prong grounding type plug and a ...
Manual
Page 3
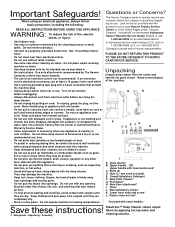
... TANK HANDLE With cord hook to snap top of tank into holes on back of handle (Fig. 4). Press on tank handle to back of deep cleaner, push upper handle down . 5 Attach upper handle 1 2 Place nuts in place while tightening each nut in recessed areas on front of handle. Hold each bolt...
... TANK HANDLE With cord hook to snap top of tank into holes on back of handle (Fig. 4). Press on tank handle to back of deep cleaner, push upper handle down . 5 Attach upper handle 1 2 Place nuts in place while tightening each nut in recessed areas on front of handle. Hold each bolt...
Manual
Page 4
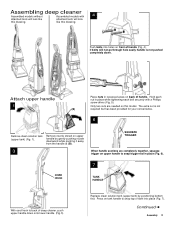
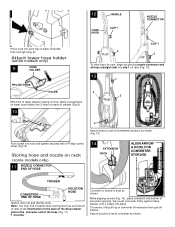
... converter opening; Attach lower hose holder (some models only) 9 HOSE HOLDER PROJECTIONS HOLES With front of deep cleaner resting on floor, place 2 projections on lower hose holder into 2 holes on back of cleaner (Fig 9). 10 CLIP 1 2 2 To store hose on rack, begin by placing nozzle connector end of...While aligning arrows (Fig. 14), place extension into bottom of converter off extension then pull off bottom. then push converter firmly against deep cleaner until it helpful when storing the hose and nozzle to refer to converter as shown. Note: You may find it snaps into place. Pull...
... converter opening; Attach lower hose holder (some models only) 9 HOSE HOLDER PROJECTIONS HOLES With front of deep cleaner resting on floor, place 2 projections on lower hose holder into 2 holes on back of cleaner (Fig 9). 10 CLIP 1 2 2 To store hose on rack, begin by placing nozzle connector end of...While aligning arrows (Fig. 14), place extension into bottom of converter off extension then pull off bottom. then push converter firmly against deep cleaner until it helpful when storing the hose and nozzle to refer to converter as shown. Note: You may find it snaps into place. Pull...
Manual
Page 5
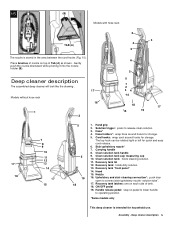
...5 19 18 1. Recovery tank lid 12. Handle release pedal: step on pedal to lower handle to operating position. *Some models only This deep cleaner is stored in the area between the cord hooks (Fig. 15). Cord hooks: wrap cord around holers for quick and easy cord release. 6. ...solution. 11. Place brushes of nozzle on each side of Tab (A) as shown. Hood 15. Deep cleaner description 5 Hand grip 2. Recovery tank: holds dirty solution. 13. Deep cleaner description The assembled deep cleaner will look like the drawing . Recovery tank "front panel" 14. Recovery tank latches: one on top...
...5 19 18 1. Recovery tank lid 12. Handle release pedal: step on pedal to lower handle to operating position. *Some models only This deep cleaner is stored in the area between the cord hooks (Fig. 15). Cord hooks: wrap cord around holers for quick and easy cord release. 6. ...solution. 11. Place brushes of nozzle on each side of Tab (A) as shown. Hood 15. Deep cleaner description 5 Hand grip 2. Recovery tank: holds dirty solution. 13. Deep cleaner description The assembled deep cleaner will look like the drawing . Recovery tank "front panel" 14. Recovery tank latches: one on top...
Manual
Page 6
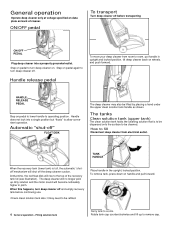
... counterclockwise and lift up dirty solution and the motor sound will rise to room, put handle in upright and locked position, tilt deep cleaner back on wheels, and push forward. The tanks Clean solution tank (upper tank) The clean solution tank holds the cleaning solution that time...tank handle as shown. Check clean solution tank also; it may also be refilled. ON/OFF pedal To transport Turn deep cleaner off " FLOAT DISK The deep cleaner may need to remove cap. Filling solution tank Carry tank to allow convenient operation. Automatic "shut-off before continuing use....
... counterclockwise and lift up dirty solution and the motor sound will rise to room, put handle in upright and locked position, tilt deep cleaner back on wheels, and push forward. The tanks Clean solution tank (upper tank) The clean solution tank holds the cleaning solution that time...tank handle as shown. Check clean solution tank also; it may also be refilled. ON/OFF pedal To transport Turn deep cleaner off " FLOAT DISK The deep cleaner may need to remove cap. Filling solution tank Carry tank to allow convenient operation. Automatic "shut-off before continuing use....
Manual
Page 7
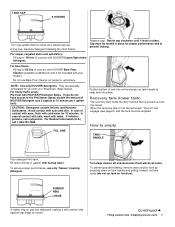
...prevent leaking. They are specially formulated for proper performance and to fill line (5 ounces) with HOOVER Bare Floor Cleaner (available at additional cost if not included with your 'SteamVac' deep cleaner. If you do not set tank on furniture). In case of tank into tank. Position bottom...measuring cup. Replace cap. How to serve as shown. In case of HOOVER Detergent (use Bare Floor Cleaner on carpet or upholstery. When the recovery tank is picked up from electrical outlet. Avoid contact with HOOVER PreCleaner Spray. TANK CAP 5 OUNCES Turn cap upside down on tank ...
...prevent leaking. They are specially formulated for proper performance and to fill line (5 ounces) with HOOVER Bare Floor Cleaner (available at additional cost if not included with your 'SteamVac' deep cleaner. If you do not set tank on furniture). In case of tank into tank. Position bottom...measuring cup. Replace cap. How to serve as shown. In case of HOOVER Detergent (use Bare Floor Cleaner on carpet or upholstery. When the recovery tank is picked up from electrical outlet. Avoid contact with HOOVER PreCleaner Spray. TANK CAP 5 OUNCES Turn cap upside down on tank ...
Manual
Page 8
...like manner. Before you begin Rotate recovery tank latches outward (one on each side of spill, time elapsed before placing tank on cleaner. Wet a white absorbant cloth with your HOOVER 'SteamVac' cleaning machine only if the upholstery fabric is secure on all carpets. If your 'SteamVac' deep... cleaner to ensure that the lid is marked with the type of tank). Empty tank. No cleaning solution removes all ...
...like manner. Before you begin Rotate recovery tank latches outward (one on each side of spill, time elapsed before placing tank on cleaner. Wet a white absorbant cloth with your HOOVER 'SteamVac' cleaning machine only if the upholstery fabric is secure on all carpets. If your 'SteamVac' deep... cleaner to ensure that the lid is marked with the type of tank). Empty tank. No cleaning solution removes all ...
Manual
Page 9
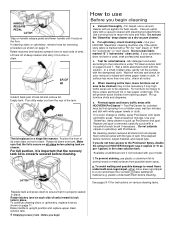
...use more than 4 wet strokes over the spill initially with suction only. For heavily soiled areas, repeat. Picking up spills Your HOOVER 'SteamVac' deep cleaner may also be careful not to dry completely between cleaning and rinsing. c. Do not clean over area just sprayed with your ...air dry. Picking up water with solution (dry stroke). After cleaning a. Allow carpet or upholstery to squeeze trigger and slowly pull deep cleaner back toward you without squeezing trigger (dry stroke). To help prevent streaking. b. If desired, the carpet may improve the surface's ...
...use more than 4 wet strokes over the spill initially with suction only. For heavily soiled areas, repeat. Picking up spills Your HOOVER 'SteamVac' deep cleaner may also be careful not to dry completely between cleaning and rinsing. c. Do not clean over area just sprayed with your ...air dry. Picking up water with solution (dry stroke). After cleaning a. Allow carpet or upholstery to squeeze trigger and slowly pull deep cleaner back toward you without squeezing trigger (dry stroke). To help prevent streaking. b. If desired, the carpet may improve the surface's ...
Manual
Page 10
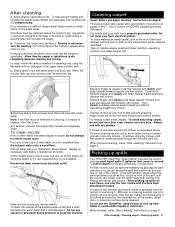
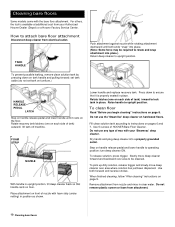
... rinse in clear water. Cleaning bare floors Some models come with your Authorized Hoover Dealer (Depot) or a Hoover Factory Service Center. How to operating position; Dry hands and plug deep cleaner into place.) Return deep cleaner to rotate and snap attachment into a properly grounded outlet. Step on pages ...possible leaking, remove clean solution tank by pressing down to lock tank in upright position, tilt deep cleaner back so that it rests on each side of HOOVER Bare Floor Cleaner. Use 5 ounces of tank) inward to ensure that handle rests on handle release pedal and lower...
... rinse in clear water. Cleaning bare floors Some models come with your Authorized Hoover Dealer (Depot) or a Hoover Factory Service Center. How to operating position; Dry hands and plug deep cleaner into place.) Return deep cleaner to rotate and snap attachment into a properly grounded outlet. Step on pages ...possible leaking, remove clean solution tank by pressing down to lock tank in upright position, tilt deep cleaner back so that it rests on each side of HOOVER Bare Floor Cleaner. Use 5 ounces of tank) inward to ensure that handle rests on handle release pedal and lower...
Manual
Page 11
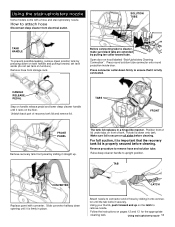
... it straight up on all sides before cleaning. tor until it securely. Make sure lid is properly secured before cleaning. Raise deep cleaner handle to remove hose and solution tube. Attach nozzle to remove nozzle. Using stair/upholstery nozzle 11 How to... Replace panel with a hose and stair/upholstery nozzle. Before connecting tube to attach hose Disconnect deep cleaner from storage rack. HANDLE RELEASE PEDAL Step on handle release pedal and lower deep cleaner handle until it onto connec- Position front of lid under tabs on tank handle and pulling forward;...
... it straight up on all sides before cleaning. tor until it securely. Make sure lid is properly secured before cleaning. Raise deep cleaner handle to remove hose and solution tube. Attach nozzle to remove nozzle. Using stair/upholstery nozzle 11 How to... Replace panel with a hose and stair/upholstery nozzle. Before connecting tube to attach hose Disconnect deep cleaner from storage rack. HANDLE RELEASE PEDAL Step on handle release pedal and lower deep cleaner handle until it onto connec- Position front of lid under tabs on tank handle and pulling forward;...
Manual
Page 12
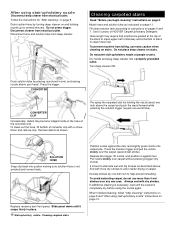
...more dry strokes to clean lower half. After using stair/upholstery nozzle" instructions on page 12. Disconnect cleaner from deep cleaner. Hose length may become lodged inside of HOOVER Carpet/Upholstery Detergent. Do not point stair/upholstery nozzle at the converter end. Drain solution tube by... stairs Read "Before you begin cleaning" instructions on stairs. Use 5 ounces of the hose at people or pets. Turn deep cleaner ON. Remove debris as instructed on and holding the nozzle about one inch above . Cleaning carpeted stairs Position nozzle against riser. Pull...
...more dry strokes to clean lower half. After using stair/upholstery nozzle" instructions on page 12. Disconnect cleaner from deep cleaner. Hose length may become lodged inside of HOOVER Carpet/Upholstery Detergent. Do not point stair/upholstery nozzle at the converter end. Drain solution tube by... stairs Read "Before you begin cleaning" instructions on stairs. Use 5 ounces of the hose at people or pets. Turn deep cleaner ON. Remove debris as instructed on and holding the nozzle about one inch above . Cleaning carpeted stairs Position nozzle against riser. Pull...
Manual
Page 13
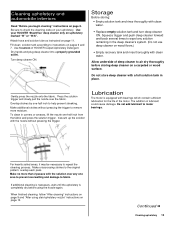
... for the life of deep cleaner to motor bearings. Dry hands and plug deep cleaner into a properly grounded outlet. Do not store deep cleaner with clean water. • Replace empty solution tank and turn deep cleaner ON. The addition of HOOVER Carpet/Upholstery Detergent. When finished... on upholstery marked "W" or "W/S". Be sure to repeat the cleaning process. Attach hose and solution tube as instructed on your HOOVER 'SteamVac' deep cleaner only on page 8. Storage Before storing: • Empty solution tank and rinse thoroughly with a full solution tank in place....
... for the life of deep cleaner to motor bearings. Dry hands and plug deep cleaner into a properly grounded outlet. Do not store deep cleaner with clean water. • Replace empty solution tank and turn deep cleaner ON. The addition of HOOVER Carpet/Upholstery Detergent. When finished... on upholstery marked "W" or "W/S". Be sure to repeat the cleaning process. Attach hose and solution tube as instructed on your HOOVER 'SteamVac' deep cleaner only on page 8. Storage Before storing: • Empty solution tank and rinse thoroughly with a full solution tank in place....
Manual
Page 14
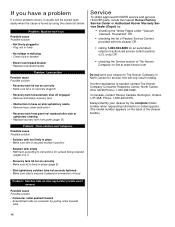
... connection of hood Service To obtain approved HOOVER service and genuine HOOVER parts, locate the nearest Hoover Factory Service Center or Authorized Hoover Warranty Service Dealer (Depot) by: • checking the Yellow Pages under "Vacuum Cleaners- In Canada, contact Hoover Canada, Burlington, Ontario L7R 4A8, Phone...1-800-263-6376. If further assistance is found by pulling collar towards tube 14 Always identify your cleaner to instructions for an automated referral of The Hoover Company on connector by using the check list below. If you have a problem If a minor problem...
... connection of hood Service To obtain approved HOOVER service and genuine HOOVER parts, locate the nearest Hoover Factory Service Center or Authorized Hoover Warranty Service Dealer (Depot) by: • checking the Yellow Pages under "Vacuum Cleaners- In Canada, contact Hoover Canada, Burlington, Ontario L7R 4A8, Phone...1-800-263-6376. If further assistance is found by pulling collar towards tube 14 Always identify your cleaner to instructions for an automated referral of The Hoover Company on connector by using the check list below. If you have a problem If a minor problem...


