Manual
Page 1
... This HOOVER deep cleaner is for an automated referral of carpet, and rugs. This appliance is designed for selecting a HOOVER product. For your Hoover product. Improper connection of your personal records, please enter the COMPLETE model and serial numbers in sketch (A). ADAPTER TAB FOR (C) GROUNDING SCREW METAL SCREW (D) NOTE: In Canada, the use Before you begin 8 After cleaning 9 Cleaning carpet 9 Picking up spills 9 Cleaning bare floors 10 Using the stair/upholstery nozzle 11 Cleaning carpeted stairs 12 Cleaning upholstery...
... This HOOVER deep cleaner is for an automated referral of carpet, and rugs. This appliance is designed for selecting a HOOVER product. For your Hoover product. Improper connection of your personal records, please enter the COMPLETE model and serial numbers in sketch (A). ADAPTER TAB FOR (C) GROUNDING SCREW METAL SCREW (D) NOTE: In Canada, the use Before you begin 8 After cleaning 9 Cleaning carpet 9 Picking up spills 9 Cleaning bare floors 10 Using the stair/upholstery nozzle 11 Cleaning carpeted stairs 12 Cleaning upholstery...
Manual
Page 2
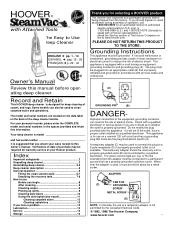
... care when cleaning on cord. Bare floor attachment* I K J L A. B B J A E FG CD H I . Deep cleaner B. Stair/upholstery nozzle* K. Do not place carpet cleaning machine on cord or pull cord around sharp edges or corners. Household" for the nearest Authorized Hoover Warranty Service Dealer (Depot) or call: 1-800-944-9200 for your cleaner or questions regarding its intended use as a handle, close door on stairs. • Use deep cleaner only for its use with the product for an...
... care when cleaning on cord. Bare floor attachment* I K J L A. B B J A E FG CD H I . Deep cleaner B. Stair/upholstery nozzle* K. Do not place carpet cleaning machine on cord or pull cord around sharp edges or corners. Household" for the nearest Authorized Hoover Warranty Service Dealer (Depot) or call: 1-800-944-9200 for your cleaner or questions regarding its intended use as a handle, close door on stairs. • Use deep cleaner only for its use with the product for an...
Manual
Page 3
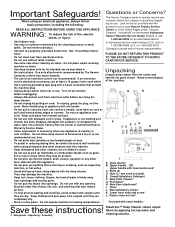
.... Remove nozzle stored on this model. Assembling deep cleaner Assembled models without Assembled models with a Phillips screw driver (Fig. 5). Push bolts into place (Fig. 7). The extra nut is not pushed completely down onto lower handle. (Fig.3). Continued § Assembly 3 Hold each bolt securely with 4 attached tools will not go through hole easily handle is not (B) required but has been provided for your convenience. 6 Remove clean solution tank (upper tank) (Fig. 1). Replace clean solution tank (upper tank...
.... Remove nozzle stored on this model. Assembling deep cleaner Assembled models without Assembled models with a Phillips screw driver (Fig. 5). Push bolts into place (Fig. 7). The extra nut is not pushed completely down onto lower handle. (Fig.3). Continued § Assembly 3 Hold each bolt securely with 4 attached tools will not go through hole easily handle is not (B) required but has been provided for your convenience. 6 Remove clean solution tank (upper tank) (Fig. 1). Replace clean solution tank (upper tank...
Manual
Page 4
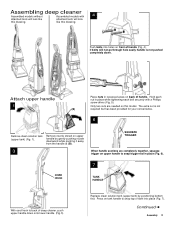
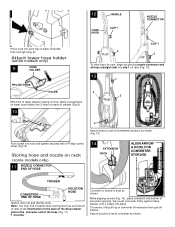
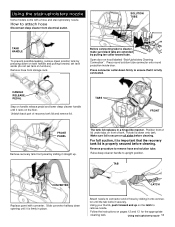
Attach lower hose holder (some models only) 9 HOSE HOLDER PROJECTIONS HOLES With front of deep cleaner resting on floor, place 2 projections on lower hose holder into 2 holes on back of cleaner (Fig 9). 10 CLIP 1 2 2 To store hose on rack, begin by placing nozzle connector end of hose (straight end) into clip 1 on rack (some models only) 11 NOZZLE CONNECTOR END OF HOSE 14 EXTENSION HOOK ALIGN ARROW...
Attach lower hose holder (some models only) 9 HOSE HOLDER PROJECTIONS HOLES With front of deep cleaner resting on floor, place 2 projections on lower hose holder into 2 holes on back of cleaner (Fig 9). 10 CLIP 1 2 2 To store hose on rack, begin by placing nozzle connector end of hose (straight end) into clip 1 on rack (some models only) 11 NOZZLE CONNECTOR END OF HOSE 14 EXTENSION HOOK ALIGN ARROW...
Manual
Page 5
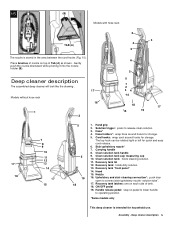
... Clean solution tank handle 9. Clean solution tank: holds cleaning solution. 11. Recovery tank "front panel" 14. Upholstery and stair cleaning connection*: push door open to release clean solution. 3. Solution trigger: press to connect stair/upholstery nozzle "solution tube". 17. Carrying handle 8. Recovery tank: holds dirty solution. 13. Deep cleaner description 5 Deep cleaner description The assembled deep cleaner will look like the drawing . The top hook can be rotated right or left for quick and easy cord release. 6. Clean solution tank cap/ measuring cup 10. Recovery tank...
... Clean solution tank handle 9. Clean solution tank: holds cleaning solution. 11. Recovery tank "front panel" 14. Upholstery and stair cleaning connection*: push door open to release clean solution. 3. Solution trigger: press to connect stair/upholstery nozzle "solution tube". 17. Carrying handle 8. Recovery tank: holds dirty solution. 13. Deep cleaner description 5 Deep cleaner description The assembled deep cleaner will look like the drawing . The top hook can be rotated right or left for quick and easy cord release. 6. Clean solution tank cap/ measuring cup 10. Recovery tank...
Manual
Page 6
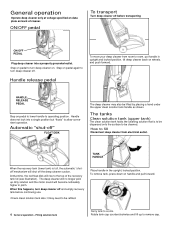
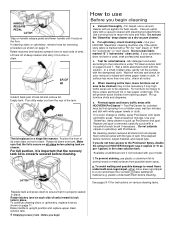
... deep cleaner from electrical outlet. TANK HANDLE When the recovery tank (lower tank) is to be refilled. When this happens, turn deep cleaner off the deep cleaner suction. it may also be cleaned. To remove tank, press down on handle and pull forward. 6 General operation - ON/OFF pedal To transport Turn deep cleaner off before continuing use. How to a sink. The deep cleaner will no longer pick up to allow convenient operation. Check clean solution tank also; Filling solution tank...
... deep cleaner from electrical outlet. TANK HANDLE When the recovery tank (lower tank) is to be refilled. When this happens, turn deep cleaner off the deep cleaner suction. it may also be cleaned. To remove tank, press down on handle and pull forward. 6 General operation - ON/OFF pedal To transport Turn deep cleaner off before continuing use. How to a sink. The deep cleaner will no longer pick up to allow convenient operation. Check clean solution tank also; Filling solution tank...
Manual
Page 7
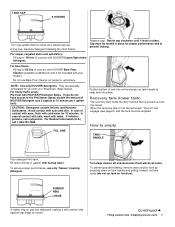
..., use with your model.) Do not use 2 capfuls or 10 ounces per 1 gallon tank). Using cap, measure detergent following the chart below. They are specially formulated for use only 'Hoover' cleaning detergent . For heavy traffic areas: Pre-treat with eyes and skin. Position bottom of HOOVER Detergent (use Bare Floor Cleaner on cap has displaced, replace it locks in place for 15 minutes. set tank on tank handle to the PreCleaner Spray...
..., use with your model.) Do not use 2 capfuls or 10 ounces per 1 gallon tank). Using cap, measure detergent following the chart below. They are specially formulated for use only 'Hoover' cleaning detergent . For heavy traffic areas: Pre-treat with eyes and skin. Position bottom of HOOVER Detergent (use Bare Floor Cleaner on cap has displaced, replace it locks in place for 15 minutes. set tank on tank handle to the PreCleaner Spray...
Manual
Page 8
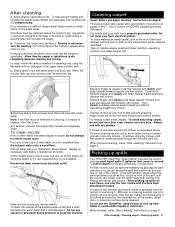
... removal, carpet material, and carpet type. To continue cleaning stairs or upholstery, replace hose as a dry vacuum cleaner. If cleaning stairs or upholstery, remove hose by first spraying it to be necessary if only high traffic areas are to a sink or drain. Rotate recovery tank latches outward (one on each side of the tank. Make sure that it is properly seated in place. LATCH How to upright position and replace upper clean solution tank. 8 Emptying recovery tank...
... removal, carpet material, and carpet type. To continue cleaning stairs or upholstery, replace hose as a dry vacuum cleaner. If cleaning stairs or upholstery, remove hose by first spraying it to be necessary if only high traffic areas are to a sink or drain. Rotate recovery tank latches outward (one on each side of the tank. Make sure that it is properly seated in place. LATCH How to upright position and replace upper clean solution tank. 8 Emptying recovery tank...
Manual
Page 9
... the recovery tank lid.) When finished cleaning, follow "After cleaning" instructions on the traffic areas. If desired, vacuum thoroughly after it . Pour one area. Do not use more than 4 wet strokes over one to remove nozzle cover. For heavily soiled areas, repeat. If a spot is left, the stair/upholstery nozzle is generally more dry strokes. (Continue using hot tap water with your 'SteamVac' deep cleaner. Do not use only the floor nozzle with solution (dry...
... the recovery tank lid.) When finished cleaning, follow "After cleaning" instructions on the traffic areas. If desired, vacuum thoroughly after it . Pour one area. Do not use more than 4 wet strokes over one to remove nozzle cover. For heavily soiled areas, repeat. If a spot is left, the stair/upholstery nozzle is generally more dry strokes. (Continue using hot tap water with your 'SteamVac' deep cleaner. Do not use only the floor nozzle with solution (dry...
Manual
Page 10
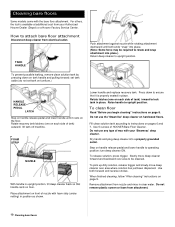
... attachment. 10 Cleaning bare floors Do not remove plastic screen or foam from electrical outlet. To clean floor Read "Before you begin cleaning" instructions on page 9. Do not use the 'SteamVac' deep cleaner on the floor. Use both ends "snap" into place. (Note: Some force may be cleaned. How to upright position. Rotate recovery tank latches (one on pages 6 and 7. Raise handle to instructions on each side of tank) outward; To prevent possible leaking, remove clean solution tank...
... attachment. 10 Cleaning bare floors Do not remove plastic screen or foam from electrical outlet. To clean floor Read "Before you begin cleaning" instructions on page 9. Do not use the 'SteamVac' deep cleaner on the floor. Use both ends "snap" into place. (Note: Some force may be cleaned. How to upright position. Rotate recovery tank latches (one on pages 6 and 7. Raise handle to instructions on each side of tank) outward; To prevent possible leaking, remove clean solution tank...
Manual
Page 11
... deep cleaner from storage rack. TAB CONVERTER LATCH Replace panel with a hose and stair/upholstery nozzle. Attach nozzle to ensure that the recovery tank lid is fully connected. tor until it is properly secured before cleaning. Using stair/upholstery nozzle 11 Press connector collar down onto tank. Using your thumb, push forward and up . Unlatch back part of hose by pulling tan collar toward tube. Press round solution tube connector onto round projection inside door. HANDLE...
... deep cleaner from storage rack. TAB CONVERTER LATCH Replace panel with a hose and stair/upholstery nozzle. Attach nozzle to ensure that the recovery tank lid is fully connected. tor until it is properly secured before cleaning. Using stair/upholstery nozzle 11 Press connector collar down onto tank. Using your thumb, push forward and up . Unlatch back part of hose by pulling tan collar toward tube. Press round solution tube connector onto round projection inside door. HANDLE...
Manual
Page 12
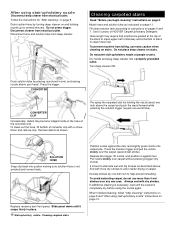
... trigger. Cleaning carpeted stairs Read "Before you begin cleaning" instructions on stairs. Press the trigger. Replace recovery tank front panel. To avoid saturating carpet, do not use extra caution when cleaning on pages 6 and 7. If additional cleaning is completely dry before using the nozzle again. Use 5 ounces of converter clip with a screw driver and remove clip. Do not place deep cleaner on page 8. To clean-out the hose, lift bottom of HOOVER Carpet/Upholstery Detergent. Slide panel down...
... trigger. Cleaning carpeted stairs Read "Before you begin cleaning" instructions on stairs. Press the trigger. Replace recovery tank front panel. To avoid saturating carpet, do not use extra caution when cleaning on pages 6 and 7. If additional cleaning is completely dry before using the nozzle again. Use 5 ounces of converter clip with a screw driver and remove clip. Do not place deep cleaner on page 8. To clean-out the hose, lift bottom of HOOVER Carpet/Upholstery Detergent. Slide panel down...
Manual
Page 13
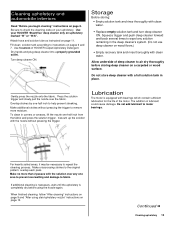
... solution trigger. When finished cleaning, follow "After cleaning" instructions on page 9 and "After using the nozzle again. Make additional strokes without pressing the trigger. Vacuum up the solution with clean water. • Replace empty solution tank and turn deep cleaner ON. Do not add lubricant to check the cleaning code on pages 6 and 7. Cleaning upholstery and automobile interiors Read "Before you begin cleaning" instructions on page 11. Be sure to motor bearings. Attach hose and solution tube as instructed...
... solution trigger. When finished cleaning, follow "After cleaning" instructions on page 9 and "After using the nozzle again. Make additional strokes without pressing the trigger. Vacuum up the solution with clean water. • Replace empty solution tank and turn deep cleaner ON. Do not add lubricant to check the cleaning code on pages 6 and 7. Cleaning upholstery and automobile interiors Read "Before you begin cleaning" instructions on page 11. Be sure to motor bearings. Attach hose and solution tube as instructed...
Manual
Page 14
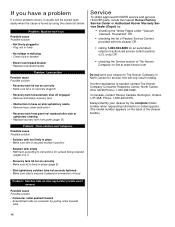
... model number when requesting information or ordering parts. (The model number appears on the back of the cleaner handle.) Problem: Solution tube on stair/upyholstery nozzle won't connect Possible cause Possible solution • Connector collar pushed forward • Extend black tabs on connector by pulling collar towards tube 14 clear obstruction • Recovery tank front panel not replaced after stair or upholstery cleaning • Replace recovery tank front panel (page 12) Problem: Clean solution won't dispense Possible cause Possible solution • Solution tank...
... model number when requesting information or ordering parts. (The model number appears on the back of the cleaner handle.) Problem: Solution tube on stair/upyholstery nozzle won't connect Possible cause Possible solution • Connector collar pushed forward • Extend black tabs on connector by pulling collar towards tube 14 clear obstruction • Recovery tank front panel not replaced after stair or upholstery cleaning • Replace recovery tank front panel (page 12) Problem: Clean solution won't dispense Possible cause Possible solution • Solution tank...


