
Manual
Page 1
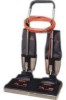
™ ™ ® ENGLISH § pp. 1-17 ESPAÑOL § pág. 18-27 FRANÇAIS § p. 28-37 Deep Cleaner The Easy to Use Deep Cleaner SteamVac™ Dual V™ Deep Cleaner cleans carpet fibers by applying hot tap water and cleaning solution. www.hoover.com
™ ™ ® ENGLISH § pp. 1-17 ESPAÑOL § pág. 18-27 FRANÇAIS § p. 28-37 Deep Cleaner The Easy to Use Deep Cleaner SteamVac™ Dual V™ Deep Cleaner cleans carpet fibers by applying hot tap water and cleaning solution. www.hoover.com

Manual
Page 2
... the powered hand tool. • Always disconnect cord from electrical outlet before servicing the deep cleaner. • Do not unplug by the Canadian Electrical Code. Keep cord away from openings and moving parts. • Do not put any other cleaners out of dust, lint, hair, and anything that accepts the machine plug. • Unplug deep cleaner when not in the instructions. • Use only commercially available Hoover SteamVac™ cleaners intended for electrical...
... the powered hand tool. • Always disconnect cord from electrical outlet before servicing the deep cleaner. • Do not unplug by the Canadian Electrical Code. Keep cord away from openings and moving parts. • Do not put any other cleaners out of dust, lint, hair, and anything that accepts the machine plug. • Unplug deep cleaner when not in the instructions. • Use only commercially available Hoover SteamVac™ cleaners intended for electrical...

Manual
Page 3
... serial numbers are included with your model may be purchased separately using the order form located at www.hoover.com. Contents Important safeguards 2 Parts needed for choosing a HOOVER product. Assembly Parts needed for assembly 3 Assembling deep cleaner 4-6 Deep cleaner description 7 General operation 7-9 Filling the clean water tank . . . 8-9 Emptying the recovery tank . . . . 9 Brush speed selector 8 Automatic shut-off 8 How to use Before you begin 10 After cleaning 10-11 Cleaning carpet 11 Cleaning bare floors 12 Using the tools 12-15 Cleaning carpeted...
... serial numbers are included with your model may be purchased separately using the order form located at www.hoover.com. Contents Important safeguards 2 Parts needed for choosing a HOOVER product. Assembly Parts needed for assembly 3 Assembling deep cleaner 4-6 Deep cleaner description 7 General operation 7-9 Filling the clean water tank . . . 8-9 Emptying the recovery tank . . . . 9 Brush speed selector 8 Automatic shut-off 8 How to use Before you begin 10 After cleaning 10-11 Cleaning carpet 11 Cleaning bare floors 12 Using the tools 12-15 Cleaning carpeted...

Manual
Page 4
... a Phillips screw driver. Place nuts in the lower handle. 1-4 1-5 1-6 D With cord hook (D) to the tools and hose, or if the tools are needed on the caddy. Attach hose/tool caddy The hose/tool caddy is designed to Fig. 1-10 for storage. Model with SpinScrub™ hand tool is shown. 1-3 C B A Attach upper handle Remove clean water tank (upper tank) from the front of the handle) with assembly of your convenience. The assembled cleaner will not...
... a Phillips screw driver. Place nuts in the lower handle. 1-4 1-5 1-6 D With cord hook (D) to the tools and hose, or if the tools are needed on the caddy. Attach hose/tool caddy The hose/tool caddy is designed to Fig. 1-10 for storage. Model with SpinScrub™ hand tool is shown. 1-3 C B A Attach upper handle Remove clean water tank (upper tank) from the front of the handle) with assembly of your convenience. The assembled cleaner will not...

Manual
Page 5
... cleaner) through "loop" on hose connector into place. To remove the bag before storing hose. Bring hose up and over top of cleaner and press into caddy. Snap tab (M) on caddy. Press solution tube (J) into opposite side of clip. 1-15 1-16 1-17 Insert top of bare floor tool (available at bottom of caddy again. J Identify the hose parts before using the tool, open tool door. 5 Loop hose...
... cleaner) through "loop" on hose connector into place. To remove the bag before storing hose. Bring hose up and over top of cleaner and press into caddy. Snap tab (M) on caddy. Press solution tube (J) into opposite side of clip. 1-15 1-16 1-17 Insert top of bare floor tool (available at bottom of caddy again. J Identify the hose parts before using the tool, open tool door. 5 Loop hose...

Manual
Page 6
How to snap free if it is pushed open too far. To reattach, align hinges of cover with a breakaway feature which allows it to reattach tool cover The tool cover is designed with holes on sides of tool storage area. To reposition the tool, reverse this procedure. Snap door into place. 6 1-18 1-19 Pull tool down and outward.
How to snap free if it is pushed open too far. To reattach, align hinges of cover with a breakaway feature which allows it to reattach tool cover The tool cover is designed with holes on sides of tool storage area. To reposition the tool, reverse this procedure. Snap door into place. 6 1-18 1-19 Pull tool down and outward.

Manual
Page 7
.... 1. To turn cleaner ON, push switch down. Hand grip 2. Carrying handle 7. Detergent container 10. Hose connection port 17. Stair/upholstery nozzle 21. A Handle release pedal Step on wheels and push forward. 7 How to release cleaning solution 3. SpinScrub™ hand tool (not included with SpinScrub™ hand tool is intended for quick cord release 18. Recovery tank latches 13. Brush setting selector 14. Plug deep cleaner into a single position but "floats" to operating position. Handle does...
.... 1. To turn cleaner ON, push switch down. Hand grip 2. Carrying handle 7. Detergent container 10. Hose connection port 17. Stair/upholstery nozzle 21. A Handle release pedal Step on wheels and push forward. 7 How to release cleaning solution 3. SpinScrub™ hand tool (not included with SpinScrub™ hand tool is intended for quick cord release 18. Recovery tank latches 13. Brush setting selector 14. Plug deep cleaner into a single position but "floats" to operating position. Handle does...

Manual
Page 8
..., turn deep cleaner off the deep cleaner suction (suction will rise to use water only. To remove tank, press down on tank handle and pull forward. 8 Do not use . See "How to easily change from electrical outlet. It holds the detergent that mixes with detergent and water. Check clean water tank also; Slide selector button to clean the carpet or floor with the water. Set the switch to WASH to the desired setting before continuing use...
..., turn deep cleaner off the deep cleaner suction (suction will rise to use water only. To remove tank, press down on tank handle and pull forward. 8 Do not use . See "How to easily change from electrical outlet. It holds the detergent that mixes with detergent and water. Check clean water tank also; Slide selector button to clean the carpet or floor with the water. Set the switch to WASH to the desired setting before continuing use...
Manual
Page 9
... handle of tank. Lift lid off cleaner. set tank aside (do not set tank on the floor. Do not use with cold water for use any type of tank to a sink. To assure proper results, use Bare Floor Cleaner on tank handle and pulling forward; For Medical Information (U.S.) call a physician. Turn latches (one on each side of tank) inward to upright position and reposition upper clean water...
... handle of tank. Lift lid off cleaner. set tank aside (do not set tank on the floor. Do not use with cold water for use any type of tank to a sink. To assure proper results, use Bare Floor Cleaner on tank handle and pulling forward; For Medical Information (U.S.) call a physician. Turn latches (one on each side of tank) inward to upright position and reposition upper clean water...

Manual
Page 10
... bare floor surface or place waterproof material (e.g. For carpet, use . 3-1 c. If your model. e. Wet a white absorbent cloth with an agitator for colorfastness - Wait at additional cost if not included with the type of cleaner as a dry vacuum cleaner. Do not saturate carpet or upholstery with cleaning tool attachments. After cleaning a. b. If desired, vacuum thoroughly after carpet has completely dried. If surface has more than one color, check all carpets. Squeeze filter frame...
... bare floor surface or place waterproof material (e.g. For carpet, use . 3-1 c. If your model. e. Wet a white absorbent cloth with an agitator for colorfastness - Wait at additional cost if not included with the type of cleaner as a dry vacuum cleaner. Do not saturate carpet or upholstery with cleaning tool attachments. After cleaning a. b. If desired, vacuum thoroughly after carpet has completely dried. If surface has more than one color, check all carpets. Squeeze filter frame...

Manual
Page 11
... floor for cleaning. 3-3 3-4 BA Unplug deep cleaner from cleaner. Set Wash/Rinse switch to 2-15. 3. Keep nozzle flat on damp carpet, start at the end of the room farthest from the door or path to go on the floor. Note: To avoid saturating carpet, do not use more dry strokes. (Continue using dry strokes until little water is desired, set Wash/Rinse switch to upright position and replace clean water tank (Fig. 2-15). For best cleaning...
... floor for cleaning. 3-3 3-4 BA Unplug deep cleaner from cleaner. Set Wash/Rinse switch to 2-15. 3. Keep nozzle flat on damp carpet, start at the end of the room farthest from the door or path to go on the floor. Note: To avoid saturating carpet, do not use more dry strokes. (Continue using dry strokes until little water is desired, set Wash/Rinse switch to upright position and replace clean water tank (Fig. 2-15). For best cleaning...

Manual
Page 12
.... 3. Turn brushes ON for scrubbing or OFF if scrubbing is a loss in clear water. Turn cleaner ON. 7. Step on pages 9 & 10. When finished cleaning, follow "After cleaning" instructions on handle release pedal and lower handle to upright position. Make sure arrow on end of nozzle (D). F Plug solution tube firmly into a properly grounded outlet. 5. If rinsing the floor is not necessary, but will help remove detergent residue from attachment. Open hose connection...
.... 3. Turn brushes ON for scrubbing or OFF if scrubbing is a loss in clear water. Turn cleaner ON. 7. Step on pages 9 & 10. When finished cleaning, follow "After cleaning" instructions on handle release pedal and lower handle to upright position. Make sure arrow on end of nozzle (D). F Plug solution tube firmly into a properly grounded outlet. 5. If rinsing the floor is not necessary, but will help remove detergent residue from attachment. Open hose connection...

Manual
Page 13
... remove tool. After using tool Drain suction hose by placing round end in hard to reach areas on the latch (K) to the base. Press the trigger. Scrub module with your head. How to scrub stubborn areas such as scuff marks, dried spills, and in sink and raising nozzle above your cleaner. 1. Note: If may be used to attach tools 3-14 J K Unplug deep cleaner from electrical...
... remove tool. After using tool Drain suction hose by placing round end in hard to reach areas on the latch (K) to the base. Press the trigger. Scrub module with your head. How to scrub stubborn areas such as scuff marks, dried spills, and in sink and raising nozzle above your cleaner. 1. Note: If may be used to attach tools 3-14 J K Unplug deep cleaner from electrical...

Manual
Page 14
... and scrub area with dry strokes. Attach tool to alternate wet and dry strokes as shown. Do not place deep cleaner on page 9. 1. Release trigger at bottom of carpet. End with mild detergent. Agitator brushes will not rotate while handle is best to end of hose. 6. If no . 40308001. Fill clean water tank according to instructions for Figs. 2-9 to WASH. Attach hose and solution tube as described below. 1. Press...
... and scrub area with dry strokes. Attach tool to alternate wet and dry strokes as shown. Do not place deep cleaner on page 9. 1. Release trigger at bottom of carpet. End with mild detergent. Agitator brushes will not rotate while handle is best to end of hose. 6. If no . 40308001. Fill clean water tank according to instructions for Figs. 2-9 to WASH. Attach hose and solution tube as described below. 1. Press...

Manual
Page 15
... with HOOVER Carpet/Upholstery Detergent according to instructions for easy cleaning. If additional cleaning is equipped with slots (B) in corners or creases, lift the tool one area to check the cleaning code on pages 9 & 10 and "After using the tool again. 13. Dry hands and plug deep cleaner into place. 15 Set tanks aside. 4-1 With handle in upright position. Attach tool to the original pattern; To prevent possible leaking, remove clean water tank...
... with HOOVER Carpet/Upholstery Detergent according to instructions for easy cleaning. If additional cleaning is equipped with slots (B) in corners or creases, lift the tool one area to check the cleaning code on pages 9 & 10 and "After using the tool again. 13. Dry hands and plug deep cleaner into place. 15 Set tanks aside. 4-1 With handle in upright position. Attach tool to the original pattern; To prevent possible leaking, remove clean water tank...

Manual
Page 16
... filter screen on cap with tabs (C) in place Problem: Detergent won 't dispense Possible cause Possible solution • Clean water tank not firmly in place • Make sure tank is securely locked in warm water for at least 15 minutes. Replace on correctly • Make sure lid is found by using the check list below. The addition of deep cleaner to air dry...
... filter screen on cap with tabs (C) in place Problem: Detergent won 't dispense Possible cause Possible solution • Clean water tank not firmly in place • Make sure tank is securely locked in warm water for at least 15 minutes. Replace on correctly • Make sure lid is found by using the check list below. The addition of deep cleaner to air dry...
Manual
Page 17
... "Vacuum Cleaners - Household" OR • calling 1-800-944-9200 for warranty service, transportation will be obtained by : • checking the Service section of The Hoover Company on -line at www.hoover.com OR • checking the list of authorized service outlet locations (U.S. however, if you may also have other rights which covers the cost of parts only. Service To obtain approved HOOVER service and genuine HOOVER parts, locate the...
... "Vacuum Cleaners - Household" OR • calling 1-800-944-9200 for warranty service, transportation will be obtained by : • checking the Service section of The Hoover Company on -line at www.hoover.com OR • checking the list of authorized service outlet locations (U.S. however, if you may also have other rights which covers the cost of parts only. Service To obtain approved HOOVER service and genuine HOOVER parts, locate the...


