Product Manual
Page 7
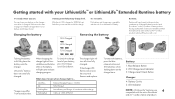
...an error has occurred. If using a LithiumLife™ battery model different than the battery that came with the entire FloorMate 4 and Air™ Cordless family of your battery, press the Charge Level Check Button. LED Charge Level Indicator 3. Charge Level Check Button Charger 4. LED Indicator NOTE... with your LithiumLife™ or LithiumLife™ Extended Runtime battery It's ready when you are compatible with your AirTM Cordless product, runtime differences will vary based on the particular combination of LithiumLife battery model and FloorMate or AirTM...
...an error has occurred. If using a LithiumLife™ battery model different than the battery that came with the entire FloorMate 4 and Air™ Cordless family of your battery, press the Charge Level Check Button. LED Charge Level Indicator 3. Charge Level Check Button Charger 4. LED Indicator NOTE... with your LithiumLife™ or LithiumLife™ Extended Runtime battery It's ready when you are compatible with your AirTM Cordless product, runtime differences will vary based on the particular combination of LithiumLife battery model and FloorMate or AirTM...
Product Manual
Page 8
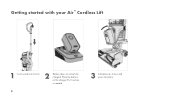
Getting started with your Air™ Cordless Lift 1 Insert wand until it clicks. 2 Battery does not come fully charged. Place the battery on the charger if full runtime is needed. 5 3 Set battery as shown and pivot into place.
Getting started with your Air™ Cordless Lift 1 Insert wand until it clicks. 2 Battery does not come fully charged. Place the battery on the charger if full runtime is needed. 5 3 Set battery as shown and pivot into place.

Product Manual
Page 9
... in injury or damage. Do not place vacuum on floor. For delicate or highly polished floors push here to remove the canister. CAUTION ! Using your Air™ Cordless Lift as it may result in upright position. 6 To avoid personal injury or damage, and to prevent the cleaner from falling, always place the...
... in injury or damage. Do not place vacuum on floor. For delicate or highly polished floors push here to remove the canister. CAUTION ! Using your Air™ Cordless Lift as it may result in upright position. 6 To avoid personal injury or damage, and to prevent the cleaner from falling, always place the...

Product Manual
Page 10
WARNING ! until canister clicks into place. The brushroll 5 Holding carry handle, align bottom of canister with docking tab on pg. 6. Always turn off this appliance before connecting or disconnecting the Canister or tools. 7 3 The canister is designed to release canister. 2 Pivot canister forward and lift off. ! Using your Air™ Cordless Lift as a canister 1 Grasp carry handle and press the button to be held by the carry handle or stand on its own. 4 Use Power & Boost buttons as described on button does not function upright base and pivot in canister mode.
WARNING ! until canister clicks into place. The brushroll 5 Holding carry handle, align bottom of canister with docking tab on pg. 6. Always turn off this appliance before connecting or disconnecting the Canister or tools. 7 3 The canister is designed to release canister. 2 Pivot canister forward and lift off. ! Using your Air™ Cordless Lift as a canister 1 Grasp carry handle and press the button to be held by the carry handle or stand on its own. 4 Use Power & Boost buttons as described on button does not function upright base and pivot in canister mode.
Product Manual
Page 11
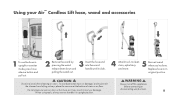
CAUTION ! Using your Air™ Cordless Lift hose, wand and accessories 1 To use the hose in upright position. 4 5 Attach tools to clean stairs, upholstery Reinsert wand when you're done. and ...
CAUTION ! Using your Air™ Cordless Lift hose, wand and accessories 1 To use the hose in upright position. 4 5 Attach tools to clean stairs, upholstery Reinsert wand when you're done. and ...
Product Manual
Page 12
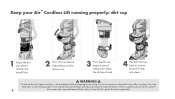
... pivot the dirt cup out. 3 Press the dirt cup empty button to release dirt. Do not lift dirt cup by filter housing handle. Keep your Air™ Cordless Lift running properly: dirt cup 1 Empty the dirt cup when it clicks into place. !
... pivot the dirt cup out. 3 Press the dirt cup empty button to release dirt. Do not lift dirt cup by filter housing handle. Keep your Air™ Cordless Lift running properly: dirt cup 1 Empty the dirt cup when it clicks into place. !

Product Manual
Page 13
Keep your Air™ Cordless Lift running properly: filters & core 1 The Air™ Cordless Lift is equipped with one filter. WARNING ! To reduce the risk of personal injury, remove battery before cleaning or servicing. 5 Slide the core out of the dirt cup. 10 dry for 2 minutes in clear warm water; Lift out filter assembly by the handle. 3 Pull the mesh tab to remove filter. 4 Rinse for 24 hours. ! Clean this filter every 4-6 uses. 2 Remove the dirt cup as shown on page 9.
Keep your Air™ Cordless Lift running properly: filters & core 1 The Air™ Cordless Lift is equipped with one filter. WARNING ! To reduce the risk of personal injury, remove battery before cleaning or servicing. 5 Slide the core out of the dirt cup. 10 dry for 2 minutes in clear warm water; Lift out filter assembly by the handle. 3 Pull the mesh tab to remove filter. 4 Rinse for 24 hours. ! Clean this filter every 4-6 uses. 2 Remove the dirt cup as shown on page 9.
Product Manual
Page 14
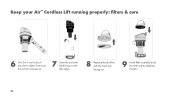
Keep your Air™ Cordless Lift running properly: filters & core 6 Use 2-in-1 tool to brush any dirt or debris from core. Do not turn vacuum on. 7 Insert the core into the dirt cup so the tabs align. 8 Replace the dry filter with the mesh tab facing out. 9 Insert filter assembly back into the core by aligning the tabs. 11
Keep your Air™ Cordless Lift running properly: filters & core 6 Use 2-in-1 tool to brush any dirt or debris from core. Do not turn vacuum on. 7 Insert the core into the dirt cup so the tabs align. 8 Replace the dry filter with the mesh tab facing out. 9 Insert filter assembly back into the core by aligning the tabs. 11
Product Manual
Page 15
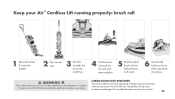
... which contain sufficient lubrication for their lifetime. WARNING ! The addition of personal injury: brush roll may suddenly restart if battery is in place. Keep your Air™ Cordless Lift running properly: brush roll 1 Remove battery & lower the handle. 2 Flip vacuum over. 3 Pull tabs towards the brush roll and lift up. 4 Pull the...
... which contain sufficient lubrication for their lifetime. WARNING ! The addition of personal injury: brush roll may suddenly restart if battery is in place. Keep your Air™ Cordless Lift running properly: brush roll 1 Remove battery & lower the handle. 2 Flip vacuum over. 3 Pull tabs towards the brush roll and lift up. 4 Pull the...
Product Manual
Page 18
...correct defects in the LithiumLife™ battery that came with the Owner's Guide, your Hoover® product and battery are to state. 15 SERVICE & WARRANTY FOR HOOVER® AIR™ CORDLESS LIFT PRODUCT & BATTERY SERVICE INFORMATION ANY SERVICING SHOULD BE DONE BY AN AUTHORIZED SERVICE .... ALL OTHER WARRANTIES, EXPRESSED OR IMPLIED, INCLUDING WARRANTIES OF MERCHANTABILITY OR FITNESS FOR PARTICULAR PURPOSE, ARE DISCLAIMED. Please call the Hoover® Services, (888) 679-2121, on the bottom of the charger and side of battery.) LIMITED FIVE YEAR WARRANTY (...
...correct defects in the LithiumLife™ battery that came with the Owner's Guide, your Hoover® product and battery are to state. 15 SERVICE & WARRANTY FOR HOOVER® AIR™ CORDLESS LIFT PRODUCT & BATTERY SERVICE INFORMATION ANY SERVICING SHOULD BE DONE BY AN AUTHORIZED SERVICE .... ALL OTHER WARRANTIES, EXPRESSED OR IMPLIED, INCLUDING WARRANTIES OF MERCHANTABILITY OR FITNESS FOR PARTICULAR PURPOSE, ARE DISCLAIMED. Please call the Hoover® Services, (888) 679-2121, on the bottom of the charger and side of battery.) LIMITED FIVE YEAR WARRANTY (...


