User Manual
Page 1
HONEYWELL TE831W-2 COMPLETE WIRELESS WEATHER STATION USER MANUAL TE831W-2
HONEYWELL TE831W-2 COMPLETE WIRELESS WEATHER STATION USER MANUAL TE831W-2
User Manual
Page 2
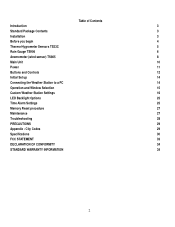
... TS906 6 Anemometer (wind sensor) TS805 8 Main Unit 10 Power 11 Buttons and Controls 12 Initial Set up 14 Connecting the Weather Station to a PC 14 Operation and Window Selection 15 Custom Weather Station Settings 16 LED Backlight Options 25 Time Alarm Settings 25 Memory Reset procedure 27 Maintenance 27 Troubleshooting 28 PRECAUTIONS 29 Appendix...
... TS906 6 Anemometer (wind sensor) TS805 8 Main Unit 10 Power 11 Buttons and Controls 12 Initial Set up 14 Connecting the Weather Station to a PC 14 Operation and Window Selection 15 Custom Weather Station Settings 16 LED Backlight Options 25 Time Alarm Settings 25 Memory Reset procedure 27 Maintenance 27 Troubleshooting 28 PRECAUTIONS 29 Appendix...

User Manual
Page 3
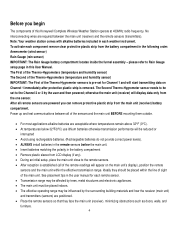
...no wire installation is transmitted to the main unit wirelessly, with the operating range up to 100 feet (30 meters). Installation The Honeywell Complete Wireless Weather Station operates at your immediate location. The remote weather sensors include (2) thermo-hygrometer (temperature and humidity) ...damaged, please contact Hideki Electronics Customer Service before proceeding with wrench tool One User Manual Required for selecting the Honeywell Complete Wireless Weather Station. It includes a wide range of each Three-Channel Temperature & Humidity Sensors (transmitter) (TS33C) One ...
...no wire installation is transmitted to the main unit wirelessly, with the operating range up to 100 feet (30 meters). Installation The Honeywell Complete Wireless Weather Station operates at your immediate location. The remote weather sensors include (2) thermo-hygrometer (temperature and humidity) ...damaged, please contact Hideki Electronics Customer Service before proceeding with wrench tool One User Manual Required for selecting the Honeywell Complete Wireless Weather Station. It includes a wide range of each Three-Channel Temperature & Humidity Sensors (transmitter) (TS33C) One ...
User Manual
Page 4
... transmitters (sensors) are positioned. • Place the remote sensors so that they should be placed within the effective transmission range. See placement tips in this Honeywell Complete Wireless Weather Station operate at 433MHz radio frequency. The First of the Thermo-Hygrometers (temperature and humidity sensor) The Second of the Thermo-Hygrometers (temperature and humidity sensor...
... transmitters (sensors) are positioned. • Place the remote sensors so that they should be placed within the effective transmission range. See placement tips in this Honeywell Complete Wireless Weather Station operate at 433MHz radio frequency. The First of the Thermo-Hygrometers (temperature and humidity sensor) The Second of the Thermo-Hygrometers (temperature and humidity sensor...
User Manual
Page 14
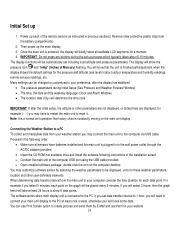
... USB cable provided. • Open installed software package: double-click the icon on the main unit display Connecting the Weather Station to a PC To collect and manipulate data from your weather station you will select 3 hours, then the graph trend will take at least once a week, otherwise your will know....( Remove clear protective plastic slips from the main unit to the PC. IMPORTANT: Do not press any buttons during Initial Setup (See Pressure and Weather Forecast Window) • The time, the date and the weekday language (Clock and Alarm Window) • The location data (City) will ...
... USB cable provided. • Open installed software package: double-click the icon on the main unit display Connecting the Weather Station to a PC To collect and manipulate data from your weather station you will select 3 hours, then the graph trend will take at least once a week, otherwise your will know....( Remove clear protective plastic slips from the main unit to the PC. IMPORTANT: Do not press any buttons during Initial Setup (See Pressure and Weather Forecast Window) • The time, the date and the weekday language (Clock and Alarm Window) • The location data (City) will ...
User Manual
Page 15
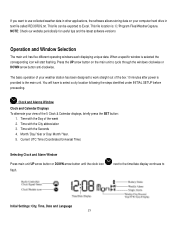
... 5. This file can be exported to Initial Settings: City, Time, Date and Language 15 Clock and Alarms Window Clock and Calendar Displays To alternate your weather station has been designed to work straight out of the box 10 minutes after power is provided to the main unit. Time with the City abbreviation...Clock and Alarm Window Press main unit UP arrow button or DOWN arrow button until the clock icon flash. If you want to use collected weather data in other applications, the software allows storing data on the main unit to cycle through the windows clockwise or DOWN arrow button anti-...
... 5. This file can be exported to Initial Settings: City, Time, Date and Language 15 Clock and Alarms Window Clock and Calendar Displays To alternate your weather station has been designed to work straight out of the box 10 minutes after power is provided to the main unit. Time with the City abbreviation...Clock and Alarm Window Press main unit UP arrow button or DOWN arrow button until the clock icon flash. If you want to use collected weather data in other applications, the software allows storing data on the main unit to cycle through the windows clockwise or DOWN arrow button anti-...
User Manual
Page 16
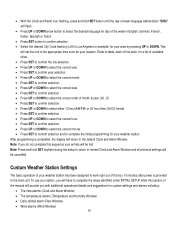
... or DOWN to select the correct order of the box 10 minutes after power is completed, the display will return to the default Clock and Alarm Window. Custom Weather Station Settings The basic operation of your weather station has been designed to work right out of month & year. (M...D) • Press...confirm selection. • Press UP or DOWN to select the correct minute. • Press SET to confirm selection and to complete the initial programming for your weather station. • With the Clock and Alarm icon flashing, press and hold SET anytime during the setup to return to normal ...
... or DOWN to select the correct order of the box 10 minutes after power is completed, the display will return to the default Clock and Alarm Window. Custom Weather Station Settings The basic operation of your weather station has been designed to work right out of month & year. (M...D) • Press...confirm selection. • Press UP or DOWN to select the correct minute. • Press SET to confirm selection and to complete the initial programming for your weather station. • With the Clock and Alarm icon flashing, press and hold SET anytime during the setup to return to normal ...
User Manual
Page 17
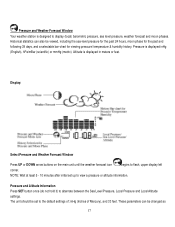
... and Local Altitude settings. Display: Select Pressure and Weather Forecast Window Press UP or DOWN arrow buttons on the main unit until the weather forecast icon begins to the default settings of: inHg (Inches of Mercury), and 33 feet. Pressure and Weather Forecast Window Your weather station is designed to display (local) barometric pressure, sea...
... and Local Altitude settings. Display: Select Pressure and Weather Forecast Window Press UP or DOWN arrow buttons on the main unit until the weather forecast icon begins to the default settings of: inHg (Inches of Mercury), and 33 feet. Pressure and Weather Forecast Window Your weather station is designed to display (local) barometric pressure, sea...

User Manual
Page 18
...to know pressure changes at your specific location (house), the LOCAL barometric pressure should be modified after the display has stabilized Select the Pressure and Weather Forecast window by pressing the UP or DOWN buttons to confirm your altitude with the word "SEA LEVEL" is displayed. • Press and ... icon starts flashing. If you adjust sea level pressure, it will not operate. Changing Pressure and Altitude Parameters The weather station is flashing, inHg, mmHg or hPa/mBar • Set the pressure units by pressing the UP or DOWN arrow buttons • Press MEMORY ...
...to know pressure changes at your specific location (house), the LOCAL barometric pressure should be modified after the display has stabilized Select the Pressure and Weather Forecast window by pressing the UP or DOWN buttons to confirm your altitude with the word "SEA LEVEL" is displayed. • Press and ... icon starts flashing. If you adjust sea level pressure, it will not operate. Changing Pressure and Altitude Parameters The weather station is flashing, inHg, mmHg or hPa/mBar • Set the pressure units by pressing the UP or DOWN arrow buttons • Press MEMORY ...
User Manual
Page 20
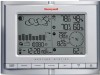
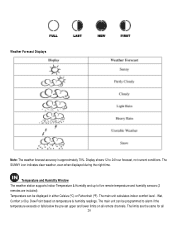
The SUNNY icon indicates clear weather, even when displayed during the night-time. The main unit can be programmed to alarm if the temperature exceeds or falls below the pre-set ... 20 Wet, Comfort or Dry. Temperature can be displayed in either Celsius (ºC) or Fahrenheit (ºF). The limits are included). Temperature and Humidity Window The weather station supports Indoor Temperature & Humidity and up to 24 hour forecast, not current conditions. Display shows 12 to five remote temperature and humidity sensors (2 remotes are...
The SUNNY icon indicates clear weather, even when displayed during the night-time. The main unit can be programmed to alarm if the temperature exceeds or falls below the pre-set ... 20 Wet, Comfort or Dry. Temperature can be displayed in either Celsius (ºC) or Fahrenheit (ºF). The limits are included). Temperature and Humidity Window The weather station supports Indoor Temperature & Humidity and up to 24 hour forecast, not current conditions. Display shows 12 to five remote temperature and humidity sensors (2 remotes are...

User Manual
Page 29
... in this does not work, check the wireless transmission path from wireless devices such as metal surfaces, concrete walls or dense vegetation, are in the path of the remote sensors. If this manual. A: Weather forecast predicts the weather for the next 12 to improve reception. The... electronic circuits. • Do not subject the product to give you years of -sight with the product's internal components. Q: "My weather station readings are in question, check the sensor placement tips included in malfunctions, shorter lifespan, damaged batteries, and damaged parts. • Do ...
... in this does not work, check the wireless transmission path from wireless devices such as metal surfaces, concrete walls or dense vegetation, are in the path of the remote sensors. If this manual. A: Weather forecast predicts the weather for the next 12 to improve reception. The... electronic circuits. • Do not subject the product to give you years of -sight with the product's internal components. Q: "My weather station readings are in question, check the sensor placement tips included in malfunctions, shorter lifespan, damaged batteries, and damaged parts. • Do ...
User Manual
Page 34
...following two conditions: This device may be possible, contact Hideki Customer Service for proof of the original purchase. The Honeywell Trademark is not to our Company website at: www.honeywellweatherstations.com. Copyright (2008) Hideki Electronics Inc. Please ... Honeywell International Inc. Please retain your product, go to be refused. Should you may not cause harmful interference. Address: 7865 SW Mohawk, Tualatin, OR 97062 Telephone No.: 1-503-612-8395 declare that the product Product No.: TE831W-2 Product Name: Complete Wireless Weather Station Manufacturer...
...following two conditions: This device may be possible, contact Hideki Customer Service for proof of the original purchase. The Honeywell Trademark is not to our Company website at: www.honeywellweatherstations.com. Copyright (2008) Hideki Electronics Inc. Please ... Honeywell International Inc. Please retain your product, go to be refused. Should you may not cause harmful interference. Address: 7865 SW Mohawk, Tualatin, OR 97062 Telephone No.: 1-503-612-8395 declare that the product Product No.: TE831W-2 Product Name: Complete Wireless Weather Station Manufacturer...


