Owner's Manual
Page 2
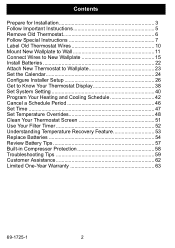
... 10 Mount New Wallplate to Wall 11 Connect Wires to New Wallplate 15 Install Batteries 22 Attach New Thermostat to Wallplate 23 Set the Calendar 24 Configure Installer Setup 26 Get to Know Your Thermostat Display 38 Set System Setting 40 Program Your Heating and Cooling Schedule 42 Cancel a... Schedule Period 46 Set Time 47 Set Temperature Overrides 48 Clean Your Thermostat Screen 51 Use Your Filter Timer ...
... 10 Mount New Wallplate to Wall 11 Connect Wires to New Wallplate 15 Install Batteries 22 Attach New Thermostat to Wallplate 23 Set the Calendar 24 Configure Installer Setup 26 Get to Know Your Thermostat Display 38 Set System Setting 40 Program Your Heating and Cooling Schedule 42 Cancel a... Schedule Period 46 Set Time 47 Set Temperature Overrides 48 Clean Your Thermostat Screen 51 Use Your Filter Timer ...
Owner's Manual
Page 3
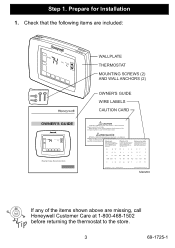
... any of the corresponding letter on your new thermostat or base. Check that the following items are missing, call Honeywell Customer Care at the fuse/circuit breaker panel before returning the thermostat to the store. 3 69-1725-1 Prepare for Installation 1. Match the letter of your old thermostat wire with the terminal of the items shown...
... any of the corresponding letter on your new thermostat or base. Check that the following items are missing, call Honeywell Customer Care at the fuse/circuit breaker panel before returning the thermostat to the store. 3 69-1725-1 Prepare for Installation 1. Match the letter of your old thermostat wire with the terminal of the items shown...

Owner's Manual
Page 4
Prepare for drywall; use 7/32 in . use 3/16 in . Step 1. for Installation (Cont) 2. for the installation: • Three AAA alkaline batteries • No. 2 Phillips screwdriver and standard pocket screwdriver • Drill • Drill bit - Check that you have everything required for plaster • Level (optional) • Hammer • Pencil • Electrical tape 69-1725-1 4
Prepare for drywall; use 7/32 in . use 3/16 in . Step 1. for Installation (Cont) 2. for the installation: • Three AAA alkaline batteries • No. 2 Phillips screwdriver and standard pocket screwdriver • Drill • Drill bit - Check that you have everything required for plaster • Level (optional) • Hammer • Pencil • Electrical tape 69-1725-1 4

Owner's Manual
Page 5
DO NOT WIRE NEW THERMOSTAT BASED ON WIRE COLOR. These Installation Instructions explain later how to use the enclosed wire labels to correctly mark the wires connected to the heating and/or cooling system. Do not connect the wires to the new thermostat based on wire color because damage can occur to your old thermostat. M22034 5 69-1725-1 Follow Important Instructions 1. Step 2. OLD THERMOSTAT YELLOW WHITE Y W RED G GREEN RC R ORANGE !
DO NOT WIRE NEW THERMOSTAT BASED ON WIRE COLOR. These Installation Instructions explain later how to use the enclosed wire labels to correctly mark the wires connected to the heating and/or cooling system. Do not connect the wires to the new thermostat based on wire color because damage can occur to your old thermostat. M22034 5 69-1725-1 Follow Important Instructions 1. Step 2. OLD THERMOSTAT YELLOW WHITE Y W RED G GREEN RC R ORANGE !
Owner's Manual
Page 22
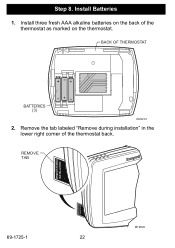
Install three fresh AAA alkaline batteries on the back of the thermostat back. REMOVE TAB REMOVE DURING INSTALLATION REMOVE DURING INSTALLATION 69-1725-1 M19920 22 Remove the tab labeled "Remove during installation" in the lower right corner of the thermostat as marked on the thermostat. BACK OF THERMOSTAT ++ + BATTERIES (3) M22212 2. Install Batteries 1. Step 8.
Install three fresh AAA alkaline batteries on the back of the thermostat back. REMOVE TAB REMOVE DURING INSTALLATION REMOVE DURING INSTALLATION 69-1725-1 M19920 22 Remove the tab labeled "Remove during installation" in the lower right corner of the thermostat as marked on the thermostat. BACK OF THERMOSTAT ++ + BATTERIES (3) M22212 2. Install Batteries 1. Step 8.

Owner's Manual
Page 24
Press the Done key. See Step 11, Configure Installer Setup, for up to ten years, under normal use, once the calendar is ready to set any time. Use the arrow keys to automatically keep current time and day in memory for instructions. 69-1725-1 24 Set the Calendar This thermostat is designed to set . When the thermostat is first powered, the display is set the year, month and day. 2. Step 10. SET CURRENT DATE SET MONTH MON TUE WED THU FRI DONE USE ARROWS TO SET YEAR M22226 The calendar can be set the calendar. 1.
Press the Done key. See Step 11, Configure Installer Setup, for up to ten years, under normal use, once the calendar is ready to set any time. Use the arrow keys to automatically keep current time and day in memory for instructions. 69-1725-1 24 Set the Calendar This thermostat is designed to set . When the thermostat is first powered, the display is set the year, month and day. 2. Step 10. SET CURRENT DATE SET MONTH MON TUE WED THU FRI DONE USE ARROWS TO SET YEAR M22226 The calendar can be set the calendar. 1.
Owner's Manual
Page 26
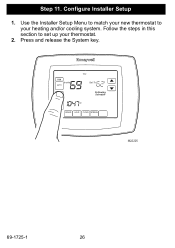
Press and release the System key. Use the Installer Setup Menu to match your new thermostat to set up your heating and/or cooling system. Follow the steps in this section to your thermostat. 2. FAN ON Inside AUTO THU Set To SYSTEM EM HEAT OFF COOL Following Schedule AM SCHED HOLD CLOCK SCREEN M22225 69-1725-1 26 Configure Installer Setup 1. Step 11.
Press and release the System key. Use the Installer Setup Menu to match your new thermostat to set up your heating and/or cooling system. Follow the steps in this section to your thermostat. 2. FAN ON Inside AUTO THU Set To SYSTEM EM HEAT OFF COOL Following Schedule AM SCHED HOLD CLOCK SCREEN M22225 69-1725-1 26 Configure Installer Setup 1. Step 11.
Owner's Manual
Page 27
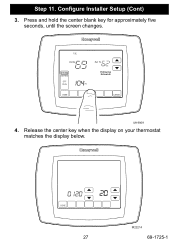
Release the center key when the display on your thermostat matches the display below. MON WED THU FRI SAT SUN DONE 27 M22214 69-1725-1 Step 11. TUE CHANGE FILTER UV LAMP HUMIDIFIER PAD Inside Set To SYSTEM EM HEAT OFF COOL Following Schedule PM DONE CANCEL M19969 4. Press and hold the center blank key for approximately five seconds, until the screen changes. Configure Installer Setup (Cont) 3.
Release the center key when the display on your thermostat matches the display below. MON WED THU FRI SAT SUN DONE 27 M22214 69-1725-1 Step 11. TUE CHANGE FILTER UV LAMP HUMIDIFIER PAD Inside Set To SYSTEM EM HEAT OFF COOL Following Schedule PM DONE CANCEL M19969 4. Press and hold the center blank key for approximately five seconds, until the screen changes. Configure Installer Setup (Cont) 3.
Owner's Manual
Page 28
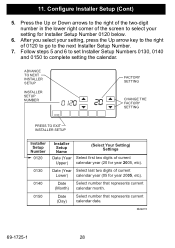
...Day) Select number that represents current (Month) calendar month. Follow steps 5 and 6 to set Installer Setup Numbers 0130, 0140 and 0150 to the next Installer Setup Number. 7. After you select your setting for Installer Setup Number 0120 below. 6. Date Select number that represents current calendar date. Configure Installer...M22215 69-1725-1 28 11. ADVANCE TO NEXT INSTALLER SETUP INSTALLER SETUP NUMBER DONE PRESS TO EXIT INSTALLER SETUP FACTORY SETTING CHANGE THE FACTORY SETTING Installer Setup Number 0120 0130 0140 0150 Installer Setup Name Date (Year Upper) (Select Your ...
...Day) Select number that represents current (Month) calendar month. Follow steps 5 and 6 to set Installer Setup Numbers 0130, 0140 and 0150 to the next Installer Setup Number. 7. After you select your setting for Installer Setup Number 0120 below. 6. Date Select number that represents current calendar date. Configure Installer...M22215 69-1725-1 28 11. ADVANCE TO NEXT INSTALLER SETUP INSTALLER SETUP NUMBER DONE PRESS TO EXIT INSTALLER SETUP FACTORY SETTING CHANGE THE FACTORY SETTING Installer Setup Number 0120 0130 0140 0150 Installer Setup Name Date (Year Upper) (Select Your ...
Owner's Manual
Page 29
...). 9 - Gas, oil or electric heating with fan (Conventional) -- Gas or Oil hot water heat with three wires connected to new thermostat or for Installer Setup Number 0170. 9. Multistage Conventional Heating and Cooling -2 stages of Heat (wires on W and W2) and 2 stages of Cool (wires ...on new thermostat. 6 - UP ARROW INSTALLER SETUP NUMBER PRESS TO EXIT INSTALLER SETUP DONE SETTING UP ARROW DOWN ARROW Installer Setup Number 0170 Installer Setup Name System Type Selection (Select Your Setting) Settings 1 - Single-stage Heat Pump...
...). 9 - Gas, oil or electric heating with fan (Conventional) -- Gas or Oil hot water heat with three wires connected to new thermostat or for Installer Setup Number 0170. 9. Multistage Conventional Heating and Cooling -2 stages of Heat (wires on W and W2) and 2 stages of Cool (wires ...on new thermostat. 6 - UP ARROW INSTALLER SETUP NUMBER PRESS TO EXIT INSTALLER SETUP DONE SETTING UP ARROW DOWN ARROW Installer Setup Number 0170 Installer Setup Name System Type Selection (Select Your Setting) Settings 1 - Single-stage Heat Pump...

Owner's Manual
Page 30
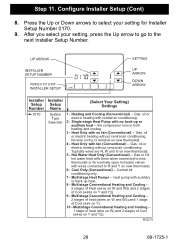
...side of your display, press the Up or Down arrow to select your setting, press the Up arrow key to go to the next Installer Setup Number. M22217 69-1725-1 30 Electric Heat -- Step 11. After you do not have a number 0180 on the left side of... for heat. Gas or Oil Heat -- Thermostat controls fan in a call for heat. 1 - If you select your setting for Installer Setup Number 0180. 12. UP ARROW SETTING INSTALLER SETUP NUMBER DONE PRESS TO EXIT INSTALLER SETUP UP ARROW DOWN ARROW Installer Setup Number 0180 Installer Setup Name (Select Your Setting) Settings Fan...
...side of your display, press the Up or Down arrow to select your setting, press the Up arrow key to go to the next Installer Setup Number. M22217 69-1725-1 30 Electric Heat -- Step 11. After you do not have a number 0180 on the left side of... for heat. Gas or Oil Heat -- Thermostat controls fan in a call for heat. 1 - If you select your setting for Installer Setup Number 0180. 12. UP ARROW SETTING INSTALLER SETUP NUMBER DONE PRESS TO EXIT INSTALLER SETUP UP ARROW DOWN ARROW Installer Setup Number 0180 Installer Setup Name (Select Your Setting) Settings Fan...

Owner's Manual
Page 31
... Use this setting if you connected a wire labeled B to the O/B terminal. 1 - Use this setting if you select your display, go to select your setting for Installer Setup Number 0190. 15. M22228 31 69-1725-1 After you connected a Valve wire labeled O to the O/B terminal. Changeover Valve in Cooling -- Changeover Valve in Heating... (Cont) 13. If you have a number 0190 on the left side of your display, press the Up or Down arrow to the next Installer Setup Number. If you do not have a number 0190 on the left side of your setting, press the Up arrow key to go to the ...
... Use this setting if you connected a wire labeled B to the O/B terminal. 1 - Use this setting if you select your display, go to select your setting for Installer Setup Number 0190. 15. M22228 31 69-1725-1 After you connected a Valve wire labeled O to the O/B terminal. Changeover Valve in Cooling -- Changeover Valve in Heating... (Cont) 13. If you have a number 0190 on the left side of your display, press the Up or Down arrow to the next Installer Setup Number. If you do not have a number 0190 on the left side of your setting, press the Up arrow key to go to the ...
Owner's Manual
Page 32
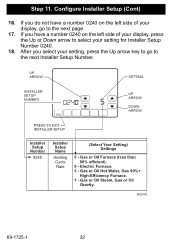
... left side of your display, press the Up or Down arrow to select your setting, press the Up arrow key to go to the next Installer Setup Number. Gas or Oil Hot Water, Gas 90%+ High-Efficiency Furnace. 1 - After you do not have a number 0240 on the ... Gas or Oil Gravity. Gas or Oil Furnace (less than 90% efficient). 9 - Configure Installer Setup (Cont) 16. UP ARROW SETTING INSTALLER SETUP NUMBER DONE PRESS TO EXIT INSTALLER SETUP UP ARROW DOWN ARROW Installer Setup Number 0240 Installer Setup Name Heating Cycle Rate (Select Your Setting) Settings 5 - M22342 69-1725-1 32 Step...
... left side of your display, press the Up or Down arrow to select your setting, press the Up arrow key to go to the next Installer Setup Number. Gas or Oil Hot Water, Gas 90%+ High-Efficiency Furnace. 1 - After you do not have a number 0240 on the ... Gas or Oil Gravity. Gas or Oil Furnace (less than 90% efficient). 9 - Configure Installer Setup (Cont) 16. UP ARROW SETTING INSTALLER SETUP NUMBER DONE PRESS TO EXIT INSTALLER SETUP UP ARROW DOWN ARROW Installer Setup Number 0240 Installer Setup Name Heating Cycle Rate (Select Your Setting) Settings 5 - M22342 69-1725-1 32 Step...

Owner's Manual
Page 33
Step 11. UP ARROW SETTING INSTALLER SETUP NUMBER DONE PRESS TO EXIT INSTALLER SETUP UP ARROW DOWN ARROW Installer Setup Number Installer Setup Name (Select Your Setting) Settings 0320 Temperature 0 - Press the Up or Down arrow to the next Installer Setup Number. After you select your setting, press the Up arrow to go to select your setting for Installer Setup Number 0320. 20. Celsius Temperature Display. Configure Installer Setup (Cont) 19. Indication 1 - Scale M22218 33 69-1725-1 Fahrenheit Temperature Display.
Step 11. UP ARROW SETTING INSTALLER SETUP NUMBER DONE PRESS TO EXIT INSTALLER SETUP UP ARROW DOWN ARROW Installer Setup Number Installer Setup Name (Select Your Setting) Settings 0320 Temperature 0 - Press the Up or Down arrow to the next Installer Setup Number. After you select your setting, press the Up arrow to go to select your setting for Installer Setup Number 0320. 20. Celsius Temperature Display. Configure Installer Setup (Cont) 19. Indication 1 - Scale M22218 33 69-1725-1 Fahrenheit Temperature Display.

Owner's Manual
Page 34
... your setting, press the Up arrow to go to select your setting for Daylight Savings Time. 1 - UP ARROW SETTING INSTALLER SETUP NUMBER DONE PRESS TO EXIT INSTALLER SETUP UP ARROW DOWN ARROW Installer Setup Number 0330 Installer Setup Name Daylight Savings (Select Your Setting) Settings 0 - Daylight Savings is Off -- clock will not adjust for...
... your setting, press the Up arrow to go to select your setting for Daylight Savings Time. 1 - UP ARROW SETTING INSTALLER SETUP NUMBER DONE PRESS TO EXIT INSTALLER SETUP UP ARROW DOWN ARROW Installer Setup Number 0330 Installer Setup Name Daylight Savings (Select Your Setting) Settings 0 - Daylight Savings is Off -- clock will not adjust for...

Owner's Manual
Page 35
... arrow to select your setting, press the Up arrow to go to the next Installer Setup Number. Configure Installer Setup (Cont) 23. After you select your setting for Installer Setup Number 0500. 24. Approximately 6 months -- Approximately 9 months -- based on 30 days of fan run time. 3 - Approximately 1 year -- Approximately 1 month -- Approximately 3 years -- M22220 35 69...
... arrow to select your setting, press the Up arrow to go to the next Installer Setup Number. Configure Installer Setup (Cont) 23. After you select your setting for Installer Setup Number 0500. 24. Approximately 6 months -- Approximately 9 months -- based on 30 days of fan run time. 3 - Approximately 1 year -- Approximately 1 month -- Approximately 3 years -- M22220 35 69...

Owner's Manual
Page 36
... period. Conventional recovery -- Step 11. M22221 69-1725-1 36 system starts recovery at programmed time. 1 - UP ARROW SETTING INSTALLER SETUP NUMBER DONE PRESS TO EXIT INSTALLER SETUP UP ARROW DOWN ARROW Installer Setup Number 0530 Installer Setup Name Adaptive Intelligent RecoveryTM (Select Your Setting) Settings 0 - Press the Up or Down arrow to select your...
... period. Conventional recovery -- Step 11. M22221 69-1725-1 36 system starts recovery at programmed time. 1 - UP ARROW SETTING INSTALLER SETUP NUMBER DONE PRESS TO EXIT INSTALLER SETUP UP ARROW DOWN ARROW Installer Setup Number 0530 Installer Setup Name Adaptive Intelligent RecoveryTM (Select Your Setting) Settings 0 - Press the Up or Down arrow to select your...

Owner's Manual
Page 37
Congratulations! M22222 37 69-1725-1 The installation of the thermostat is complete. After you select your setting, press the Done key to select your settings. 29. Press the Up or Down arrow to exit the Installer Setup and save your setting for Installer Setup Number 0640. 28. Configure Installer Setup (Cont) 27. UP ARROW SETTING INSTALLER SETUP NUMBER DONE PRESS TO EXIT INSTALLER SETUP UP ARROW DOWN ARROW Installer Setup Number 0640 Installer Setup Name Clock Format (Select Your Setting) Settings 12 - 12-hour clock format. 24 - 24-hour clock format. Step 11.
Congratulations! M22222 37 69-1725-1 The installation of the thermostat is complete. After you select your setting, press the Done key to select your settings. 29. Press the Up or Down arrow to exit the Installer Setup and save your setting for Installer Setup Number 0640. 28. Configure Installer Setup (Cont) 27. UP ARROW SETTING INSTALLER SETUP NUMBER DONE PRESS TO EXIT INSTALLER SETUP UP ARROW DOWN ARROW Installer Setup Number 0640 Installer Setup Name Clock Format (Select Your Setting) Settings 12 - 12-hour clock format. 24 - 24-hour clock format. Step 11.
Owner's Manual
Page 47
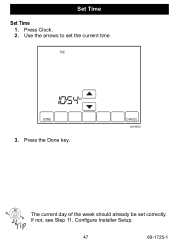
TUE AM DONE 3. If not, see Step 11, Configure Installer Setup. 47 69-1725-1 Press the Done key. CANCEL M19958 The current day of the week should already be set the current time. Set Time Set Time 1. Use the arrows to set correctly. Press Clock. 2.
TUE AM DONE 3. If not, see Step 11, Configure Installer Setup. 47 69-1725-1 Press the Done key. CANCEL M19958 The current day of the week should already be set the current time. Set Time Set Time 1. Use the arrows to set correctly. Press Clock. 2.

Owner's Manual
Page 52
Use Your Filter Timer The Filter Timer notifies you selected in the Installer Setup or the new reload value you when to change your furnace filter. "Change Filter" appears on the screen. 2. Use the Up or Down arrow ... timer expires. 2. Press the Reset key to reset the timer to the timer reload value. (This is the setting you set in step 2.) 5. See Configure Installer Setup Number 0500, for approximate calendar days. 3. Reset Filter Timer 1. Press the Done key to go back to change the number of run Time...
Use Your Filter Timer The Filter Timer notifies you selected in the Installer Setup or the new reload value you when to change your furnace filter. "Change Filter" appears on the screen. 2. Use the Up or Down arrow ... timer expires. 2. Press the Reset key to reset the timer to the timer reload value. (This is the setting you set in step 2.) 5. See Configure Installer Setup Number 0500, for approximate calendar days. 3. Reset Filter Timer 1. Press the Done key to go back to change the number of run Time...


