Owner's Manual
Page 1
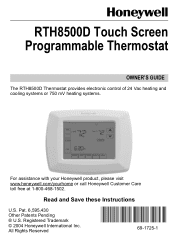
Pat. 6,595,430 Other Patents Pending ® U.S. All Rights Reserved 69-1725-1 Registered Trademark © 2004 Honeywell International Inc. RTH8500D Touch Screen Programmable Thermostat OWNER'S GUIDE The RTH8500D Thermostat provides electronic control of 24 Vac heating and cooling systems or 750 mV heating systems. For assistance with your Honeywell product, please visit www.honeywell.com/yourhome or call Honeywell Customer Care toll free at 1-800-468-1502. Read and Save these Instructions U.S.
Pat. 6,595,430 Other Patents Pending ® U.S. All Rights Reserved 69-1725-1 Registered Trademark © 2004 Honeywell International Inc. RTH8500D Touch Screen Programmable Thermostat OWNER'S GUIDE The RTH8500D Thermostat provides electronic control of 24 Vac heating and cooling systems or 750 mV heating systems. For assistance with your Honeywell product, please visit www.honeywell.com/yourhome or call Honeywell Customer Care toll free at 1-800-468-1502. Read and Save these Instructions U.S.
Owner's Manual
Page 2
...Important Instructions 5 Remove Old Thermostat 6 Follow Special Instructions 7 Label Old Thermostat Wires 10 Mount New Wallplate to Wall 11 Connect Wires to New Wallplate 15 Install Batteries 22 Attach New Thermostat to Wallplate 23 Set the Calendar 24 Configure Installer Setup 26 Get to Know Your Thermostat Display... Your Heating and Cooling Schedule 42 Cancel a Schedule Period 46 Set Time 47 Set Temperature Overrides 48 Clean Your Thermostat Screen 51 Use Your Filter Timer 52 Understanding Temperature Recovery Feature 53 Replace Batteries 54 Review Battery Tips 57 Built-...
...Important Instructions 5 Remove Old Thermostat 6 Follow Special Instructions 7 Label Old Thermostat Wires 10 Mount New Wallplate to Wall 11 Connect Wires to New Wallplate 15 Install Batteries 22 Attach New Thermostat to Wallplate 23 Set the Calendar 24 Configure Installer Setup 26 Get to Know Your Thermostat Display... Your Heating and Cooling Schedule 42 Cancel a Schedule Period 46 Set Time 47 Set Temperature Overrides 48 Clean Your Thermostat Screen 51 Use Your Filter Timer 52 Understanding Temperature Recovery Feature 53 Replace Batteries 54 Review Battery Tips 57 Built-...
Owner's Manual
Page 3
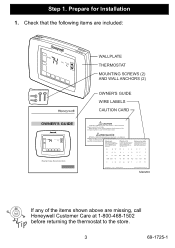
... Set To Read and save these instructions WALLPLATE THERMOSTAT MOUNTING SCREWS (2) AND WALL ANCHORS (2) OWNER'S GUIDE WIRE LABELS CAUTION CARD CAUTION TURN OFF POWER to the store. 3 69-1725-1 Step 1. Check that the following items are missing, call Honeywell Customer Care at the fuse/circuit breaker... panel before returning the thermostat to system at the furnace, or at 1-800-468-1502 before you begin.
... Set To Read and save these instructions WALLPLATE THERMOSTAT MOUNTING SCREWS (2) AND WALL ANCHORS (2) OWNER'S GUIDE WIRE LABELS CAUTION CARD CAUTION TURN OFF POWER to the store. 3 69-1725-1 Step 1. Check that the following items are missing, call Honeywell Customer Care at the fuse/circuit breaker... panel before returning the thermostat to system at the furnace, or at 1-800-468-1502 before you begin.

Owner's Manual
Page 5
Step 2. These Installation Instructions explain later how to use the enclosed wire labels to correctly mark the wires connected to the heating and/or cooling system. OLD THERMOSTAT YELLOW WHITE Y W RED G GREEN RC R ORANGE ! Do not connect the wires to the new thermostat based on wire color because damage can occur to your old thermostat. DO NOT WIRE NEW THERMOSTAT BASED ON WIRE COLOR. M22034 5 69-1725-1 Follow Important Instructions 1.
Step 2. These Installation Instructions explain later how to use the enclosed wire labels to correctly mark the wires connected to the heating and/or cooling system. OLD THERMOSTAT YELLOW WHITE Y W RED G GREEN RC R ORANGE ! Do not connect the wires to the new thermostat based on wire color because damage can occur to your old thermostat. DO NOT WIRE NEW THERMOSTAT BASED ON WIRE COLOR. M22034 5 69-1725-1 Follow Important Instructions 1.

Owner's Manual
Page 6
... panel. 2. Step 3. Remove the old thermostat from the old thermostat. 3. Remove the cover from the wall or wallplate. Y G C OLD THERMOSTAT WALLPLATE W THERMOSTAT R COVER .2.18 .9 .7 .5 L O .25 N GE R .4 .3 M22036 MERCURY NOTICE If you are replacing a thermostat that contains mercury in a sealed tube, do not place your local waste management authority for instructions regarding recycling and the proper disposal...
... panel. 2. Step 3. Remove the old thermostat from the old thermostat. 3. Remove the cover from the wall or wallplate. Y G C OLD THERMOSTAT WALLPLATE W THERMOSTAT R COVER .2.18 .9 .7 .5 L O .25 N GE R .4 .3 M22036 MERCURY NOTICE If you are replacing a thermostat that contains mercury in a sealed tube, do not place your local waste management authority for instructions regarding recycling and the proper disposal...

Owner's Manual
Page 7
If you have two C and/or C1 wires connected to your old thermostat, do not touch each C and/or C1 wire with electrical tape. OLD THERMOSTAT Y G C C W R LETTER DESIGNATION SCREW TERMINAL WIRE WIRE HOLE DO NOT CONNECT TO NEW THERMOSTAT M22201 7 69-1725-1 Follow Special Instructions 1. Make sure they do not connect them to your new thermostat. 2. Disconnect the C and/or C1 wires. Step 4. Wrap the bare end of each other or any other wires. 3.
If you have two C and/or C1 wires connected to your old thermostat, do not touch each C and/or C1 wire with electrical tape. OLD THERMOSTAT Y G C C W R LETTER DESIGNATION SCREW TERMINAL WIRE WIRE HOLE DO NOT CONNECT TO NEW THERMOSTAT M22201 7 69-1725-1 Follow Special Instructions 1. Make sure they do not connect them to your new thermostat. 2. Disconnect the C and/or C1 wires. Step 4. Wrap the bare end of each other or any other wires. 3.

Owner's Manual
Page 8
OLD THERMOSTAT Y G C W R LETTER DESIGNATION SCREW TERMINAL WIRE WIRE HOLE CONNECT TO THE "C" ON THE NEW THERMOSTAT M22223 69-1725-1 8 Follow Special Instructions (Cont) 4. If you have only one C and/or C1 wire connected to your old thermostat, connect this wire to the store. Visit www.honeywell.com/yourhome or call Honeywell Customer Care at 1-800-468-1502 before returning the thermostat to C on the new thermostat. Step 4.
OLD THERMOSTAT Y G C W R LETTER DESIGNATION SCREW TERMINAL WIRE WIRE HOLE CONNECT TO THE "C" ON THE NEW THERMOSTAT M22223 69-1725-1 8 Follow Special Instructions (Cont) 4. If you have only one C and/or C1 wire connected to your old thermostat, connect this wire to the store. Visit www.honeywell.com/yourhome or call Honeywell Customer Care at 1-800-468-1502 before returning the thermostat to C on the new thermostat. Step 4.

Owner's Manual
Page 9
DO NOT CONNECT TO NEW THERMOSTAT M22040 9 69-1725-1 Wrap the end of the wires that are not connected with electrical tape. OLD THERMOSTAT Y G RC W R LETTER DESIGNATION SCREW TERMINAL WIRE WIRE HOLE WIRES NOT CONNECTED - If you find any wires not connected to your old thermostat, do not connect them to your new thermostat. 6. Step 4. Follow Special Instructions (Cont) 5.
DO NOT CONNECT TO NEW THERMOSTAT M22040 9 69-1725-1 Wrap the end of the wires that are not connected with electrical tape. OLD THERMOSTAT Y G RC W R LETTER DESIGNATION SCREW TERMINAL WIRE WIRE HOLE WIRES NOT CONNECTED - If you find any wires not connected to your old thermostat, do not connect them to your new thermostat. 6. Step 4. Follow Special Instructions (Cont) 5.

Owner's Manual
Page 24
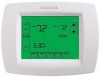
SET CURRENT DATE SET MONTH MON TUE WED THU FRI DONE USE ARROWS TO SET YEAR M22226 The calendar can be set . Use the arrow keys to set the year, month and day. 2. See Step 11, Configure Installer Setup, for up to ten years, under normal use, once the calendar is ready to set the calendar. 1. Press the Done key. Set the Calendar This thermostat is designed to automatically keep current time and day in memory for instructions. 69-1725-1 24 Step 10. When the thermostat is first powered, the display is set any time.
SET CURRENT DATE SET MONTH MON TUE WED THU FRI DONE USE ARROWS TO SET YEAR M22226 The calendar can be set . Use the arrow keys to set the year, month and day. 2. See Step 11, Configure Installer Setup, for up to ten years, under normal use, once the calendar is ready to set the calendar. 1. Press the Done key. Set the Calendar This thermostat is designed to automatically keep current time and day in memory for instructions. 69-1725-1 24 Step 10. When the thermostat is first powered, the display is set any time.


