
Owner's Manual
Page 12
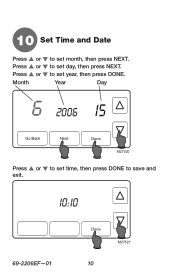
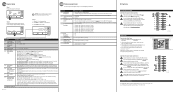
Press s or t to set time, then press DONE to save and exit. 10:10 69-2206EF-01 Done M27521 10 Month Year Day 6 2006 15 Go Back Next Done M27520 Press s or t to set year, then press DONE. Press s or t to set month, then press NEXT. 10 Set Time and Date Press s or t to set day, then press NEXT.
Press s or t to set time, then press DONE to save and exit. 10:10 69-2206EF-01 Done M27521 10 Month Year Day 6 2006 15 Go Back Next Done M27520 Press s or t to set year, then press DONE. Press s or t to set month, then press NEXT. 10 Set Time and Date Press s or t to set day, then press NEXT.
Owner's Manual
Page 17
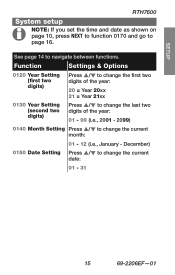
SETUP WIRING RTH7600 ASybsotuetmyosuertunpew thermostat NOTE: If you set the time and date as shown on page 10, press NEXT to function 0170 and go to change the current month: 01 - 12 (i.e., January - Function Settings & Options 0120 Year Setting (first two digits) Press s/t to change the first two digits of the ...year: 20 = Year 20xx 21 = Year 21xx 0130 Year Setting (second two digits) Press s/t to change the current date: 01 - 31 ASSISTANCE TROUBLESHOOTING 15 69-2206EF-01 See page 14 to change the last two digits of the year...
SETUP WIRING RTH7600 ASybsotuetmyosuertunpew thermostat NOTE: If you set the time and date as shown on page 10, press NEXT to function 0170 and go to change the current month: 01 - 12 (i.e., January - Function Settings & Options 0120 Year Setting (first two digits) Press s/t to change the first two digits of the ...year: 20 = Year 20xx 21 = Year 21xx 0130 Year Setting (second two digits) Press s/t to change the current date: 01 - 31 ASSISTANCE TROUBLESHOOTING 15 69-2206EF-01 See page 14 to change the last two digits of the year...
Operation Manual
Page 8
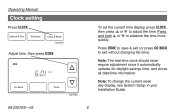
... CLOCK System & Fan Schedule Clock & Mode M27527 Adjust time, then press DONE MON 6:01 AM Go Back Done M27528 To set the current time display, press CLOCK, then press s or t to advance the time more quickly. Press DONE to save & exit (or press GO BACK to ...exit without changing the time). Note: The real-time clock should never require adjustment since it automatically updates for daylight savings time, and stores all date/time information. Note: To change the current week day display, see System Setup in your Installation Guide. 69-2207ES-05 6
... CLOCK System & Fan Schedule Clock & Mode M27527 Adjust time, then press DONE MON 6:01 AM Go Back Done M27528 To set the current time display, press CLOCK, then press s or t to advance the time more quickly. Press DONE to save & exit (or press GO BACK to ...exit without changing the time). Note: The real-time clock should never require adjustment since it automatically updates for daylight savings time, and stores all date/time information. Note: To change the current week day display, see System Setup in your Installation Guide. 69-2207ES-05 6
Quick Start Guide
Page 1
... RC R R MCR28070 Remove metal jumper if you 're done! MCR27518 10 Set Time and Date Press s or t to set month, then press NEXT. Installation is Easy Label wires and remove your old...F EM. Contact the Thermostat Recycling Corporation at 1-800-468-1502. Registered Trademark. © 2012 Honeywell International Inc. 69-2721-01 M.S. 05-12 Printed in . See Wiring Notes (over ). If... New Thermostat Remove wallplate from the new thermostat. Quick Start Guide Touchscreen Programmable Thermostat RTH7600 Series 69-2721-01 5 Mount Wallplate Mount the new wallplate using the supplied wire...
... RC R R MCR28070 Remove metal jumper if you 're done! MCR27518 10 Set Time and Date Press s or t to set month, then press NEXT. Installation is Easy Label wires and remove your old...F EM. Contact the Thermostat Recycling Corporation at 1-800-468-1502. Registered Trademark. © 2012 Honeywell International Inc. 69-2721-01 M.S. 05-12 Printed in . See Wiring Notes (over ). If... New Thermostat Remove wallplate from the new thermostat. Quick Start Guide Touchscreen Programmable Thermostat RTH7600 Series 69-2721-01 5 Mount Wallplate Mount the new wallplate using the supplied wire...
Quick Start Guide
Page 2
December) 0150* Date Setting 01 - 31 0170 Select System Type 1 Heat/cool: Gas, oil or... valve: Use this setting if you connected a wire labeled "O" to the O/B terminal (see Changeover Valve Wiring Notes). (for heat pumps 1 Heating changeover valve: Use this product, please visit http://yourhome.honeywell.com or call Honeywell Customer Care toll-free...only 1 C or C1 wire, G connect it to loosen screws, insert wires into the wall opening. When these settings are set temperature. 12a System Setup Step 1 Press and release the left button. Connect the R wire to the Rc terminal...
December) 0150* Date Setting 01 - 31 0170 Select System Type 1 Heat/cool: Gas, oil or... valve: Use this setting if you connected a wire labeled "O" to the O/B terminal (see Changeover Valve Wiring Notes). (for heat pumps 1 Heating changeover valve: Use this product, please visit http://yourhome.honeywell.com or call Honeywell Customer Care toll-free...only 1 C or C1 wire, G connect it to loosen screws, insert wires into the wall opening. When these settings are set temperature. 12a System Setup Step 1 Press and release the left button. Connect the R wire to the Rc terminal...


