

Owner's Manual
Page 1
Quick Installation Guide RTH2310 Programmable Thermostat 69-2214EF-04
Quick Installation Guide RTH2310 Programmable Thermostat 69-2214EF-04

Owner's Manual
Page 3
This thermostat is compatible with the following systems: • Gas, oil or electric furnace • Central air conditioner • a hot water system with heat pumps or multi-stage systems. 2 RTH2310 Programmable Thermostat 1 Identify System Type 1. This thermostat is not compatible with or without pump • a millivolt system • a central heating and cooling system If you are not sure of your system type or if you have any other questions, call us toll-free at 1-800-468-1502.
This thermostat is compatible with the following systems: • Gas, oil or electric furnace • Central air conditioner • a hot water system with heat pumps or multi-stage systems. 2 RTH2310 Programmable Thermostat 1 Identify System Type 1. This thermostat is not compatible with or without pump • a millivolt system • a central heating and cooling system If you are not sure of your system type or if you have any other questions, call us toll-free at 1-800-468-1502.
Owner's Manual
Page 5
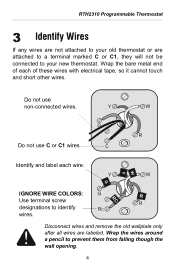
If any wires are not attached to your new thermostat. IGNORE WIRE COLORS: Use terminal screw designations to your old thermostat or are labeled. Disconnect wires and remove the old wallplate only after all wires are attached to a terminal marked C or C1, they will not be ... the bare metal end of these wires with electrical tape, so it cannot touch and short other wires. Do not use non-connected wires. RTH2310 Programmable Thermostat 3 Identify Wires 3.
If any wires are not attached to your new thermostat. IGNORE WIRE COLORS: Use terminal screw designations to your old thermostat or are labeled. Disconnect wires and remove the old wallplate only after all wires are attached to a terminal marked C or C1, they will not be ... the bare metal end of these wires with electrical tape, so it cannot touch and short other wires. Do not use non-connected wires. RTH2310 Programmable Thermostat 3 Identify Wires 3.
Owner's Manual
Page 7
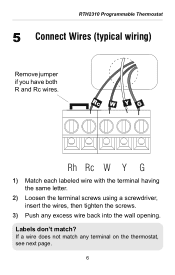
Labels don't match? RTH2310 Programmable Thermostat 5 Connect Wires (typical wiring) 5. If a wire does not match any excess wire back into the wall opening. Remove jumper if you have both R and Rc wires. 1) Match each labeled wire with the terminal having the same letter. 2) Loosen the terminal screws using a screwdriver, insert the wires, then tighten the screws. 3) Push any terminal on the thermostat, see next page. 6
Labels don't match? RTH2310 Programmable Thermostat 5 Connect Wires (typical wiring) 5. If a wire does not match any excess wire back into the wall opening. Remove jumper if you have both R and Rc wires. 1) Match each labeled wire with the terminal having the same letter. 2) Loosen the terminal screws using a screwdriver, insert the wires, then tighten the screws. 3) Push any terminal on the thermostat, see next page. 6
Owner's Manual
Page 9
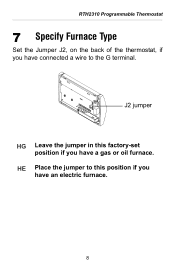
J2 jumper HG Leave the jumper in this position if you have an electric furnace. 8 HE Place the jumper to the G terminal. Set the Jumper J2, on the back of the thermostat, if you have connected a wire to this factory-set position if you have a gas or oil furnace. RTH2310 Programmable Thermostat 7 Specify Furnace Type 6.
J2 jumper HG Leave the jumper in this position if you have an electric furnace. 8 HE Place the jumper to the G terminal. Set the Jumper J2, on the back of the thermostat, if you have connected a wire to this factory-set position if you have a gas or oil furnace. RTH2310 Programmable Thermostat 7 Specify Furnace Type 6.
Owner's Manual
Page 11
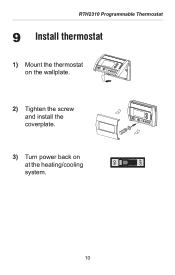
RTH2310 Programmable Thermostat 9 Install thermostat 8. 1) Mount the thermostat on the wallplate. 2) Tighten the screw and install the coverplate. 3) Turn power back on at the heating/cooling system. 10
RTH2310 Programmable Thermostat 9 Install thermostat 8. 1) Mount the thermostat on the wallplate. 2) Tighten the screw and install the coverplate. 3) Turn power back on at the heating/cooling system. 10
Owner's Manual
Page 13
Guide d'installation rapide RTH2310 Thermostat programmable 69-2214EF-04
Guide d'installation rapide RTH2310 Thermostat programmable 69-2214EF-04


