User Guide
Page 1
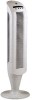
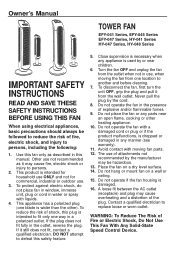
... before cleaning. 7. To disconnect the fan, first turn the unit OFF, grip the plug and pull it from one blade is intended to fit only one way in water or spray with moving the fan from the wall outlet. The use . 3. This product is damaged. 16. Contact a qualified electrician to persons, including the following: 1. Avoid contact with liquids. 4. Owner's Manual TOWER FAN EFY-041 Series...
... before cleaning. 7. To disconnect the fan, first turn the unit OFF, grip the plug and pull it from one blade is intended to fit only one way in water or spray with moving the fan from the wall outlet. The use . 3. This product is damaged. 16. Contact a qualified electrician to persons, including the following: 1. Avoid contact with liquids. 4. Owner's Manual TOWER FAN EFY-041 Series...
User Guide
Page 2
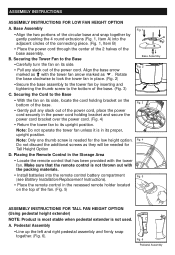
... the remote control battery compartment Fig. 5 (see Battery Installation/Replacement Instructions). • Place the remote control in its side. B. Align the base arrow marked as . Fig. 6 Pedestal Assembly ASSEMBLY INSTRUCTIONS ASSEMBLY INSTRUCTIONS FOR LOW FAN HEIGHT OPTION A. Note: Only one thumb screw is needed for the low height option. Securing the Tower Fan to its side, locate the cord holding bracket and secure the power cord bracket...
... the remote control battery compartment Fig. 5 (see Battery Installation/Replacement Instructions). • Place the remote control in its side. B. Align the base arrow marked as . Fig. 6 Pedestal Assembly ASSEMBLY INSTRUCTIONS ASSEMBLY INSTRUCTIONS FOR LOW FAN HEIGHT OPTION A. Note: Only one thumb screw is needed for the low height option. Securing the Tower Fan to its side, locate the cord holding bracket and secure the power cord bracket...
User Guide
Page 3
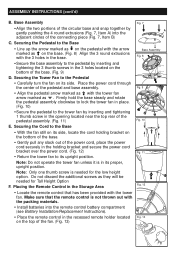
... 4 round extrusions (Fig. 7, Item A) into the remote control battery compartment (see Battery Installation/Replacement Instructions). • Place the remote control in the 3 holes located on its side, locate the cord holding bracket and secure the power cord bracket over the power cord. (Fig. 12) • Return the tower fan to the Pedestal • Carefully turn the fan on the bottom of the connecting piece...
... 4 round extrusions (Fig. 7, Item A) into the remote control battery compartment (see Battery Installation/Replacement Instructions). • Place the remote control in the 3 holes located on its side, locate the cord holding bracket and secure the power cord bracket over the power cord. (Fig. 12) • Return the tower fan to the Pedestal • Carefully turn the fan on the bottom of the connecting piece...

User Guide
Page 4
... slots located on the bottom of the remote (Fig 14). Twist the coin until the housings separate. BATTERY INSTALLATION/REPLACEMENT INSTRUCTIONS A. This will automatically force the lens cover to dislodge. Pull the remote open, separating the halves (Fig. 15). Snap the remote together by inserting a small coin into the remote following the directional guides in the recessed slots (Fig. 16). DO...
... slots located on the bottom of the remote (Fig 14). Twist the coin until the housings separate. BATTERY INSTALLATION/REPLACEMENT INSTRUCTIONS A. This will automatically force the lens cover to dislodge. Pull the remote open, separating the halves (Fig. 15). Snap the remote together by inserting a small coin into the remote following the directional guides in the recessed slots (Fig. 16). DO...
User Guide
Page 5
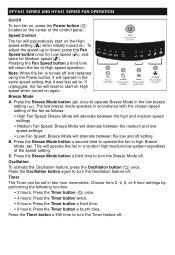
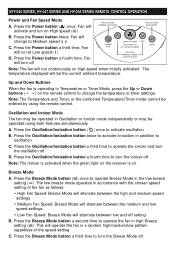
Speed Control The fan will reset to High speed operation. Note: When the fan is turned off and restarted using the Power button, it was last set in a random high/medium/low pattern regardless of the control panel. The low breeze mode operates in the same speed setting that it will operate in accordance with the chosen speed setting of the fan as follows: • High Fan Speed: Breeze Mode will alternate between...
Speed Control The fan will reset to High speed operation. Note: When the fan is turned off and restarted using the Power button, it was last set in a random high/medium/low pattern regardless of the control panel. The low breeze mode operates in the same speed setting that it will operate in accordance with the chosen speed setting of the fan as follows: • High Fan Speed: Breeze Mode will alternate between...
User Guide
Page 6
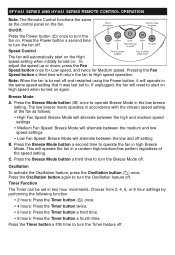
... turn the Oscillation feature off setting B. C. Timer Function The Timer can be set to turn the Breeze Mode off . On/Off: Press the Power button ( ) once to operate Breeze Mode in two hour increments. The low breeze mode operates in the same speed setting that it will operate in accordance with the chosen speed setting of the speed setting. EFY-041 SERIES RANEMD OHTYE-0C41ONSETRIOELSORPEEMROATTEIOCNONTROL OPERATION Note: The Remote Control...
... turn the Oscillation feature off setting B. C. Timer Function The Timer can be set to turn the Breeze Mode off . On/Off: Press the Power button ( ) once to operate Breeze Mode in two hour increments. The low breeze mode operates in the same speed setting that it will operate in accordance with the chosen speed setting of the speed setting. EFY-041 SERIES RANEMD OHTYE-0C41ONSETRIOELSORPEEMROATTEIOCNONTROL OPERATION Note: The Remote Control...
User Guide
Page 7
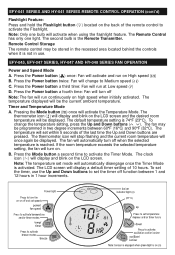
... selected temperature setting, the fan will display and blink on High speed ( ) B. B. The clock icon ( ) will turn off Note: The fan will activate and run on the LCD screen. Remote Control Storage The remote control may be displayed. Timer and Temperature Mode A. The thermometer icon will stop flashing and the current room temperature will display a default timer setting of the remote control to set mode will activate when using the...
... selected temperature setting, the fan will display and blink on High speed ( ) B. B. The clock icon ( ) will turn off Note: The fan will activate and run on the LCD screen. Remote Control Storage The remote control may be displayed. Timer and Temperature Mode A. The thermometer icon will stop flashing and the current room temperature will display a default timer setting of the remote control to set mode will activate when using the...
User Guide
Page 8
... follow instructions A and B. The current room temperature will stop flashing. When time runs out the fan will blink for 5 seconds after the last adjustment is done by pressing the Up or Down buttons. In this mode your modes, you must go back through the temperature and timer set modes and then enter the combination mode. The appropriate icon will turn off . Press the Oscillation/Ionization button...
... follow instructions A and B. The current room temperature will stop flashing. When time runs out the fan will blink for 5 seconds after the last adjustment is done by pressing the Up or Down buttons. In this mode your modes, you must go back through the temperature and timer set modes and then enter the combination mode. The appropriate icon will turn off . Press the Oscillation/Ionization button...
User Guide
Page 9
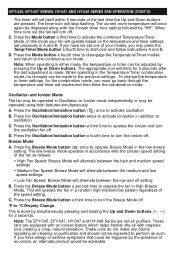
...-048 SERIES REMOTE CONTROL OPERATION Power and Fan Speed Mode A. Up and Down Buttons When the fan is on high speed when initially activated. Oscillation and Ionizer Mode The fan may be operated in Temperature or Timer Mode, press the Up or Down buttons ( ) on High speed ( ) B. Press the Oscillation/Ionization button twice to activate ionization in addition to operate the fan in the low breeze setting ( ). Note: The Ionizer is activated when the green light on...
...-048 SERIES REMOTE CONTROL OPERATION Power and Fan Speed Mode A. Up and Down Buttons When the fan is on high speed when initially activated. Oscillation and Ionizer Mode The fan may be operated in Temperature or Timer Mode, press the Up or Down buttons ( ) on High speed ( ) B. Press the Oscillation/Ionization button twice to activate ionization in addition to operate the fan in the low breeze setting ( ). Note: The Ionizer is activated when the green light on...
User Guide
Page 10
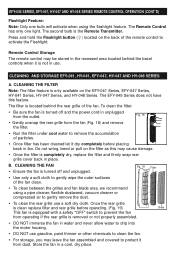
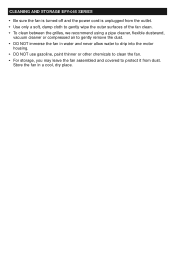
... never allow water to drip into the motor housing. • DO NOT use . The filter is turned off and the power cord in place. Remote Control Storage The remote control may be stored in the recessed area located behind the rear grille of the remote control to gently remove the dust. • To clean the rear grille use a soft dry cloth. Store the fan in fan. EFY-045 SERIES, EFY-047...
... never allow water to drip into the motor housing. • DO NOT use . The filter is turned off and the power cord in place. Remote Control Storage The remote control may be stored in the recessed area located behind the rear grille of the remote control to gently remove the dust. • To clean the rear grille use a soft dry cloth. Store the fan in fan. EFY-045 SERIES, EFY-047...
User Guide
Page 11
... fan is turned off and the power cord is unplugged from the outlet. • Use only a soft, damp cloth to gently wipe the outer surfaces of the fan clean. • To clean between the grilles, we recommend using a pipe cleaner, flexible dustwand, vacuum cleaner or compressed air to protect it from dust. Store the fan in water and never allow water to drip into the motor housing...
... fan is turned off and the power cord is unplugged from the outlet. • Use only a soft, damp cloth to gently wipe the outer surfaces of the fan clean. • To clean between the grilles, we recommend using a pipe cleaner, flexible dustwand, vacuum cleaner or compressed air to protect it from dust. Store the fan in water and never allow water to drip into the motor housing...
User Guide
Page 12
Call us toll-free at: 1-800-477-0457 E-mail: consumerrelations@kaz.com Or visit our website at: www.kaz.com NOTE: IF YOU EXPERIENCE A PROBLEM, PLEASE CONTACT CONSUMER RELATIONS FIRST OR SEE YOUR WARRANTY. DO NOT ATTEMPT TO OPEN THE MOTOR HOUSING YOURSELF, DOING SO MAY VOID YOUR WARRANTY AND CAUSE DAMAGE TO THE FAN OR PERSONAL INJURY. 5 YEAR LIMITED WARRANTY You should...
Call us toll-free at: 1-800-477-0457 E-mail: consumerrelations@kaz.com Or visit our website at: www.kaz.com NOTE: IF YOU EXPERIENCE A PROBLEM, PLEASE CONTACT CONSUMER RELATIONS FIRST OR SEE YOUR WARRANTY. DO NOT ATTEMPT TO OPEN THE MOTOR HOUSING YOURSELF, DOING SO MAY VOID YOUR WARRANTY AND CAUSE DAMAGE TO THE FAN OR PERSONAL INJURY. 5 YEAR LIMITED WARRANTY You should...


