
Owner's Manual
Page 1
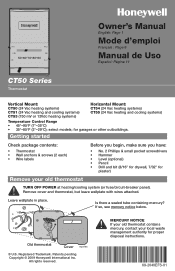
...Honeywell International Inc. Getting started Check package contents: • Thermostat • Wall anchors & screws (2 each) • Wire labels Remove your local waste management authority for garages or other outbuildings. All rights reserved. Owner's Manual English: Page 1 Mode d'emploi Français : Page 6 Manual de Uso Español: Página 11 M23785 CT50... Series Thermostat Vertical Mount: CT50 (24 Vac heating systems) CT51 (24 Vac heating and cooling systems) CT53 (750 mV or 12Vdc ...
...Honeywell International Inc. Getting started Check package contents: • Thermostat • Wall anchors & screws (2 each) • Wire labels Remove your local waste management authority for garages or other outbuildings. All rights reserved. Owner's Manual English: Page 1 Mode d'emploi Français : Page 6 Manual de Uso Español: Página 11 M23785 CT50... Series Thermostat Vertical Mount: CT50 (24 Vac heating systems) CT51 (24 Vac heating and cooling systems) CT53 (750 mV or 12Vdc ...
Owner's Manual
Page 2
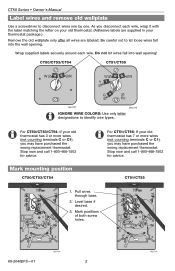
... terminals C or C1), you may have purchased the wrong replacement thermostat. Mark mounting position CT50/CT53/CT54 For CT51/CT55: If your thermostat package.) Remove the old wallplate only after all wires are supplied in your old thermostat has 7 or more wires (not counting terminals C or C1),...Wrap supplied labels securely around each wire, wrap it with the label matching the letter on your old thermostat. (Adhesive labels are labeled. As you disconnect each wire. CT50/CT53/CT54 CT51/CT55 M23787 M23788 IGNORE WIRE COLORS: Use only letter designations to disconnect wires one ...
... terminals C or C1), you may have purchased the wrong replacement thermostat. Mark mounting position CT50/CT53/CT54 For CT51/CT55: If your thermostat package.) Remove the old wallplate only after all wires are supplied in your old thermostat has 7 or more wires (not counting terminals C or C1),...Wrap supplied labels securely around each wire, wrap it with the label matching the letter on your old thermostat. (Adhesive labels are labeled. As you disconnect each wire. CT50/CT53/CT54 CT51/CT55 M23787 M23788 IGNORE WIRE COLORS: Use only letter designations to disconnect wires one ...
Owner's Manual
Page 3
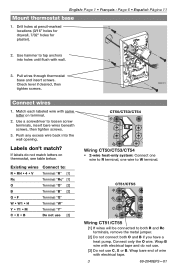
... 1. Pull wires through thermostat base and insert screws. Use a screwdriver to both R and Rc terminals, remove the metal jumper. [2] Do not connect both O and B if you have a heat pump. Connect only the O wire. If labels do not use. [3] Do not use [3] CT50/CT53/CT54 Wiring CT50/CT53/CT54 • 2-wire heat-only system...
... 1. Pull wires through thermostat base and insert screws. Use a screwdriver to both R and Rc terminals, remove the metal jumper. [2] Do not connect both O and B if you have a heat pump. Connect only the O wire. If labels do not use. [3] Do not use [3] CT50/CT53/CT54 Wiring CT50/CT53/CT54 • 2-wire heat-only system...
Owner's Manual
Page 4
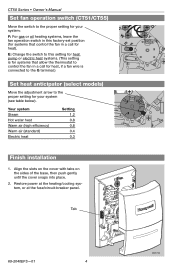
... gently until the cover snaps into place. 2. Your system Steam Hot water heat Warm air (high efficiency) Warm air (standard) Electric heat Setting 1.2 0.8 0.8 0.4 0.3 Finish installation 1. CT50 Series • Owner's Manual Set fan operation switch (CT51/CT55) Move the switch to the proper setting for your system: F: For gas or oil heating... systems, leave the fan operation switch in this setting for heat pump or electric heat systems. (This setting is for systems that allow the thermostat to control the fan in a call for your system (see table below).
... gently until the cover snaps into place. 2. Your system Steam Hot water heat Warm air (high efficiency) Warm air (standard) Electric heat Setting 1.2 0.8 0.8 0.4 0.3 Finish installation 1. CT50 Series • Owner's Manual Set fan operation switch (CT51/CT55) Move the switch to the proper setting for your system: F: For gas or oil heating... systems, leave the fan operation switch in this setting for heat pump or electric heat systems. (This setting is for systems that allow the thermostat to control the fan in a call for your system (see table below).


