
Owner's Manual
Page 1
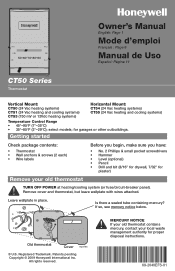
... drywall, 7/32" for plaster) TURN OFF POWER at heating/cooling system (or fuse/circuit-breaker panel). Remove cover and thermostat, but leave wallplate with wires attached. All rights reserved. Owner's Manual English: Page 1 Mode d'emploi Français : Page 6 Manual de Uso Español: Página 11 M23785 CT50 Series Thermostat Vertical Mount: CT50 (24 Vac heating systems) CT51 (24 Vac heating and cooling systems) CT53 (750 mV or...
... drywall, 7/32" for plaster) TURN OFF POWER at heating/cooling system (or fuse/circuit-breaker panel). Remove cover and thermostat, but leave wallplate with wires attached. All rights reserved. Owner's Manual English: Page 1 Mode d'emploi Français : Page 6 Manual de Uso Español: Página 11 M23785 CT50 Series Thermostat Vertical Mount: CT50 (24 Vac heating systems) CT51 (24 Vac heating and cooling systems) CT53 (750 mV or...
Owner's Manual
Page 2
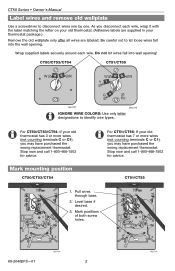
... M23788 IGNORE WIRE COLORS: Use only letter designations to disconnect wires one by one. Level base if desired. 3. M23789 69-2040EFS-01 2 M23790 Pull wires through base. 2. CT50 Series • Owner's Manual Label wires and remove old wallplate Use a screwdriver to identify wire types. CT51/CT55 1. As you may have purchased the wrong replacement thermostat. Be careful not to let loose wires fall into the wall opening !
... M23788 IGNORE WIRE COLORS: Use only letter designations to disconnect wires one by one. Level base if desired. 3. M23789 69-2040EFS-01 2 M23790 Pull wires through base. 2. CT50 Series • Owner's Manual Label wires and remove old wallplate Use a screwdriver to identify wire types. CT51/CT55 1. As you may have purchased the wrong replacement thermostat. Be careful not to let loose wires fall into the wall opening !
Owner's Manual
Page 3
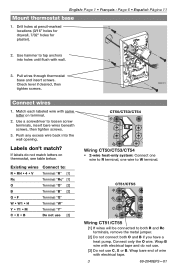
... into the wall opening. Wrap bare end of wire with same letter on thermostat, see table below. English: Page 1 • Français : Page 6 • Español: Página 11 Mount thermostat base 1. Pull wires through thermostat base and insert screws. Use hammer to both R and Rc terminals, remove the metal jumper. [2] Do not connect both O and B if you have a heat pump. Labels...
... into the wall opening. Wrap bare end of wire with same letter on thermostat, see table below. English: Page 1 • Français : Page 6 • Español: Página 11 Mount thermostat base 1. Pull wires through thermostat base and insert screws. Use hammer to both R and Rc terminals, remove the metal jumper. [2] Do not connect both O and B if you have a heat pump. Labels...
Owner's Manual
Page 4
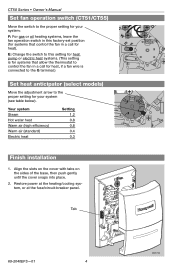
... air (high efficiency) Warm air (standard) Electric heat Setting 1.2 0.8 0.8 0.4 0.3 Finish installation 1. Tab 69-2040EFS-01 4 M23 M23795 M23796 CT50 Series • Owner's Manual Set fan operation switch (CT51/CT55) Move the switch to the proper setting for your system: F: For gas or oil heating systems, leave the fan operation switch in this setting for heat pump or electric heat systems. (This setting is for systems that control the fan in a call for heat, if a fan wire is connected to the G terminal.) Set heat anticipator (select models) Move the adjustment...
... air (high efficiency) Warm air (standard) Electric heat Setting 1.2 0.8 0.8 0.4 0.3 Finish installation 1. Tab 69-2040EFS-01 4 M23 M23795 M23796 CT50 Series • Owner's Manual Set fan operation switch (CT51/CT55) Move the switch to the proper setting for your system: F: For gas or oil heating systems, leave the fan operation switch in this setting for heat pump or electric heat systems. (This setting is for systems that control the fan in a call for heat, if a fan wire is connected to the G terminal.) Set heat anticipator (select models) Move the adjustment...

Owner's Manual
Page 5
...; On: Fan runs continuously. Customer Care will make the determination whether the product should be returned to the following address: Honeywell Return Goods, Dock 4 MN10-3860, 1885 Douglas Dr. N., Golden Valley, MN 55422, or whether a replacement product can be free from the date of purchase, to you . This warranty shall not apply if it ; Temperature setting Adjust to you have other dated proof...
...; On: Fan runs continuously. Customer Care will make the determination whether the product should be returned to the following address: Honeywell Return Goods, Dock 4 MN10-3860, 1885 Douglas Dr. N., Golden Valley, MN 55422, or whether a replacement product can be free from the date of purchase, to you . This warranty shall not apply if it ; Temperature setting Adjust to you have other dated proof...

Owner's Manual
Page 16
... site Web http://DIYthermostats.honeywell.com ou vous adresser aux Services à la clientèle de Honeywell en composant le 1 800 468-1502 ¿Necesita ayuda? Honeywell Limited-Honeywell Limitée 1985 Douglas Drive North 35 Dynamic Drive Golden Valley, MN 55422 Toronto, Ontario M1V 4Z9 http://DIYthermostats.honeywell.com Printed in U.S.A. CT50 Series • Owner's Manual Need Help? on recycled paper...
... site Web http://DIYthermostats.honeywell.com ou vous adresser aux Services à la clientèle de Honeywell en composant le 1 800 468-1502 ¿Necesita ayuda? Honeywell Limited-Honeywell Limitée 1985 Douglas Drive North 35 Dynamic Drive Golden Valley, MN 55422 Toronto, Ontario M1V 4Z9 http://DIYthermostats.honeywell.com Printed in U.S.A. CT50 Series • Owner's Manual Need Help? on recycled paper...


