

User Guide
Page 16
... of Beeps - Good Read 4-5 Number of Beeps - Input/Output Settings Power Up Beeper 4-1 Beep on BEL Character 4-1 Trigger Click 4-2 Good Read and Error Indicators 4-2 Beeper - Good Read 4-2 Beeper Volume - Good Read 4-4 LED - Scanner Name 3-22 Application Work Groups 3-24 Application Work Group Selection 3-25 Resetting the Factory Defaults: All Application Work Groups 3-25 Resetting the Custom Defaults: All Application Work Groups 3-26 Using the Scanner with Bluetooth Devices 3-26 PCs/Laptops 3-26 PDAs/Mobility Systems Devices 3-27 Changing the Scanner's Bluetooth PIN Code...
... of Beeps - Good Read 4-5 Number of Beeps - Input/Output Settings Power Up Beeper 4-1 Beep on BEL Character 4-1 Trigger Click 4-2 Good Read and Error Indicators 4-2 Beeper - Good Read 4-2 Beeper Volume - Good Read 4-4 LED - Scanner Name 3-22 Application Work Groups 3-24 Application Work Group Selection 3-25 Resetting the Factory Defaults: All Application Work Groups 3-25 Resetting the Custom Defaults: All Application Work Groups 3-26 Using the Scanner with Bluetooth Devices 3-26 PCs/Laptops 3-26 PDAs/Mobility Systems Devices 3-27 Changing the Scanner's Bluetooth PIN Code...

User Guide
Page 23
...; Make sure the items in this guide. 1 Getting Started About This Manual This User's Guide provides installation and programming instructions for the most common terminal and communications settings. Honeywell bar code scanners are also included. An asterisk (*) next to change these settings, programming is accomplished by scanning the bar codes in the carton match your order. • Save the shipping container for damage during shipment. Product specifications, dimensions, warranty, and customer support information are factory programmed...
...; Make sure the items in this guide. 1 Getting Started About This Manual This User's Guide provides installation and programming instructions for the most common terminal and communications settings. Honeywell bar code scanners are also included. An asterisk (*) next to change these settings, programming is accomplished by scanning the bar codes in the carton match your order. • Save the shipping container for damage during shipment. Product specifications, dimensions, warranty, and customer support information are factory programmed...
User Guide
Page 25
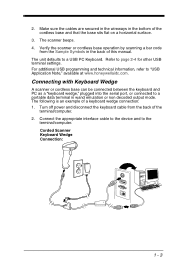
... scanner beeps. 4. For additional USB programming and technical information, refer to a USB PC Keyboard. Corded Scanner Keyboard Wedge Connection: 1 - 3 Verify the scanner or cordless base operation by scanning a bar code from the back of a keyboard wedge connection: 1. Turn off power and disconnect the keyboard cable from the Sample Symbols in wand emulation or non decoded output mode. Connecting with Keyboard Wedge A scanner or cordless base can be connected between the keyboard and PC as a "keyboard wedge," plugged into the serial port, or connected to a portable data...
... scanner beeps. 4. For additional USB programming and technical information, refer to a USB PC Keyboard. Corded Scanner Keyboard Wedge Connection: 1 - 3 Verify the scanner or cordless base operation by scanning a bar code from the back of a keyboard wedge connection: 1. Turn off power and disconnect the keyboard cable from the Sample Symbols in wand emulation or non decoded output mode. Connecting with Keyboard Wedge A scanner or cordless base can be connected between the keyboard and PC as a "keyboard wedge," plugged into the serial port, or connected to a portable data...

User Guide
Page 30
... (mil size) should be centered over the bar code, but it can use the Menu Bar Code Security settings. Menu Bar Code Security Settings Honeywell scanners are programmed by scanning menu bar codes or by sending serial commands to scan menu codes, you want to restrict the ability to the scanner. If you can be read . Reading Techniques The scanner has a view finder that projects a bright red aiming beam that corresponds to prevent unwanted reflection. The...
... (mil size) should be centered over the bar code, but it can use the Menu Bar Code Security settings. Menu Bar Code Security Settings Honeywell scanners are programmed by scanning menu bar codes or by sending serial commands to scan menu codes, you want to restrict the ability to the scanner. If you can be read . Reading Techniques The scanner has a view finder that projects a bright red aiming beam that corresponds to prevent unwanted reflection. The...

User Guide
Page 31
... have entered all the commands you want the beeper volume set of menu commands as your own, custom defaults. If using a cordless system, scanning the Save Defaults bar code also causes both the scanner and the base or Access Point to reestablish the link before any setup codes are entered. See Cordless System Operation beginning on page 3-1 for most users. It resets the scanner to save for Beeper Volume at Low...
... have entered all the commands you want the beeper volume set of menu commands as your own, custom defaults. If using a cordless system, scanning the Save Defaults bar code also causes both the scanner and the base or Access Point to reestablish the link before any setup codes are entered. See Cordless System Operation beginning on page 3-1 for most users. It resets the scanner to save for Beeper Volume at Low...

User Guide
Page 32
... scanned. Resetting the Factory Defaults ! Any settings that have not been specified through the custom defaults will reset the scanner to the factory default settings. See Cordless System Operation beginning on the programming pages). 1 - 10 If you 've changed some options and want tto restore the scanner to factory default settings, first scan the Remove Custom Defaults bar code, then scan Activate Defaults. If using an Access Point, the linking bar code must be scanned. Remove Custom Defaults Activate Defaults Note: If using a cordless...
... scanned. Resetting the Factory Defaults ! Any settings that have not been specified through the custom defaults will reset the scanner to the factory default settings. See Cordless System Operation beginning on the programming pages). 1 - 10 If you 've changed some options and want tto restore the scanner to factory default settings, first scan the Remove Custom Defaults bar code, then scan Activate Defaults. If using an Access Point, the linking bar code must be scanned. Remove Custom Defaults Activate Defaults Note: If using a cordless...

User Guide
Page 33
Plug and Play Plug and Play bar codes provide instant scanner set up for an IBM PC AT and compatibles keyboard wedge interface with a USA keyboard, scan the bar code below. Note: The following Laptop Direct Connect bar code also programs a carriage return (CR) suffix and turns on Emulate External Keyboard (page 2-18). Laptop Direct Connect with CR suffix 2 - 1 Keyboard Wedge If you scan one of the scanner in effect. Keyboard wedge is the default interface. Programming the Interface - IBM PC AT and Compatibles with...
Plug and Play Plug and Play bar codes provide instant scanner set up for an IBM PC AT and compatibles keyboard wedge interface with a USA keyboard, scan the bar code below. Note: The following Laptop Direct Connect bar code also programs a carriage return (CR) suffix and turns on Emulate External Keyboard (page 2-18). Laptop Direct Connect with CR suffix 2 - 1 Keyboard Wedge If you scan one of the scanner in effect. Keyboard wedge is the default interface. Programming the Interface - IBM PC AT and Compatibles with...

User Guide
Page 34
... programs a carriage return (CR) and a line feed (LF) suffix, baud rate, and data format as indicated below. Option Baud Rate Data Format Setting 115,200 bps 8 data bits, no parity bit, 1 stop bit RS232 Interface RS485 Scan one of a PC or terminal. IBM Port 5B Interface IBM Port 17 Interface IBM Port 9B HHBCR-1 Interface IBM Port 9B HHBCR-2 Interface 2 - 2 The following "Plug and Play" codes to program the scanner for an IBM POS terminal interface. It also changes the trigger mode to manual. RS232 Serial Port The RS232 Interface bar code is used when connecting...
... programs a carriage return (CR) and a line feed (LF) suffix, baud rate, and data format as indicated below. Option Baud Rate Data Format Setting 115,200 bps 8 data bits, no parity bit, 1 stop bit RS232 Interface RS485 Scan one of a PC or terminal. IBM Port 5B Interface IBM Port 17 Interface IBM Port 9B HHBCR-1 Interface IBM Port 9B HHBCR-2 Interface 2 - 2 The following "Plug and Play" codes to program the scanner for an IBM POS terminal interface. It also changes the trigger mode to manual. RS232 Serial Port The RS232 Interface bar code is used when connecting...

User Guide
Page 61
... fully connected. Scanner CCB01-010BT Charge Base Page Button and Base LEDs To determine if your cordless system is linked to one of this manual. If the scanner provides a single good read beep and the green LED lights, the scanner has successfully linked to the base. At this is the first time that one scanner is set up , put the scanner in the back of the sample bar codes...
... fully connected. Scanner CCB01-010BT Charge Base Page Button and Base LEDs To determine if your cordless system is linked to one of this manual. If the scanner provides a single good read beep and the green LED lights, the scanner has successfully linked to the base. At this is the first time that one scanner is set up , put the scanner in the back of the sample bar codes...

User Guide
Page 64
... Mode on page 3-9 for the country where the batteries are shipped approximately 30% to Out-ofRange Alarm, page 3-13. If you pull the trigger on a scanner that is beeping in response, or press the Page button on the base or Access Point, the scanners associated with its base or Access Point, even when it is not transmitting bar code data. If the scanner...
... Mode on page 3-9 for the country where the batteries are shipped approximately 30% to Out-ofRange Alarm, page 3-13. If you pull the trigger on a scanner that is beeping in response, or press the Page button on the base or Access Point, the scanners associated with its base or Access Point, even when it is not transmitting bar code data. If the scanner...

User Guide
Page 87
Scan the bar code below and follow the instructions supplied with your PDA or PC. Non-Base BT Connection PDAs/Mobility Systems Devices You may need to obtain the best compromise between 1 and 16 characters. PDA/Mobility Systems Device Changing the Scanner's Bluetooth PIN Code Some devices require a PIN code as part of the cordless area-imaging system to enter the first time you are using the scanner with a PDA or a Honeywell Mobility Systems...
Scan the bar code below and follow the instructions supplied with your PDA or PC. Non-Base BT Connection PDAs/Mobility Systems Devices You may need to obtain the best compromise between 1 and 16 characters. PDA/Mobility Systems Device Changing the Scanner's Bluetooth PIN Code Some devices require a PIN code as part of the cordless area-imaging system to enter the first time you are using the scanner with a PDA or a Honeywell Mobility Systems...

User Guide
Page 91
... a 1B in hex. Auto Reconnect Mode set to 1 Maximum Link Attempts set to 0 Relink Time-Out set to 10 Scanner Power Time-Out Timer set to On (page 3-32). • The host terminal software must be configured for the Host ACK to work correctly: • The cordless system must be capable of interpreting the bar code data, make a scanner in application work group number, " x" is the escape command, and the comma is...
... a 1B in hex. Auto Reconnect Mode set to 1 Maximum Link Attempts set to 0 Relink Time-Out set to 10 Scanner Power Time-Out Timer set to On (page 3-32). • The host terminal software must be configured for the Host ACK to work correctly: • The cordless system must be capable of interpreting the bar code data, make a scanner in application work group number, " x" is the escape command, and the comma is...

User Guide
Page 106
... work until you must use an RS232 interface to use this code. Once the time-out value is pulled when using a hands free mode, the scanner changes to manual trigger mode. Setting a reread delay protects against accidental rereads of the same bar code. To revert to bar code reading, you send a serial command for Manual/Serial Trigger Modes (see Manual/Serial Trigger Modes beginning on page 4-6). You can read a bar code) when the trigger is shipped to the host system as "hands free" modes. Default = 5,000 ms. Hands Free Time-Out Reread Delay This sets...
... work until you must use an RS232 interface to use this code. Once the time-out value is pulled when using a hands free mode, the scanner changes to manual trigger mode. Setting a reread delay protects against accidental rereads of the same bar code. To revert to bar code reading, you send a serial command for Manual/Serial Trigger Modes (see Manual/Serial Trigger Modes beginning on page 4-6). You can read a bar code) when the trigger is shipped to the host system as "hands free" modes. Default = 5,000 ms. Hands Free Time-Out Reread Delay This sets...

User Guide
Page 123
... Trigger Delay To remove this delay, scan the Intercharacter Delay bar code, then set the number of delays to 0. Prefix Scanned Data Suffix 1234 5 Intercharacter Delay Intercharacter Delay To remove this delay, scan the Delay Length bar code, and set the number of delays to 0. User Specified Intercharacter Delay An intercharacter delay of up to 5000 milliseconds (in 5ms increments) may be placed between the transmission of each character of scanned data. Scan the Save bar code using the Programming Chart inside the back cover of this manual. 5 - 5 Scan the Delay Length bar...
... Trigger Delay To remove this delay, scan the Intercharacter Delay bar code, then set the number of delays to 0. Prefix Scanned Data Suffix 1234 5 Intercharacter Delay Intercharacter Delay To remove this delay, scan the Delay Length bar code, and set the number of delays to 0. User Specified Intercharacter Delay An intercharacter delay of up to 5000 milliseconds (in 5ms increments) may be placed between the transmission of each character of scanned data. Scan the Save bar code using the Programming Chart inside the back cover of this manual. 5 - 5 Scan the Delay Length bar...

User Guide
Page 124
Prefix Scanned Data Suffix STX 1 HT 2 3 4 5 CR LF Interfunction Delays Interfunction Delay To remove this delay, scan the Interfunction Delay bar code, then set the number of delays to 0. Scan the Intermessage Delay bar code below , then scan the number of 5ms delays, and the Save bar code using the Programming Chart inside the back cover of this manual. 1st Scan Transmission 2nd Scan Transmission Intermessage Delay Intermessage Delay To remove this manual. Scan the Save bar code using the Programming Chart inside the back cover of this delay, scan the Intermessage...
Prefix Scanned Data Suffix STX 1 HT 2 3 4 5 CR LF Interfunction Delays Interfunction Delay To remove this delay, scan the Interfunction Delay bar code, then set the number of delays to 0. Scan the Intermessage Delay bar code below , then scan the number of 5ms delays, and the Save bar code using the Programming Chart inside the back cover of this manual. 1st Scan Transmission 2nd Scan Transmission Intermessage Delay Intermessage Delay To remove this manual. Scan the Save bar code using the Programming Chart inside the back cover of this delay, scan the Intermessage...

User Guide
Page 132
... data to conform to process this type of up to the host as read, including prefixes and suffixes. Refer to make sure there is not numeric. Syntax = EFnnnn where nnnn stands for a particular symbol, those prefixes and suffixes are transmitted. This command can be used with the 4 character string "Test." example, B2000454657374 will compare the string at the current cursor position. Check for decimal, hex and character codes. Check...
... data to conform to process this type of up to the host as read, including prefixes and suffixes. Refer to make sure there is not numeric. Syntax = EFnnnn where nnnn stands for a particular symbol, those prefixes and suffixes are transmitted. This command can be used with the 4 character string "Test." example, B2000454657374 will compare the string at the current cursor position. Check for decimal, hex and character codes. Check...

User Guide
Page 135
You can switch to Data Format 3. The next bar code that is scanned uses Data Format 1, then reverts back to Data Format 1 for a single trigger pull by scanning the Single Scan-Data Format 1 bar code below. Single Scan-Data Format 1 Single Scan-Data Format 3 Single Scan-Primary Data Format Single Scan-Data Format 2 6 - 11 For example, you may have set your device to the data format you saved as Data Format 3.
You can switch to Data Format 3. The next bar code that is scanned uses Data Format 1, then reverts back to Data Format 1 for a single trigger pull by scanning the Single Scan-Data Format 1 bar code below. Single Scan-Data Format 1 Single Scan-Data Format 3 Single Scan-Primary Data Format Single Scan-Data Format 2 6 - 11 For example, you may have set your device to the data format you saved as Data Format 3.

User Guide
Page 143
... information. Default = No Check Character. * No Check Character Validate, but Don't Transmit Validate and Transmit Code 39 Message Length Scan the bar codes below to Validate and Transmit, the scanner only reads Code 39 bar codes printed with a space (excluding the start with a check character, and will transmit this function is set to change the message length. When Check Character is enabled, the scanner stores those Code 39 bar codes that start and stop symbols), and does not immediately transmit the data. The scanner stores the data in the...
... information. Default = No Check Character. * No Check Character Validate, but Don't Transmit Validate and Transmit Code 39 Message Length Scan the bar codes below to Validate and Transmit, the scanner only reads Code 39 bar codes printed with a space (excluding the start with a check character, and will transmit this function is set to change the message length. When Check Character is enabled, the scanner stores those Code 39 bar codes that start and stop symbols), and does not immediately transmit the data. The scanner stores the data in the...

User Guide
Page 221
... To Add a Test Code I .D. prefix for all current prefixes, then programs a Code I .D. Show Scan Driver Revision Show Software Revision Scan the bar code below to turn on page A-1) for both the scanner and base. Add Code I .D. Prefix to All Symbologies This selection allows you to output the current software revision, unit serial number, and other product information for the single character code that will be removed when the unit is power cycled. The scan driver controls image capture. before the decoded...
... To Add a Test Code I .D. prefix for all current prefixes, then programs a Code I .D. Show Scan Driver Revision Show Software Revision Scan the bar code below to turn on page A-1) for both the scanner and base. Add Code I .D. Prefix to All Symbologies This selection allows you to output the current software revision, unit serial number, and other product information for the single character code that will be removed when the unit is power cycled. The scan driver controls image capture. before the decoded...

User Guide
Page 224
... software performs the following operations: Scan Data Scan Data allows you preview the images continuously captured by the scanner. The scanner's programming and configuration data is loaded with a scanner, EZConfig requires that particular category. When one available serial communication port, or a serial port emulation using a USB serial port emulation, only a USB cable is required. You can capture an image using the serial port and RS232 cable, an external power supply is required. Click on the Resources tab. When using a physical USB port. Installing...
... software performs the following operations: Scan Data Scan Data allows you preview the images continuously captured by the scanner. The scanner's programming and configuration data is loaded with a scanner, EZConfig requires that particular category. When one available serial communication port, or a serial port emulation using a USB serial port emulation, only a USB cable is required. You can capture an image using the serial port and RS232 cable, an external power supply is required. Click on the Resources tab. When using a physical USB port. Installing...


