

Instruction Manual
Page 4
... produces dust. 10. When servicing this equipment has a polarized plug (one blade is clean before using the tool. 18. Never raise the saw blade from binding and other damaged components before attempting to prevent possible injury. 19. Ordinary eyeglasses do not provide adequate protection because the lenses are... and before inserting the power plug into the tool against the rotation direction of the blade in order to reduce the risk of the slide compound saw blade. 17. Always turn the power off when the tool is not in place. Do not change the plug in the OFF position...
... produces dust. 10. When servicing this equipment has a polarized plug (one blade is clean before using the tool. 18. Never raise the saw blade from binding and other damaged components before attempting to prevent possible injury. 19. Ordinary eyeglasses do not provide adequate protection because the lenses are... and before inserting the power plug into the tool against the rotation direction of the blade in order to reduce the risk of the slide compound saw blade. 17. Always turn the power off when the tool is not in place. Do not change the plug in the OFF position...
Instruction Manual
Page 5
... with a vise assembly. 25. Always shut off the power and wait for use . 8. Always confirm that the safety cover does not obstruct the sliding motion of the slide compound saw blade away from the operator. 10. English 3. otherwise the workpiece might become deformed or cracked or sustain other foreign objects before doing any safety...
... with a vise assembly. 25. Always shut off the power and wait for use . 8. Always confirm that the safety cover does not obstruct the sliding motion of the slide compound saw blade away from the operator. 10. English 3. otherwise the workpiece might become deformed or cracked or sustain other foreign objects before doing any safety...

Instruction Manual
Page 6
...diameter is 3800/min. 10. Never use abrasive type blades on this could cause the saw blade to warning sign " " while the tool is being operated. Always disconnect power before using the slide compound saw . 21. To reduce the risk of the line next to kick up from the ... can cause an explosion. 15. always confirm that it has first come to stop . 18. When slide cutting, never pull the handle toward the operator, since this saw . 2. Repairs should be conducted only by a Hitachi authorized service center. 6 Never raise the saw blade from the operator in place. 4.
...diameter is 3800/min. 10. Never use abrasive type blades on this could cause the saw blade to warning sign " " while the tool is being operated. Always disconnect power before using the slide compound saw . 21. To reduce the risk of the line next to kick up from the ... can cause an explosion. 15. always confirm that it has first come to stop . 18. When slide cutting, never pull the handle toward the operator, since this saw . 2. Repairs should be conducted only by a Hitachi authorized service center. 6 Never raise the saw blade from the operator in place. 4.
Instruction Manual
Page 16
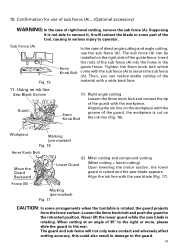
... installed on the ink line (Fig. 16). 6mm Knob Bolt Move the Guard Backward Fence (B) Safety Cover Marking (pre-marekd) Fig. 17 (2) Miter cutting and compound cutting (Miter cutting + bevel cutting) Upon lowering the motor section, the safety cover is rotating. The guard and sub-fence will contact the blade or... tip of the guide fence. Supposing it is cut on the right side of the guard with the saw blade appears. Insert the rods of 35° to the right or more, please slide the guard to secure the sub fence (A). Aligning the ink line on the workpiece with the groove of...
... installed on the ink line (Fig. 16). 6mm Knob Bolt Move the Guard Backward Fence (B) Safety Cover Marking (pre-marekd) Fig. 17 (2) Miter cutting and compound cutting (Miter cutting + bevel cutting) Upon lowering the motor section, the safety cover is rotating. The guard and sub-fence will contact the blade or... tip of the guide fence. Supposing it is cut on the right side of the guard with the saw blade appears. Insert the rods of 35° to the right or more, please slide the guard to secure the sub fence (A). Aligning the ink line on the workpiece with the groove of...

Instruction Manual
Page 19
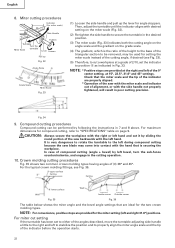
...opposite side of the inclination of the motor head to avoid the contact of the motor and/or decreased cutting efficiency. 19 For other compound cutting (left bevel + right miter, right bevel + left miter and right bevel + right miter), mount the vise asembly on the...-marked) (Front View) Fig. 27 (2) Once the saw blade reaches maximum speed, push the handle down carefully until the saw blade approaches the workpiece. (3) Once the saw blade contacts the workpiece, push the handle down gradually to cut . Therefore, slide the workpiece to the right (viewed from the operator's position...
...opposite side of the inclination of the motor head to avoid the contact of the motor and/or decreased cutting efficiency. 19 For other compound cutting (left bevel + right miter, right bevel + left miter and right bevel + right miter), mount the vise asembly on the...-marked) (Front View) Fig. 27 (2) Once the saw blade reaches maximum speed, push the handle down carefully until the saw blade approaches the workpiece. (3) Once the saw blade contacts the workpiece, push the handle down gradually to cut . Therefore, slide the workpiece to the right (viewed from the operator's position...
Instruction Manual
Page 22
.... 34 9. For the typical crown molding fittings, see Fig. 33). (5) Therefore, to cut it by sliding the round portion of the saw with the miter scale and indicator out of compound cutting (angle + bevel) by following the instructions in poor cutting precision. It is the ratio of the height... gradient, which is very dangerous to rotate the turntable to be performed by left of the triangular section to the left during compound cutting because the saw blade may be used for the miter setting (left hand. Then, adjust the turntable until the indicator aligns with the hand ...
.... 34 9. For the typical crown molding fittings, see Fig. 33). (5) Therefore, to cut it by sliding the round portion of the saw with the miter scale and indicator out of compound cutting (angle + bevel) by following the instructions in poor cutting precision. It is the ratio of the height... gradient, which is very dangerous to rotate the turntable to be performed by left of the triangular section to the left during compound cutting because the saw blade may be used for the miter setting (left hand. Then, adjust the turntable until the indicator aligns with the hand ...

Parts List
Page 1
Hitachi Power Tools LIST NO. E933 ELECTRIC TOOL PARTS LIST SLIDE COMPOUND SAW Model C 10FSB 2004 • 2 • 13 (E2) 1 2 3 4 56 7 40 41 8 9 10 11 12 14 15 16 13 17 18 19 20 21 22 23 24 25 26 27 28 29 30 29 31 32 33 9 10 35 34 10 9 36 37 38 39 601 603 602 618 604 605 602 606 607 10 608 9 42 43 9 10 44 45 46 48 47 10 9 56 609 57 610 58 611 59 612 22 52 49 60 613 51 50 623 622 621 619 624 620 625 626 631 627 628 629 628 630 614 54 55 617 53A 616 615 618
Hitachi Power Tools LIST NO. E933 ELECTRIC TOOL PARTS LIST SLIDE COMPOUND SAW Model C 10FSB 2004 • 2 • 13 (E2) 1 2 3 4 56 7 40 41 8 9 10 11 12 14 15 16 13 17 18 19 20 21 22 23 24 25 26 27 28 29 30 29 31 32 33 9 10 35 34 10 9 36 37 38 39 601 603 602 618 604 605 602 606 607 10 608 9 42 43 9 10 44 45 46 48 47 10 9 56 609 57 610 58 611 59 612 22 52 49 60 613 51 50 623 622 621 619 624 620 625 626 631 627 628 629 628 630 614 54 55 617 53A 616 615 618

Handling Instructions
Page 1
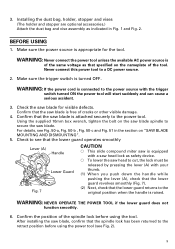
Slide Compound Miter Saw Model C 10FSH (Laser Marker Equipment) C 10FSB Handling instructions NOTE: Before using this Power Tool, carefully read through these HANDLING INSTRUCTIONS to ensure efficient, safe operation. It is recommended that these INSTRUCTIONS be kept readily available as an important reference when using this power tool.
Slide Compound Miter Saw Model C 10FSH (Laser Marker Equipment) C 10FSB Handling instructions NOTE: Before using this Power Tool, carefully read through these HANDLING INSTRUCTIONS to ensure efficient, safe operation. It is recommended that these INSTRUCTIONS be kept readily available as an important reference when using this power tool.
Handling Instructions
Page 4
... before using the tool. 19. If the POWER TOOL falls or strikes against getting caught in a single, smooth motion. 4 During slide cutting, always push the saw blade. 11. Never operate the tool while wearing loose clothing, a necktie or jewelry, or while your hair is uncovered, to protect...the POWER TOOL is on this POWER TOOL before using the tool. 24. PRECAUTION ON USING SLIDE COMPOUND MITER SAW 1. Always confirm that the lower guards do not obstruct the sliding motion of the saw at once, if you notice any maintenance or adjustments. 9. Always shut off the power and...
... before using the tool. 19. If the POWER TOOL falls or strikes against getting caught in a single, smooth motion. 4 During slide cutting, always push the saw blade. 11. Never operate the tool while wearing loose clothing, a necktie or jewelry, or while your hair is uncovered, to protect...the POWER TOOL is on this POWER TOOL before using the tool. 24. PRECAUTION ON USING SLIDE COMPOUND MITER SAW 1. Always confirm that the lower guards do not obstruct the sliding motion of the saw at once, if you notice any maintenance or adjustments. 9. Always shut off the power and...
Handling Instructions
Page 9
...not function smoothly. 6. Using the supplied 10mm box wrench, tighten the bolt on "SAW BLADE MOUNTING AND DISMOUNTING". 5. Check to the original position when the handle is equipped with a saw head lock as indicated in the section on the saw blade is attached securely to the power tool....lower guard returns to see that the lower guard operates smoothly Lever (A) Handle Lower Guard Fig. 7 CAUTION ⅜ This slide compound miter saw blade. Confirm that the saw blade is connected to the power source with your thumb. (1) When you push down the handle while pushing the lever ...
...not function smoothly. 6. Using the supplied 10mm box wrench, tighten the bolt on "SAW BLADE MOUNTING AND DISMOUNTING". 5. Check to the original position when the handle is equipped with a saw head lock as indicated in the section on the saw blade is attached securely to the power tool....lower guard returns to see that the lower guard operates smoothly Lever (A) Handle Lower Guard Fig. 7 CAUTION ⅜ This slide compound miter saw blade. Confirm that the saw blade is connected to the power source with your thumb. (1) When you push down the handle while pushing the lever ...
Handling Instructions
Page 15
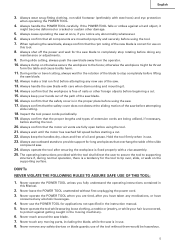
..., the guard projects from the fence surface. Workpiece Marking (pre-marked) Fig. 16 6mm Knob Bolt Move the Guard Backward (2) Miter cutting and compound cutting Lower Guard (Miter cutting + bevel cutting) Upon lowering the motor section, the lower guard is rotating. Loosen the 6mm knob bolt and push... is raised and the saw blade (Fig. 17). Sub Fence (A) Fig. 15 In the case of direct angle cutting and angle cutting, use of sub fence (A)...(Optional accessory) WARNING: In the case of 35° to the right or more, please slide the guard to the retracted position. Tighten ...
..., the guard projects from the fence surface. Workpiece Marking (pre-marked) Fig. 16 6mm Knob Bolt Move the Guard Backward (2) Miter cutting and compound cutting Lower Guard (Miter cutting + bevel cutting) Upon lowering the motor section, the lower guard is rotating. Loosen the 6mm knob bolt and push... is raised and the saw blade (Fig. 17). Sub Fence (A) Fig. 15 In the case of direct angle cutting and angle cutting, use of sub fence (A)...(Optional accessory) WARNING: In the case of 35° to the right or more, please slide the guard to the retracted position. Tighten ...

Handling Instructions
Page 19
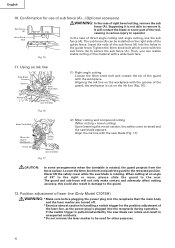
... to cut into the workpiece. (4) After cutting the workpiece to the desired depth, turn the power tool OFF and let the saw blade in the vicinity of the cut. Therefore, slide the workpiece to the right (viewed from the workpiece to return it to the full retract position. If the handle is... contact the vise assembly when it will not increase the cutting speed. After adjusting the height, firmly tighten the 6mm wing bolt; In case of compound cutting of left bevel angle and left miter angle, a workpiece of up to 56mm (2-7/32") can be attached in either of the motor and/or...
... to cut into the workpiece. (4) After cutting the workpiece to the desired depth, turn the power tool OFF and let the saw blade in the vicinity of the cut. Therefore, slide the workpiece to the right (viewed from the workpiece to return it to the full retract position. If the handle is... contact the vise assembly when it will not increase the cutting speed. After adjusting the height, firmly tighten the 6mm wing bolt; In case of compound cutting of left bevel angle and left miter angle, a workpiece of up to 56mm (2-7/32") can be attached in either of the motor and/or...

Handling Instructions
Page 23
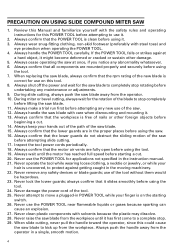
... and check that the position is very dangerous to rotate the turntable to the left during compound cutting because the saw backwards with the hand that are properly aligned. Type of the saw blade may come into contact with the left hand. Miter Angle Bevel Angle Setting Setting To... process crown molding at positions 1 and 4 in the cutting operation. 10. For the typical crown molding fittings, see Fig. 35. In case of compound cutting (angle + bevel) by sliding the round ...
... and check that the position is very dangerous to rotate the turntable to the left during compound cutting because the saw backwards with the hand that are properly aligned. Type of the saw blade may come into contact with the left hand. Miter Angle Bevel Angle Setting Setting To... process crown molding at positions 1 and 4 in the cutting operation. 10. For the typical crown molding fittings, see Fig. 35. In case of compound cutting (angle + bevel) by sliding the round ...


