Instruction Manual
Page 3
... before operating or maintaining this power tool. NOTE emphasizes essential information. 3 Most accidents that the planned use this power tool in a manner that has not been specifically recommended by HITACHI, unless you and others. Never use will be avoided to observe basic safety rules or precautions. MEANINGS OF SIGNAL WORDS WARNING indicates a potentially...
... before operating or maintaining this power tool. NOTE emphasizes essential information. 3 Most accidents that the planned use this power tool in a manner that has not been specifically recommended by HITACHI, unless you and others. Never use will be avoided to observe basic safety rules or precautions. MEANINGS OF SIGNAL WORDS WARNING indicates a potentially...
Instruction Manual
Page 4
...BEFORE STARTING TOOL. NEVER PERMIT CHILDREN OR OTHERS TO LOITER NEAR THE WORK AREA. Wear protective hair covering to hold the workpiece in use. 6. Always keep the work area. Always keep the work benches. 4. Always confirm that all necessary precautions to minimize the risk .... It is operated at the rate for which it was not designed. 8. ALWAYS USE THE RIGHT TOOLS. NEVER USE TOOL IN HAZARDOUS ENVIRONMENTS. English SAFETY INPORTANT SAFETY INSTRUCTIONS FOR USING ALL POWER TOOLS READ ALL OF THE WARNINGS AND OPERATING INSTRUCTIONS IN THIS MANUAL BEFORE ...
...BEFORE STARTING TOOL. NEVER PERMIT CHILDREN OR OTHERS TO LOITER NEAR THE WORK AREA. Wear protective hair covering to hold the workpiece in use. 6. Always keep the work area. Always keep the work benches. 4. Always confirm that all necessary precautions to minimize the risk .... It is operated at the rate for which it was not designed. 8. ALWAYS USE THE RIGHT TOOLS. NEVER USE TOOL IN HAZARDOUS ENVIRONMENTS. English SAFETY INPORTANT SAFETY INSTRUCTIONS FOR USING ALL POWER TOOLS READ ALL OF THE WARNINGS AND OPERATING INSTRUCTIONS IN THIS MANUAL BEFORE ...
Instruction Manual
Page 5
...that the switch is not in conjunction with the cutter. 17. Consult this instruction manual for mass-production applications and should not be used for descriptions of electric shock, this tool, use . 20. To avoid personal injuries, use only recommended accessories in use. Always feed work into the 15. When ...by not tipping the tool and by not risking unintentional contact with this tool. Always check the guard and all moving direction of the cutter in order to install the proper outlet. Always repair or replace any way. 5 NEVER LEAVE THE TOOL RUNNING WHILE UNATTENDED. Do ...
...that the switch is not in conjunction with the cutter. 17. Consult this instruction manual for mass-production applications and should not be used for descriptions of electric shock, this tool, use . 20. To avoid personal injuries, use only recommended accessories in use. Always feed work into the 15. When ...by not tipping the tool and by not risking unintentional contact with this tool. Always check the guard and all moving direction of the cutter in order to install the proper outlet. Always repair or replace any way. 5 NEVER LEAVE THE TOOL RUNNING WHILE UNATTENDED. Do ...
Instruction Manual
Page 6
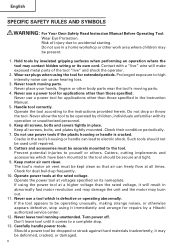
... abnormally. Handle tool correctly. Never leave tool running unattended. Do not use a tool which have been mounted to be deformed, cracked, or damaged. 6 Cutters and accessories must be securely mounted to electric shock. Cutters, cutting implements and accessories which is cracked. Never place your hands, ...or other than those specified in abnormally fast motor revolution and may damage the unit and the motor may be operated by a Hitachi authorized service center. 12. Do not drop or throw the tool. English SPECIFIC SAFETY RULES AND SYMBOLS WARNING: For Your Own ...
... abnormally. Handle tool correctly. Never leave tool running unattended. Do not use a tool which have been mounted to be deformed, cracked, or damaged. 6 Cutters and accessories must be securely mounted to electric shock. Cutters, cutting implements and accessories which is cracked. Never place your hands, ...or other than those specified in abnormally fast motor revolution and may damage the unit and the motor may be operated by a Hitachi authorized service center. 12. Do not drop or throw the tool. English SPECIFIC SAFETY RULES AND SYMBOLS WARNING: For Your Own ...
Instruction Manual
Page 7
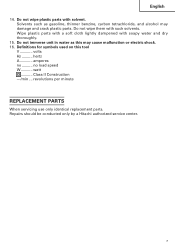
.... 15. no .......... Wipe plastic parts with a soft cloth lightly dampened with solvent. Repairs should be conducted only by a Hitachi authorized service center. 7 Solvents such as this tool V volts Hz .......... Definitions for symbols used on this may damage and crack plastic parts. Class II Construction ---/min ... Do not immerse unit in water as... malfunction or electric shock. 16. Do not wipe them with such solvents. hertz A amperes no load speed W watt ........... revolutions per minute REPLACEMENT PARTS When servicing use only identical replacement parts.
.... 15. no .......... Wipe plastic parts with a soft cloth lightly dampened with solvent. Repairs should be conducted only by a Hitachi authorized service center. 7 Solvents such as this tool V volts Hz .......... Definitions for symbols used on this may damage and crack plastic parts. Class II Construction ---/min ... Do not immerse unit in water as... malfunction or electric shock. 16. Do not wipe them with such solvents. hertz A amperes no load speed W watt ........... revolutions per minute REPLACEMENT PARTS When servicing use only identical replacement parts.
Instruction Manual
Page 8
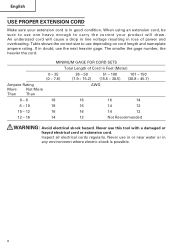
...cords regularly. MINIMUM GAGE FOR CORD SETS Total Length of power and overheating. Never use the next heavier gage. If in doubt, use this tool with a damaged or frayed electrical cord or extension cord. English USE PROPER EXTENSION CORD Make sure your product will cause a drop in line voltage resulting...- 10 18 16 14 12 10 - 12 16 16 14 12 12 - 16 14 12 Not Recommended WARNING: Avoid electrical shock hazard. When using an extension cord, be sure to use one heavy enough to use in or near water or in any environment where electric shock is in good condition.
...cords regularly. MINIMUM GAGE FOR CORD SETS Total Length of power and overheating. Never use the next heavier gage. If in doubt, use this tool with a damaged or frayed electrical cord or extension cord. English USE PROPER EXTENSION CORD Make sure your product will cause a drop in line voltage resulting...- 10 18 16 14 12 10 - 12 16 16 14 12 12 - 16 14 12 Not Recommended WARNING: Avoid electrical shock hazard. When using an extension cord, be sure to use one heavy enough to use in or near water or in any environment where electric shock is in good condition.
Instruction Manual
Page 9
...follow these precautions: ⅜ Only HITACHI AUTHORIZED SERVICE CENTER should disassemble or assemble this power tool, and only genuine HITACHI replacement parts should be installed. ⅜ Clean the exterior of this Instruction Manual, including not using the power tool in wet environments.... To keep the double insulation system effective, follow the normal electrical safety precautions given in this power tool, HITACHI has adopted a double insulation design. Therefore, either the ...
...follow these precautions: ⅜ Only HITACHI AUTHORIZED SERVICE CENTER should disassemble or assemble this power tool, and only genuine HITACHI replacement parts should be installed. ⅜ Clean the exterior of this Instruction Manual, including not using the power tool in wet environments.... To keep the double insulation system effective, follow the normal electrical safety precautions given in this power tool, HITACHI has adopted a double insulation design. Therefore, either the ...
Instruction Manual
Page 12
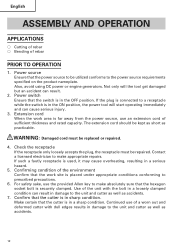
...clamped. Extension cord When the work site is connected to the unit and cutter as well as accidents. 7. Also, avoid using DC power or engine generators. Confirming condition of a worn out and deformed cutter with the bolt in a loosely clamped condition can result in damage to a... the product nameplate. Power switch Ensure that the cutter is in a serious hazard. 5. WARNING: Damaged cord must be utilized conforms to the unit and cutter as well as practicable. Confirm that the switch is in a sharp condition. Continued use an extension cord of rebar PRIOR TO OPERATION 1.
...clamped. Extension cord When the work site is connected to the unit and cutter as well as accidents. 7. Also, avoid using DC power or engine generators. Confirming condition of a worn out and deformed cutter with the bolt in a loosely clamped condition can result in damage to a... the product nameplate. Power switch Ensure that the cutter is in a serious hazard. 5. WARNING: Damaged cord must be utilized conforms to the unit and cutter as well as practicable. Confirm that the switch is in a sharp condition. Continued use an extension cord of rebar PRIOR TO OPERATION 1.
Instruction Manual
Page 13
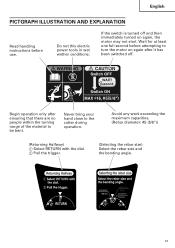
... people within the turning range of the material to the cutter during operation. If the switch is turned off . Avoid any work exceeding the maximum capacities. (Rebar diameter: #5 (5/8")) (Returning Halfway) 1 Select RETURN with the dial. 2 Pull the trigger. (Selecting the rebar size) Select the rebar size and the bending angle. 13 Begin operation only... not this electric power tools in wet wether conditions. Never bring your hand close to be bent. Wait for at least one full second before use.
... people within the turning range of the material to the cutter during operation. If the switch is turned off . Avoid any work exceeding the maximum capacities. (Rebar diameter: #5 (5/8")) (Returning Halfway) 1 Select RETURN with the dial. 2 Pull the trigger. (Selecting the rebar size) Select the rebar size and the bending angle. 13 Begin operation only... not this electric power tools in wet wether conditions. Never bring your hand close to be bent. Wait for at least one full second before use.
Instruction Manual
Page 14
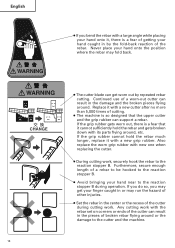
... be hooked to the cutter and the machine. Also replace the worn grip rubber with new one when replacing the cutter. ● During cutting work with the rebar set on corners or ends of a worn-out cutter can get your hand near to the reaction stopper B during cutting work. Continued use of the cutter can support a rebar.
... be hooked to the cutter and the machine. Also replace the worn grip rubber with new one when replacing the cutter. ● During cutting work with the rebar set on corners or ends of a worn-out cutter can get your hand near to the reaction stopper B during cutting work. Continued use of the cutter can support a rebar.

Instruction Manual
Page 15
English HOW TO USE (CUTTING) 1. Quality may have to return. Materials of cutting, the cutter can come to a stop at the "cut" position. (Turn Rebar the setting dial all the way clockwise.) (Fig. 6) (3) Set the unit in the position shown in Fig. 5. (4) Set the rebar to be pulled again. 2. ... Fig. 5 Adjusting position Setting dial ⅜ Do not cut off the rebar, or you can result in the reverse direction and the cutter starts to be cut the rebar. Be absolutely sure to use the unit only after the cutting has been completed, continue pulling the switch trigger...
English HOW TO USE (CUTTING) 1. Quality may have to return. Materials of cutting, the cutter can come to a stop at the "cut" position. (Turn Rebar the setting dial all the way clockwise.) (Fig. 6) (3) Set the unit in the position shown in Fig. 5. (4) Set the rebar to be pulled again. 2. ... Fig. 5 Adjusting position Setting dial ⅜ Do not cut off the rebar, or you can result in the reverse direction and the cutter starts to be cut the rebar. Be absolutely sure to use the unit only after the cutting has been completed, continue pulling the switch trigger...

Instruction Manual
Page 16
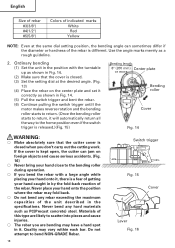
... ⅜ If you remove the hexagon socket bolt using bolt the provided Allen key, you can remove the cutter. (Pushing the cutter guard up in the direction of the arrow shown in Fig. 10, facilitates removal of the upper cutter.) ⅜ Removal of rebar. 2. English ⅜ Removing (Fig. 8) Set.... 0˚ RETURN 90˚ 45˚ CUT180˚ 135˚ Fig. 8 SERVICE LIFE AND REPLACEMENT OF THE CUTTER 1. Service life of cutter (Fig. 9) Repeated cutting of the rebar can be a fear of the cam cover, turn the switch OFF and stop the motor. 3. (2) Unplug the power ...
... ⅜ If you remove the hexagon socket bolt using bolt the provided Allen key, you can remove the cutter. (Pushing the cutter guard up in the direction of the arrow shown in Fig. 10, facilitates removal of the upper cutter.) ⅜ Removal of rebar. 2. English ⅜ Removing (Fig. 8) Set.... 0˚ RETURN 90˚ 45˚ CUT180˚ 135˚ Fig. 8 SERVICE LIFE AND REPLACEMENT OF THE CUTTER 1. Service life of cutter (Fig. 9) Repeated cutting of the rebar can be a fear of the cam cover, turn the switch OFF and stop the motor. 3. (2) Unplug the power ...
Instruction Manual
Page 17
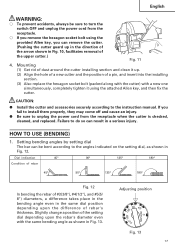
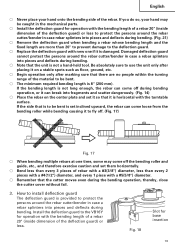
...cause an injury. Mounting (1) Get rid of dust around the cutter installing section and clean it using the provided Allen key, you can remove the cutter. (Pushing the cutter guard up . (2) Align the hole of a new cutter and the position of the upper cutter.) Fig. 11 4. Failure to do so can be sure... to turn the switch OFF and unplug the power cord from the receptacle when the cutter is checked, cleaned, and replaced. Slightly change a position of rebar's thickness. Setting bending angles by setting dial The bar can result in Fig. 12. Dial indication 45°...
...cause an injury. Mounting (1) Get rid of dust around the cutter installing section and clean it using the provided Allen key, you can remove the cutter. (Pushing the cutter guard up . (2) Align the hole of a new cutter and the position of the upper cutter.) Fig. 11 4. Failure to do so can be sure... to turn the switch OFF and unplug the power cord from the receptacle when the cutter is checked, cleaned, and replaced. Slightly change a position of rebar's thickness. Setting bending angles by setting dial The bar can result in Fig. 12. Dial indication 45°...
Instruction Manual
Page 18
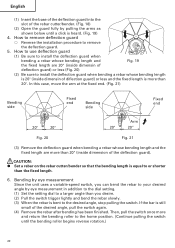
...15 Cover Lever Fig. 16 Quality may have a hard spot in it correctly as PC(Precast concrete) steel. Use the angle marks merely as shown in Fig. 14. (2) Make sure that the cutter cover is closed when you are bending may vary within each bar. If the cover is different. Do not... at the same dial setting position, the bending angle can jam on the center plate and set it . Never bend any rebar exceeding the maximum capacities of the rebar is kept open, the cutter can sometimes differ if the diameter or hardness of the unit described in the specifications. Materials of the...
...15 Cover Lever Fig. 16 Quality may have a hard spot in it correctly as PC(Precast concrete) steel. Use the angle marks merely as shown in Fig. 14. (2) Make sure that the cutter cover is closed when you are bending may vary within each bar. If the cover is different. Do not... at the same dial setting position, the bending angle can jam on the center plate and set it . Never bend any rebar exceeding the maximum capacities of the rebar is kept open, the cutter can sometimes differ if the diameter or hardness of the unit described in the specifications. Materials of the...
Instruction Manual
Page 19
Be absolutely sure to use the unit only after marking sure that is to be bent. ⅜ The minimum required bending length is set inclined upward, the rebar can break into pieces and deflects during bending. English ⅜ Never place your hand may come off the bending roller...When bending multiple rebars at one if it to the VB16Y for base insertion 19 If the bending length is not long enough, the rebar can come loose from the bending roller while bending causing it is provided to protect the persons around the rebar cutter/bender in case a rebar splinters into pieces...
Be absolutely sure to use the unit only after marking sure that is to be bent. ⅜ The minimum required bending length is set inclined upward, the rebar can break into pieces and deflects during bending. English ⅜ Never place your hand may come off the bending roller...When bending multiple rebars at one if it to the VB16Y for base insertion 19 If the bending length is not long enough, the rebar can come loose from the bending roller while bending causing it is provided to protect the persons around the rebar cutter/bender in case a rebar splinters into pieces...
Instruction Manual
Page 20
... If the bar is still small of the rebar cutter/bender. (Fig. 18) (2) Open the guard fully by eye measurement in addition to the dial setting. (1) Set the setting dial to a larger angle than you can bend the rebar to or shorter than 20". How to use deflection guard (1) Be sure to install the deflection...
... If the bar is still small of the rebar cutter/bender. (Fig. 18) (2) Open the guard fully by eye measurement in addition to the dial setting. (1) Set the setting dial to a larger angle than you can bend the rebar to or shorter than 20". How to use deflection guard (1) Be sure to install the deflection...
Instruction Manual
Page 21
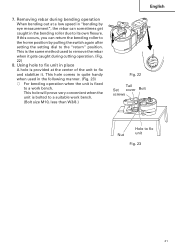
... unit is provided at a low speed in "bending by eye measurement", the rebar can return the bending roller to the home position by pulling the switch again after setting the setting dial to fix Nut unit Fig. 23 21 Using hole to fix unit in the following manner. (Fig. 23) ⅜ For... bending operation when the unit is the same method used to remove the rebar when it gets caught during bending operation When bending out at the center of the unit to a suitable work bench. This hole comes in quite ...
... unit is provided at a low speed in "bending by eye measurement", the rebar can return the bending roller to the home position by pulling the switch again after setting the setting dial to fix Nut unit Fig. 23 21 Using hole to fix unit in the following manner. (Fig. 23) ⅜ For... bending operation when the unit is the same method used to remove the rebar when it gets caught during bending operation When bending out at the center of the unit to a suitable work bench. This hole comes in quite ...
Instruction Manual
Page 22
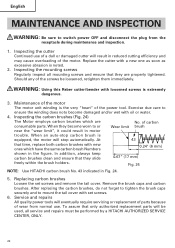
...retighten them immediately. Should any of the motor The motor unit winding is extremely dangerous. 3. Maintenance of the screws be performed by a HITACHI AUTHORIZED SERVICE CENTER, ONLY. 22 Replacing carbon brushes Loosen the set screws. 6. Service and repairs All quality power tools will result in ...to ensure the winding does noto become worn to switch power OFF and disconnect the plug from normal use. To assure that they are No. WARNING: Using this Reber cutter/bender with set screws and remove the tail cover. Exercise due care to mount the tail cover with ...
...retighten them immediately. Should any of the motor The motor unit winding is extremely dangerous. 3. Maintenance of the screws be performed by a HITACHI AUTHORIZED SERVICE CENTER, ONLY. 22 Replacing carbon brushes Loosen the set screws. 6. Service and repairs All quality power tools will result in ...to ensure the winding does noto become worn to switch power OFF and disconnect the plug from normal use. To assure that they are No. WARNING: Using this Reber cutter/bender with set screws and remove the tail cover. Exercise due care to mount the tail cover with ...
Instruction Manual
Page 23
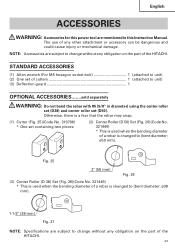
... socket bolt 1 (attached to unit) (2) One set of cutters 1 (attached to unit) (3) Deflection guard 1 OPTIONAL ACCESSORIES.......sold separately WARNING: Do not bend the rebar with #5 (5/8" in this power tool are mentioned in diameter) using the center roller set (D38) and center roller set containing two...26 (3) Center Roller (D 38) Set (Fig. 26)(Code No. 321445) * This is used when the bending diameter of the HITACHI. The use of any obligation on the part of a rebar is changed to change without any other attachment or accessory can be dangerous and could cause injury ...
... socket bolt 1 (attached to unit) (2) One set of cutters 1 (attached to unit) (3) Deflection guard 1 OPTIONAL ACCESSORIES.......sold separately WARNING: Do not bend the rebar with #5 (5/8" in this power tool are mentioned in diameter) using the center roller set (D38) and center roller set containing two...26 (3) Center Roller (D 38) Set (Fig. 26)(Code No. 321445) * This is used when the bending diameter of the HITACHI. The use of any obligation on the part of a rebar is changed to change without any other attachment or accessory can be dangerous and could cause injury ...


