

Instruction Manual
Page 3
... the influence of electric shock. e) When operating a power tool outdoors, use 2) Electrical safety an extension cord suitable for outdoor use the cord atmospheres, such as pipes, radiators, ranges and medication. The term "power tool" in serious personal your mains-operated (corded) power tool or battery-operated (cordless) power tool. risk of the warnings listed below may result in all instructions listed below refers to lose control. tool. NOTE emphasizes essential information. a) Keep work area clean and...
... the influence of electric shock. e) When operating a power tool outdoors, use 2) Electrical safety an extension cord suitable for outdoor use the cord atmospheres, such as pipes, radiators, ranges and medication. The term "power tool" in serious personal your mains-operated (corded) power tool or battery-operated (cordless) power tool. risk of the warnings listed below may result in all instructions listed below refers to lose control. tool. NOTE emphasizes essential information. a) Keep work area clean and...
Instruction Manual
Page 4
... properly SPECIFIC SAFETY RULES AND SYMBOLS used for the connection of the power tool replacement parts. ALWAYS attach the side handle and securely grip the Belt Sander. 6. NEVER touch moving parts. 7. NEVER place your application. 2. working order. Loose clothes, jewellery or long hair can be sure to be repaired. instruction manual. Such preventive safety measures reduce the risk of injury, user must be d) Remove any adjustments, changing accessories, or storing power tools. NEVER operate...
... properly SPECIFIC SAFETY RULES AND SYMBOLS used for the connection of the power tool replacement parts. ALWAYS attach the side handle and securely grip the Belt Sander. 6. NEVER touch moving parts. 7. NEVER place your application. 2. working order. Loose clothes, jewellery or long hair can be sure to be repaired. instruction manual. Such preventive safety measures reduce the risk of injury, user must be d) Remove any adjustments, changing accessories, or storing power tools. NEVER operate...
Instruction Manual
Page 5
... cutting by the operator. English 8. After operation sweep the sanding dust from the outer frame handled by sideof-belt contact should be operating unusually, making strange noises, or otherwise appears defective, stop . 18. Cracks in place. Blades and accessories must still follow these precautions: ⅜ Only HITACHI AUTHORIZED SERVICE CENTER should be operated by a Hitachi authorized service center. 17. Be careful of this power tool, and only genuine HITACHI replacement parts...
... cutting by the operator. English 8. After operation sweep the sanding dust from the outer frame handled by sideof-belt contact should be operating unusually, making strange noises, or otherwise appears defective, stop . 18. Cracks in place. Blades and accessories must still follow these precautions: ⅜ Only HITACHI AUTHORIZED SERVICE CENTER should be operated by a Hitachi authorized service center. 17. Be careful of this power tool, and only genuine HITACHI replacement parts...

Instruction Manual
Page 6
... Dial Drive pulley Lever Fig. 1-a Idle pulley Slide fastener Dust bag Belt cover Adjust screw Fig. 1-b SPECIFICATIONS Model Motor Power source Current Sanding belt size No-load belt speed Weight (without cord) 6 SB8V2 Single Phase, Series Commutator Motor Single Phase 120V AC 60 Hz 9.0 A 3" × 21" (76 mm × 533 mm) 820 - 1,476 ft/min (250 - 450 m/min) 9.5 lbs (4.3 kg) English SAVE THESE INSTRUCTIONS AND MAKE THEM AVAILABLE TO OTHER USERS AND OWNERS...
... Dial Drive pulley Lever Fig. 1-a Idle pulley Slide fastener Dust bag Belt cover Adjust screw Fig. 1-b SPECIFICATIONS Model Motor Power source Current Sanding belt size No-load belt speed Weight (without cord) 6 SB8V2 Single Phase, Series Commutator Motor Single Phase 120V AC 60 Hz 9.0 A 3" × 21" (76 mm × 533 mm) 820 - 1,476 ft/min (250 - 450 m/min) 9.5 lbs (4.3 kg) English SAVE THESE INSTRUCTIONS AND MAKE THEM AVAILABLE TO OTHER USERS AND OWNERS...
Instruction Manual
Page 7
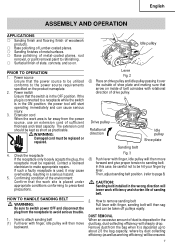
... start operating immediately and can be replaced or repaired. 4. How to page 8) CAUTION: Sanding belt installed in the wrong direction will lower work area is deposited in the ON position, the power tool will then move forward and give proper tension to avoid serious trouble. 1. Then, adjust sanding belt position. (refer to attach sanding belt (1) Pull lever with rotational direction of dust is far away from the power source, use an extension cord...
... start operating immediately and can be replaced or repaired. 4. How to page 8) CAUTION: Sanding belt installed in the wrong direction will lower work area is deposited in the ON position, the power tool will then move forward and give proper tension to avoid serious trouble. 1. Then, adjust sanding belt position. (refer to attach sanding belt (1) Pull lever with rotational direction of dust is far away from the power source, use an extension cord...
Instruction Manual
Page 8
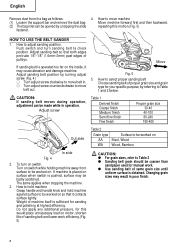
... edges of same grain size until uniform surface is operated too far on surface when switch is sufficient for your specific purpose, by turning adjust Fig. 5 screw (Fig. 4 ) 5. How to move type for sanding and polishing at highest efficiency. HOW TO USE THE BELT SANDER 1. Push switch and turn on switch Turn on switch while holding machine away from the bag as follows: 4. To turn sanding belt te check position. English Remove dust...
... edges of same grain size until uniform surface is operated too far on surface when switch is sufficient for your specific purpose, by turning adjust Fig. 5 screw (Fig. 4 ) 5. How to move type for sanding and polishing at highest efficiency. HOW TO USE THE BELT SANDER 1. Push switch and turn on switch Turn on switch while holding machine away from the bag as follows: 4. To turn sanding belt te check position. English Remove dust...
Instruction Manual
Page 9
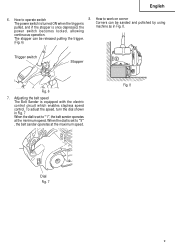
... belt sander operates at the maximum speed. Adjusting the belt speed The Belt Sander is once depressed, the machine as in Fig. 7 When the dial is set to "5" , the belt sander operetes at the minimum speed. How to operate switch 8. The stopper can be released pulling the trigger. (Fig. 6) Trigger switch Stopper Fig. 6 7. How to work on corner The power switch is turned ON when the trigger is Corners can be sanded and polished by using...
... belt sander operates at the maximum speed. Adjusting the belt speed The Belt Sander is once depressed, the machine as in Fig. 7 When the dial is set to "5" , the belt sander operetes at the minimum speed. How to operate switch 8. The stopper can be released pulling the trigger. (Fig. 6) Trigger switch Stopper Fig. 6 7. How to work on corner The power switch is turned ON when the trigger is Corners can be sanded and polished by using...
Instruction Manual
Page 10
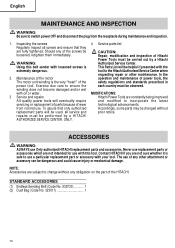
... power tool. STANDARD ACCESSORIES (1) Endless Sanding Belt (Code No. 939733 1 (2) Dust Bag (Code No. 323011 1 10 English MAINTENANCE AND INSPECTION WARNING: Be sure to the Hitachi Authorized Service Center when requesting repair or other attachment or accessory can be performed by a Hitachi WARNING: Authorized Service Center. Service parts list Regularly inspect all service and prior notice. from the receptacle during maintenance and inspection. 1. Contact HITACHI if you are fully tightened. Maintenance of the motor operation...
... power tool. STANDARD ACCESSORIES (1) Endless Sanding Belt (Code No. 939733 1 (2) Dust Bag (Code No. 323011 1 10 English MAINTENANCE AND INSPECTION WARNING: Be sure to the Hitachi Authorized Service Center when requesting repair or other attachment or accessory can be performed by a Hitachi WARNING: Authorized Service Center. Service parts list Regularly inspect all service and prior notice. from the receptacle during maintenance and inspection. 1. Contact HITACHI if you are fully tightened. Maintenance of the motor operation...
Instruction Manual
Page 11
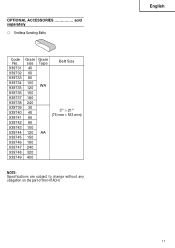
English 11 OPTIONAL ACCESSORIES sold separately ⅜ Endless Sanding Belts Code No. 939731 939732 939733 939734 939735 939736 939737 939738 939739 939740 939741 939742 939743 939744 939745 939746 939747 939748 939749 Grain size 40 60 80 100 120 150 180 240 30 40 60 80 100 120 150 180 240 320 400 Grain Type WA AA Belt Size 3" × 21" (76 mm × 533 mm) NOTE: Specifications are subject to change without any obligation on the part of the HITACHI.
English 11 OPTIONAL ACCESSORIES sold separately ⅜ Endless Sanding Belts Code No. 939731 939732 939733 939734 939735 939736 939737 939738 939739 939740 939741 939742 939743 939744 939745 939746 939747 939748 939749 Grain size 40 60 80 100 120 150 180 240 30 40 60 80 100 120 150 180 240 320 400 Grain Type WA AA Belt Size 3" × 21" (76 mm × 533 mm) NOTE: Specifications are subject to change without any obligation on the part of the HITACHI.
Instruction Manual
Page 32
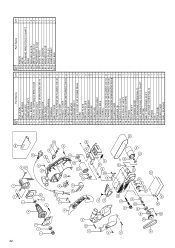
... BRUSH TERMINAL 2 62 DRIVE PULLEY 1 12 TERMINAL 1 63 SANDING BELT 1 13 BELT COVER 1 501 DUST BAG 1 14 TAPPING SCREW (W/FLANGE) D5×45 4 15 DUST COVER 1 16 HANDLE COVER 1 17 TAPPING SCREW (W/FLANGE) D4×16 2 18 CORD CLIP 1 19 CORD ARMOR 1 20 HOUSING ASS'Y 1 21 HEX. Part Name Q'TY Item No. SOCKET SET SCREW M5×8 2 22 CORD 1 23 NAME PLATE 1 24 BRUSH HOLDER 2 25 CARBON BRUSH 2 26 BRUSH CAP 2 27 SWITCH...
... BRUSH TERMINAL 2 62 DRIVE PULLEY 1 12 TERMINAL 1 63 SANDING BELT 1 13 BELT COVER 1 501 DUST BAG 1 14 TAPPING SCREW (W/FLANGE) D5×45 4 15 DUST COVER 1 16 HANDLE COVER 1 17 TAPPING SCREW (W/FLANGE) D4×16 2 18 CORD CLIP 1 19 CORD ARMOR 1 20 HOUSING ASS'Y 1 21 HEX. Part Name Q'TY Item No. SOCKET SET SCREW M5×8 2 22 CORD 1 23 NAME PLATE 1 24 BRUSH HOLDER 2 25 CARBON BRUSH 2 26 BRUSH CAP 2 27 SWITCH...


