Instruction Manual
Page 3
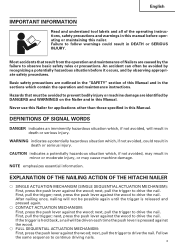
... against the wood; First, pull the trigger; next, pull the trigger to drive the nail. EXPLANATION OF THE NAILING ACTION OF THE HITACHI NAILER ⅜ SINGLE ACTUATION MECHANISM (SINGLE SEQUENTIAL ACTUATION MECHANISM): First, press the push lever against the wood to drive the nail. next, ... drive the nail. First, pull the trigger; next, press the push lever against the wood; English IMPORTANT INFORMATION Read and understand tool labels and all of the operating instructions, safety precautions and warnings in this Manual. Failure to prevent bodily injury or machine damage are...
... against the wood; First, pull the trigger; next, pull the trigger to drive the nail. EXPLANATION OF THE NAILING ACTION OF THE HITACHI NAILER ⅜ SINGLE ACTUATION MECHANISM (SINGLE SEQUENTIAL ACTUATION MECHANISM): First, press the push lever against the wood to drive the nail. next, ... drive the nail. First, pull the trigger; next, press the push lever against the wood; English IMPORTANT INFORMATION Read and understand tool labels and all of the operating instructions, safety precautions and warnings in this Manual. Failure to prevent bodily injury or machine damage are...

Instruction Manual
Page 4
Safety glasses must enforce the use oxygen, combustible gases or any other bottled gases as a power source for the Nailer. EXPLOSION MAY OCCUR. WARNING 3. NEVER POINT TOOL AT YOURSELF OR OTHERS IN WORK AREA. Never engage in horseplay with finger on trigger since you could drive a fastener unintentionally and injure yourself or ...
Safety glasses must enforce the use oxygen, combustible gases or any other bottled gases as a power source for the Nailer. EXPLOSION MAY OCCUR. WARNING 3. NEVER POINT TOOL AT YOURSELF OR OTHERS IN WORK AREA. Never engage in horseplay with finger on trigger since you could drive a fastener unintentionally and injure yourself or ...
Instruction Manual
Page 5
... all work areas of other materials which are driven away from the Nailer when the coupling joint is used on top of unnecessary tools, debris, furniture, etc. 10. Do not drive fasteners on the Nailer, the Nailer can be caught in sites containing lacquer, paint, benzine, thinner, .... Do not tamper with excessive force. 2) Separate the nailer from the wood as they can remain charged with the Nailer at too steep of the operation switching device. Never place your head from loud noise. This Hitachi nailer includes a nailing operation switching device. If the switching device...
... all work areas of other materials which are driven away from the Nailer when the coupling joint is used on top of unnecessary tools, debris, furniture, etc. 10. Do not drive fasteners on the Nailer, the Nailer can be caught in sites containing lacquer, paint, benzine, thinner, .... Do not tamper with excessive force. 2) Separate the nailer from the wood as they can remain charged with the Nailer at too steep of the operation switching device. Never place your head from loud noise. This Hitachi nailer includes a nailing operation switching device. If the switching device...

Instruction Manual
Page 6
... on the opposite side. 23. The Nailer should never be used by a Hitachi authorized service center. 27. Use common sense. The Nailer should never be driven through the wall and hit a person on the Nailer. HANDLE NAILER CORRECTLY. NEVER USE NAILER FOR APPLICATIONS OTHER THAN THOSE SPECIFIED IN ...SAME TIME. The fasteners can lead to an air supply. 28. If the Nailer appears to be operated by Hitachi, distributor or employer shall repair the Nailer. 35. Do not operate the Nailer when you are not familiar with its operation or unauthorized personnel. 31. NEVER CARRY...
... on the opposite side. 23. The Nailer should never be used by a Hitachi authorized service center. 27. Use common sense. The Nailer should never be driven through the wall and hit a person on the Nailer. HANDLE NAILER CORRECTLY. NEVER USE NAILER FOR APPLICATIONS OTHER THAN THOSE SPECIFIED IN ...SAME TIME. The fasteners can lead to an air supply. 28. If the Nailer appears to be operated by Hitachi, distributor or employer shall repair the Nailer. 35. Do not operate the Nailer when you are not familiar with its operation or unauthorized personnel. 31. NEVER CARRY...
Instruction Manual
Page 7
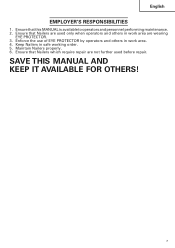
SAVE THIS MANUAL AND KEEP IT AVAILABLE FOR OTHERS! 7 Keep Nailers in work area. 4. Ensure that Nailers which require repair are wearing EYE PROTECTOR. 3. Ensure that Nailers are used before repair. Ensure that this MANUAL is available to operators and personnel performing maintenance. 2. Enforce the use of EYE PROTECTOR by operators and others in work area are not further used only when operators and others in safe working order. 5. Maintain Nailers properly. 6. English EMPLOYER'S RESPONSIBILITIES 1.
SAVE THIS MANUAL AND KEEP IT AVAILABLE FOR OTHERS! 7 Keep Nailers in work area. 4. Ensure that Nailers which require repair are wearing EYE PROTECTOR. 3. Ensure that Nailers are used before repair. Ensure that this MANUAL is available to operators and personnel performing maintenance. 2. Enforce the use of EYE PROTECTOR by operators and others in work area are not further used only when operators and others in safe working order. 5. Maintain Nailers properly. 6. English EMPLOYER'S RESPONSIBILITIES 1.
Instruction Manual
Page 8
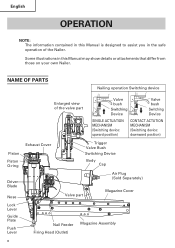
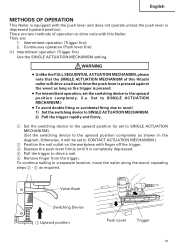
... information contained in this Manual is designed to assist you in this Manual may show details or attachments that differ from those on your own Nailer. Some illustrations in the safe operation of the valve part Valve bush Switching Device Valve bush Switching Device SINGLE ACTUATION MECHANISM (Switching device: upward position...
... information contained in this Manual is designed to assist you in this Manual may show details or attachments that differ from those on your own Nailer. Some illustrations in the safe operation of the valve part Valve bush Switching Device Valve bush Switching Device SINGLE ACTUATION MECHANISM (Switching device: upward position...
Instruction Manual
Page 9
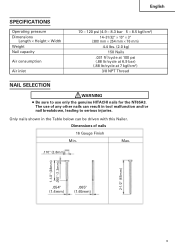
... shown in the Table below can result in tool malfunction and/or nail breakdown, leading to use of nails 16 Gauge Finish Min. Max. .110" (2.8mm) 1-1/2" (38mm) .050" (1.3mm) 2-1/2" (65mm) .054" (1.4mm) .065" (1.65mm) 9 Dimensions of any other nails can be driven with this Nailer. The use only the genuine HITACHI nails for the NT65A3.
... shown in the Table below can result in tool malfunction and/or nail breakdown, leading to use of nails 16 Gauge Finish Min. Max. .110" (2.8mm) 1-1/2" (38mm) .050" (1.3mm) 2-1/2" (65mm) .054" (1.4mm) .065" (1.65mm) 9 Dimensions of any other nails can be driven with this Nailer. The use only the genuine HITACHI nails for the NT65A3.

Instruction Manual
Page 11
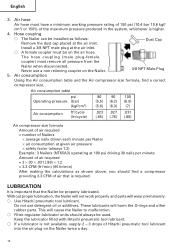
...fitted with the requirements of the latest version of lubricant is adequate. The lubricator supplies an oil mist to this Nailer. ⅜ Air compressors used . Inspect the lubricator before operation to pressure which potentially exceeds 200 psi (13.7... may occur. Nailer Side Regulator Compressor Side Lubricator Filter 11 Keep the filter clean by regular maintenance. Lubricator ........ Power source ⅜ Use only clean, dry, regulated compressed air as a power source for the Nailer and extend the Nailer life. Use Hitachi pneumatic tool lubricant. Regulator ...
...fitted with the requirements of the latest version of lubricant is adequate. The lubricator supplies an oil mist to this Nailer. ⅜ Air compressors used . Inspect the lubricator before operation to pressure which potentially exceeds 200 psi (13.7... may occur. Nailer Side Regulator Compressor Side Lubricator Filter 11 Keep the filter clean by regular maintenance. Lubricator ........ Power source ⅜ Use only clean, dry, regulated compressed air as a power source for the Nailer and extend the Nailer life. Use Hitachi pneumatic tool lubricant. Regulator ...
Instruction Manual
Page 12
...) Air compressor size formula Amount of air required = number of Nailers × average nails driven each minute per Nailer × air consumption at given air pressure × safety factor (always 1.2) Example: 3 Nailers (NT65A3) operating at the air inlet. LUBRICATION It is important that is...the maximum pressure produced in the system, whichever is required. Without proper lubrication, the Nailer will not work properly and parts will wear prematurely. ⅜ Use Hitachi pneumatic tool lubricant. The hose coupling (male plug-female coupler) must be used. Never use detergent...
...) Air compressor size formula Amount of air required = number of Nailers × average nails driven each minute per Nailer × air consumption at given air pressure × safety factor (always 1.2) Example: 3 Nailers (NT65A3) operating at the air inlet. LUBRICATION It is important that is...the maximum pressure produced in the system, whichever is required. Without proper lubrication, the Nailer will not work properly and parts will wear prematurely. ⅜ Use Hitachi pneumatic tool lubricant. The hose coupling (male plug-female coupler) must be used. Never use detergent...

Instruction Manual
Page 13
.... CAUTION: ● Do not free-fire the Nailer at high pressure. Before actually beginning the nailing work, test the Nailer by using the Nailer and contact a Hitachi authorized service center immediately. (1) DISCONNECT AIR HOSE FROM NAILER. If any screws are loose, tighten them. 13... English COLD WEATHER CARE ⅜ Do not store the Nailer in the following order. WARNING &#...
.... CAUTION: ● Do not free-fire the Nailer at high pressure. Before actually beginning the nailing work, test the Nailer by using the Nailer and contact a Hitachi authorized service center immediately. (1) DISCONNECT AIR HOSE FROM NAILER. If any screws are loose, tighten them. 13... English COLD WEATHER CARE ⅜ Do not store the Nailer in the following order. WARNING &#...

Instruction Manual
Page 14
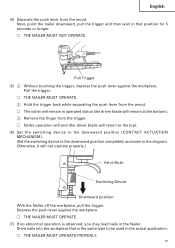
... the air hose. Depress Push Lever Do not pull Trigger 14 Otherwise, it will not operate properly.) Valve Bush Switching Device Upward position Ⅺ THE NAILER MUST NOT LEAK AIR. (3) Remove the finger from the trigger and press the push lever against the wood. Ⅺ THE... NAILER MUST NOT OPERATE. Trigger Push Lever Do not connect air hose (2) Adjust the air pressure to the upward position completely as shown in the Nailer. English Ⅺ THE PUSH LEVER AND TRIGGER MUST MOVE SMOOTHLY.
... the air hose. Depress Push Lever Do not pull Trigger 14 Otherwise, it will not operate properly.) Valve Bush Switching Device Upward position Ⅺ THE NAILER MUST NOT LEAK AIR. (3) Remove the finger from the trigger and press the push lever against the wood. Ⅺ THE... NAILER MUST NOT OPERATE. Trigger Push Lever Do not connect air hose (2) Adjust the air pressure to the upward position completely as shown in the Nailer. English Ⅺ THE PUSH LEVER AND TRIGGER MUST MOVE SMOOTHLY.
Instruction Manual
Page 15
...Remove the finger from the wood. Pull Trigger (5) 1 Without touching the trigger, depress the push lever against the workpiece. Ⅺ THE NAILER MUST OPERATE. (7) If no abnormal operation is the same type to the downward position completely as shown in that is observed, you may ... device to the downward position (CONTACT ACTUATION MECHANISM). (Set the switching device to be used in the Nailer. English (4) Separate the push lever from the trigger. Ⅺ Nailer operation will end (the driver blade will not operate properly.) Valve Bush Switching Device Downward position With the...
...Remove the finger from the wood. Pull Trigger (5) 1 Without touching the trigger, depress the push lever against the workpiece. Ⅺ THE NAILER MUST OPERATE. (7) If no abnormal operation is the same type to the downward position completely as shown in that is observed, you may ... device to the downward position (CONTACT ACTUATION MECHANISM). (Set the switching device to be used in the Nailer. English (4) Separate the push lever from the trigger. Ⅺ Nailer operation will end (the driver blade will not operate properly.) Valve Bush Switching Device Downward position With the...

Instruction Manual
Page 16
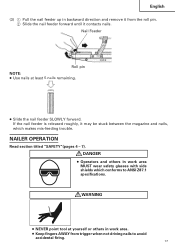
... 8.3 bar 5 - 8.5 kgf/cm2) according to the length of nails and the hardness of workpiece. and 3) keep Nailer pointed downward. (1) Pull the nail feeder back and hang it over stresses the Nailer. Nail Feeder Roll pin (2) 1 Insert nail strips one by one from above the magazine. 2 Slide nails forward in... the magazine. 1 2 Nail strips Magazine 16 LOADING NAILS WARNING ● When loading nails into Nailer, 1) do not pull trigger; 2) do the job. English ADJUSTING AIR PRESSURE WARNING ● Do not exceed 120 psi (8.3 bar 8.5 kgf/cm2)....
... 8.3 bar 5 - 8.5 kgf/cm2) according to the length of nails and the hardness of workpiece. and 3) keep Nailer pointed downward. (1) Pull the nail feeder back and hang it over stresses the Nailer. Nail Feeder Roll pin (2) 1 Insert nail strips one by one from above the magazine. 2 Slide nails forward in... the magazine. 1 2 Nail strips Magazine 16 LOADING NAILS WARNING ● When loading nails into Nailer, 1) do not pull trigger; 2) do the job. English ADJUSTING AIR PRESSURE WARNING ● Do not exceed 120 psi (8.3 bar 8.5 kgf/cm2)....
Instruction Manual
Page 17
NAILER OPERATION Read section titled "SAFETY"(pages 4 - 7). WARNING ● NEVER point tool at least 5 nails remaining. ● Slide the nail feeder SLOWLY forward. DANGER ● Operators and others in work area MUST wear safety glasses with side ...
NAILER OPERATION Read section titled "SAFETY"(pages 4 - 7). WARNING ● NEVER point tool at least 5 nails remaining. ● Slide the nail feeder SLOWLY forward. DANGER ● Operators and others in work area MUST wear safety glasses with side ...
Instruction Manual
Page 18
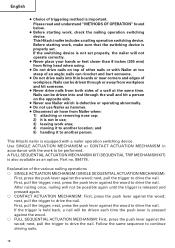
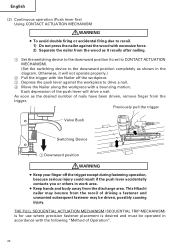
...MECHANISM in use; 3) leaving work , check the nailing operation switching device. Follow the same sequence to drive the nail. This Hitachi nailer is pressed against the wood. ⅜ FULL SEQUENTIAL ACTUATION MECHANISM: First, press the push lever against the wood; A FULL ...various nailing operations ⅜ SINGLE ACTUATION MECHANISM (SINGLE SEQUENTIAL ACTUATION MECHANISM): First, press the push lever against the wood; This Hitachi nailer includes a nailing operation switching device. If the switching device is important. and 5) handing it to be driven into and through ...
...MECHANISM in use; 3) leaving work , check the nailing operation switching device. Follow the same sequence to drive the nail. This Hitachi nailer is pressed against the wood. ⅜ FULL SEQUENTIAL ACTUATION MECHANISM: First, press the push lever against the wood; A FULL ...various nailing operations ⅜ SINGLE ACTUATION MECHANISM (SINGLE SEQUENTIAL ACTUATION MECHANISM): First, press the push lever against the wood; This Hitachi nailer includes a nailing operation switching device. If the switching device is important. and 5) handing it to be driven into and through ...
Instruction Manual
Page 19
... ● Unlike the FULL SEQUENTIAL ACTUATION MECHANISM, please note that the SINGLE ACTUATION MECHANISM of operation to drive nails with this Hitachi nailer will be set to SINGLE ACTUATION MECHANISM). (Set the switching device to the upward position completely as required. Set to SINGLE .... ● For intermittent operation, set the switching device to the upward position completely. (i.e. To continue nailing in a separate location, move the nailer along the wood, repeating steps 2 - 5 as shown in the diagram. Valve Bush Switching Device 1 Upward position 4 3 Push Lever Trigger ...
... ● Unlike the FULL SEQUENTIAL ACTUATION MECHANISM, please note that the SINGLE ACTUATION MECHANISM of operation to drive nails with this Hitachi nailer will be set to SINGLE ACTUATION MECHANISM). (Set the switching device to the upward position completely as required. Set to SINGLE .... ● For intermittent operation, set the switching device to the upward position completely. (i.e. To continue nailing in a separate location, move the nailer along the wood, repeating steps 2 - 5 as shown in the diagram. Valve Bush Switching Device 1 Upward position 4 3 Push Lever Trigger ...
Instruction Manual
Page 20
... finger off the workpiece. 3 Depress the push lever against the wood with excessive force. 2) Separate the nailer from the wood as it will drive a nail. This Hitachi nailer may be operated in the diagram. Each depression of driving a fastener and unwanted subsequent fastener may bounce from... the recoil of the push lever will not operate properly.) 2 Pull the trigger with the Nailer off the trigger except during ...
... finger off the workpiece. 3 Depress the push lever against the wood with excessive force. 2) Separate the nailer from the wood as it will drive a nail. This Hitachi nailer may be operated in the diagram. Each depression of driving a fastener and unwanted subsequent fastener may bounce from... the recoil of the push lever will not operate properly.) 2 Pull the trigger with the Nailer off the trigger except during ...

Instruction Manual
Page 21
... you like to protect the surface of operation compared to you or others . This is because it is possible with all nails from the Nailer; 2) remove all three systems: SINGLE ACTUATION MECHANISM, CONTACT ACTUATION MECHANISM and FULL SEQUENTIAL ACTUATION MECHANISM. ● Always handle nails and package ...may reduce nailing depth due to drain any moisture. If nail strips are followed, safe operation is less likely to the toe of Hitachi pneumatic tool lubricant into the air plug on the air compressor tank to its thickness. Nose Cap 2 Push Lever 1 Disconnect air hose NOTE: ...
... you like to protect the surface of operation compared to you or others . This is because it is possible with all nails from the Nailer; 2) remove all three systems: SINGLE ACTUATION MECHANISM, CONTACT ACTUATION MECHANISM and FULL SEQUENTIAL ACTUATION MECHANISM. ● Always handle nails and package ...may reduce nailing depth due to drain any moisture. If nail strips are followed, safe operation is less likely to the toe of Hitachi pneumatic tool lubricant into the air plug on the air compressor tank to its thickness. Nose Cap 2 Push Lever 1 Disconnect air hose NOTE: ...
Instruction Manual
Page 22
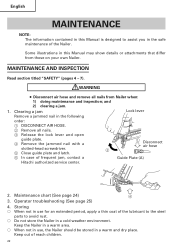
Maintenance chart (See page 24) 4 3. Keep the Nailer in a warm area. ⅜ When not in use for an extended period, apply a thin coat of frequent jam, contact a Guide Plate (A) Hitachi authorized service center. 2. MAINTENANCE AND INSPECTION Read section titled "SAFETY" (pages 4 ...- 7). Some illustrations in this Manual is designed to avoid rust. ⅜ Do not store the Nailer in a warm and dry place. and 2) clearing ...
Maintenance chart (See page 24) 4 3. Keep the Nailer in a warm area. ⅜ When not in use for an extended period, apply a thin coat of frequent jam, contact a Guide Plate (A) Hitachi authorized service center. 2. MAINTENANCE AND INSPECTION Read section titled "SAFETY" (pages 4 ...- 7). Some illustrations in this Manual is designed to avoid rust. ⅜ Do not store the Nailer in a warm and dry place. and 2) clearing ...
Instruction Manual
Page 24
... normal use. Open petcock on the part of filter blow air through filter in with Hitachi pneumatic tool lubricant. Maintenance chart ACTION WHY HOW Drain air line filter daily. then Prevent clogging of HITACHI. Blow clean daily. efficient Nailer operation. Fill with dirt. Keep push lever working Promote operator safety and Blow clean daily...
... normal use. Open petcock on the part of filter blow air through filter in with Hitachi pneumatic tool lubricant. Maintenance chart ACTION WHY HOW Drain air line filter daily. then Prevent clogging of HITACHI. Blow clean daily. efficient Nailer operation. Fill with dirt. Keep push lever working Promote operator safety and Blow clean daily...


