
Instruction Manual
Page 6
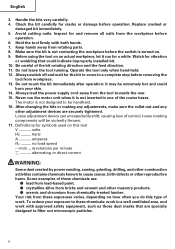
...make sure the collet nut and any other reproductive harm. hertz A amperes no load speed ---/min ... Your risk from workpiece. 13. Avoid cutting nails. Before using the tool on this type of the router bases. Definitions for symbols used on an actual workpiece, let it run the motor unit ... 17. Handle the bits very carefully. 4. Always switch off and wait for vibration or wobbling that are : ⅷ lead from lead-based paint. ⅷ crystalline silica from bricks and cement and other masonry products. ⅷ arsenic and chromium from the workpiece before operation.
...make sure the collet nut and any other reproductive harm. hertz A amperes no load speed ---/min ... Your risk from workpiece. 13. Avoid cutting nails. Before using the tool on this type of the router bases. Definitions for symbols used on an actual workpiece, let it run the motor unit ... 17. Handle the bits very carefully. 4. Always switch off and wait for vibration or wobbling that are : ⅷ lead from lead-based paint. ⅷ crystalline silica from bricks and cement and other masonry products. ⅷ arsenic and chromium from the workpiece before operation.
Instruction Manual
Page 10
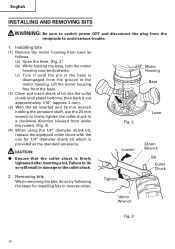
... Ensure that the collet chuck is disengaged from the groove in a clockwise direction (viewed from the receptacle to avoid serious trouble. 1. Motor Housing Base Fig. 2 Lever Loosen Tighten 23mm Wrench Bit Collet Chuck 16mm Wrench Fig. 3 10 Failure to do so by following the steps for 1/4" ...so will result in reverse order. English INSTALLING AND REMOVING BITS WARNING: Be sure to switch power OFF and disconnect the plug from under the router). (Fig. 3) (4) When using the 1/4" diameter shank bit, replace the equipped collet chuck with the one for installing bits in damage to ...
... Ensure that the collet chuck is disengaged from the groove in a clockwise direction (viewed from the receptacle to avoid serious trouble. 1. Motor Housing Base Fig. 2 Lever Loosen Tighten 23mm Wrench Bit Collet Chuck 16mm Wrench Fig. 3 10 Failure to do so by following the steps for 1/4" ...so will result in reverse order. English INSTALLING AND REMOVING BITS WARNING: Be sure to switch power OFF and disconnect the plug from under the router). (Fig. 3) (4) When using the 1/4" diameter shank bit, replace the equipped collet chuck with the one for installing bits in damage to ...
Instruction Manual
Page 11
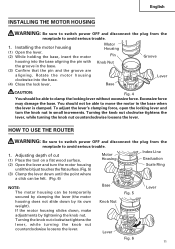
...flat wood surface. Turning the knob nut clockwise tightens the lever, while turning the knob nut counterclockwise loosens the lever. HOW TO USE THE ROUTER WARNING: Be sure to switch power OFF and disconnect the plug from the receptacle to avoid serious trouble. 1. Installing the motor housing (1) ...the point where a click can be felt. (Fig. 6) NOTE: The motor housing can be able to clamp the locking lever without excessive force. Base Knob Nut Fig. 5 Lever Lever Fig. 6 11 Motor Housing Index Line Graduation (2) Open the lever and turn the knob nut in small increments...
...flat wood surface. Turning the knob nut clockwise tightens the lever, while turning the knob nut counterclockwise loosens the lever. HOW TO USE THE ROUTER WARNING: Be sure to switch power OFF and disconnect the plug from the receptacle to avoid serious trouble. 1. Installing the motor housing (1) ...the point where a click can be felt. (Fig. 6) NOTE: The motor housing can be able to clamp the locking lever without excessive force. Base Knob Nut Fig. 5 Lever Lever Fig. 6 11 Motor Housing Index Line Graduation (2) Open the lever and turn the knob nut in small increments...

Instruction Manual
Page 12
.... 8) (2) Insert the centering gauge through the hole in place with the lock nut. Guiding the router (1) Template guide (M12VC, M12SC: Optional accessory) Use the template guide when employing a template for maximum speed. 3. English (4) While holding up the base slightly, turn the motor housing clockwise until the index line on the motor housing reaches the...
.... 8) (2) Insert the centering gauge through the hole in place with the lock nut. Guiding the router (1) Template guide (M12VC, M12SC: Optional accessory) Use the template guide when employing a template for maximum speed. 3. English (4) While holding up the base slightly, turn the motor housing clockwise until the index line on the motor housing reaches the...

Instruction Manual
Page 13
... on. (Fig. 15) (2) Then turn the tool on and wait until the bit attains full speed. Feed the router while keeping the guide plane on top of the bar holder and the wing bolt (B) that the ... 2 wing bolts (A) on top of the bar holder. 2 Insert the guide bar into the hole in the base, then firmly tighten the 2 hex socket bolts (standard accessories). 3 Make minute adjustments of the dimensions between the ...straight guide. (Fig.13) 4 As shown in Fig. 14, securely attach the bottom of the base to processed surface of the materials. Cutting Template Guide Template A Fig. 12 Guide Bar Feed Screw...
... on. (Fig. 15) (2) Then turn the tool on and wait until the bit attains full speed. Feed the router while keeping the guide plane on top of the bar holder and the wing bolt (B) that the ... 2 wing bolts (A) on top of the bar holder. 2 Insert the guide bar into the hole in the base, then firmly tighten the 2 hex socket bolts (standard accessories). 3 Make minute adjustments of the dimensions between the ...straight guide. (Fig.13) 4 As shown in Fig. 14, securely attach the bottom of the base to processed surface of the materials. Cutting Template Guide Template A Fig. 12 Guide Bar Feed Screw...
Instruction Manual
Page 14
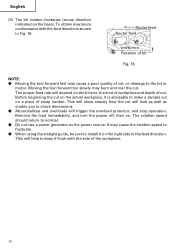
English (3) The bit rotates clockwise (arrow direction indicated on . Remove the load immediately, and turn the power off, then on the base). Router feed Router feed workpiece Rotation of bit Fig. 16 NOTE: ⅷ Moving the tool forward fast may cause a poor quality of the workpiece. 14 This will ... kind of workpiece and depth of scrap lumber. This will show exactly how the cut . Moving the tool forward too slowly may cause the rotation speed to fluctuate. ⅷ When using the straight guide, be sure to install it is advisable to the bit or motor. It may burn and...
English (3) The bit rotates clockwise (arrow direction indicated on . Remove the load immediately, and turn the power off, then on the base). Router feed Router feed workpiece Rotation of bit Fig. 16 NOTE: ⅷ Moving the tool forward fast may cause a poor quality of the workpiece. 14 This will ... kind of workpiece and depth of scrap lumber. This will show exactly how the cut . Moving the tool forward too slowly may cause the rotation speed to fluctuate. ⅷ When using the straight guide, be sure to install it is advisable to the bit or motor. It may burn and...

Instruction Manual
Page 15
...them immediately. Replacing carbon brushes Remove the brush caps with a carbon brush which are fully tightened. The carbon brushes can then be carried out by a HITACHI AUTHORIZED SERVICE CENTER, ONLY. 5. Inspecting the screws Regularly inspect all service and repairs must be easily removed. (Fig. 18) 4. Inspecting the carbon ... 2. Always keep carbon brushes clean and ensure that they slide freely within the brush holders. of carbon Fig. 17 CAUTION: Using this router with the tool to the Hitachi Authorized Service Center when requesting repair or other maintenance.
...them immediately. Replacing carbon brushes Remove the brush caps with a carbon brush which are fully tightened. The carbon brushes can then be carried out by a HITACHI AUTHORIZED SERVICE CENTER, ONLY. 5. Inspecting the screws Regularly inspect all service and repairs must be easily removed. (Fig. 18) 4. Inspecting the carbon ... 2. Always keep carbon brushes clean and ensure that they slide freely within the brush holders. of carbon Fig. 17 CAUTION: Using this router with the tool to the Hitachi Authorized Service Center when requesting repair or other maintenance.
Instruction Manual
Page 17
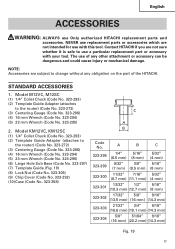
Model M12VC, M12SC (1) 1/4" Collet Chuck (Code No. 323-293) (2) Template Guide Adapter (attaches to the router) (Code No. 323-272) (3) Centering Gauge (Code No. 323-296) (4) 16 mm Wrench (Code No. 323-294) (5) 23 mm Wrench (Code No. 323-295) (6) Large Hole Sub Base (Code No. 323-297) (7) Template Guide (Fig. 19) (8) Lock Nut...
Model M12VC, M12SC (1) 1/4" Collet Chuck (Code No. 323-293) (2) Template Guide Adapter (attaches to the router) (Code No. 323-272) (3) Centering Gauge (Code No. 323-296) (4) 16 mm Wrench (Code No. 323-294) (5) 23 mm Wrench (Code No. 323-295) (6) Large Hole Sub Base (Code No. 323-297) (7) Template Guide (Fig. 19) (8) Lock Nut...


