Owners Guide
Page 1
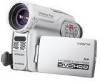
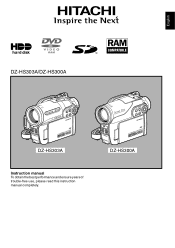
DZ-HS300A English Español Français DZ-HS303A/DZ-HS300A DZ-HS303A Instruction manual To obtain the best performance and ensure years of trouble-free use, please read this instruction manual completely.
DZ-HS300A English Español Français DZ-HS303A/DZ-HS300A DZ-HS303A Instruction manual To obtain the best performance and ensure years of trouble-free use, please read this instruction manual completely.
Owners Guide
Page 8
... DVD video camera/recorder is finished. At this time, do not do any of purchase: • Charge it before using a chemical cleaning cloth, follow instruction manuals attached. While it discharges on again with the disc or card loaded in order to protect its characteristics.) Disc cannot be executed automatically (see page...
... DVD video camera/recorder is finished. At this time, do not do any of purchase: • Charge it before using a chemical cleaning cloth, follow instruction manuals attached. While it discharges on again with the disc or card loaded in order to protect its characteristics.) Disc cannot be executed automatically (see page...

Owners Guide
Page 11
.... It is user's responsibility to control the data on disc and memory card. • Hitachi will improve (rinse the cloth well with Disc Navigation ........ 80 Dubbing on it. We want this manual to be as helpful as shown in the viewfinder. Quick Index Available Discs 26 Recording Movie ... Never use solvent (thinner, water, antistat or detergent) for cleaning. Opening or closing the LCD monitor switches the picture to appear on this manual, and get to know your DVD video camera/recorder by using the functions of DVD video camera/recorder or PC will change the file control...
.... It is user's responsibility to control the data on disc and memory card. • Hitachi will improve (rinse the cloth well with Disc Navigation ........ 80 Dubbing on it. We want this manual to be as helpful as shown in the viewfinder. Quick Index Available Discs 26 Recording Movie ... Never use solvent (thinner, water, antistat or detergent) for cleaning. Opening or closing the LCD monitor switches the picture to appear on this manual, and get to know your DVD video camera/recorder by using the functions of DVD video camera/recorder or PC will change the file control...
Owners Guide
Page 12
... midway, or return the menu screen to the preceding one. English About This Manual ●Displays in this manual Understand that the displays are different from those you use. ●Illustrations in this manual Although the external appearances of DZ-HS303A / DZ-HS300A are different, the method of operating these marks and identify the functions... function to these models is compatible with HDD/disc/card used for the explanation in the viewfinder or on the LCD screen. ●Notation of DZ-HS303A are unavailable with the function.
... midway, or return the menu screen to the preceding one. English About This Manual ●Displays in this manual Understand that the displays are different from those you use. ●Illustrations in this manual Although the external appearances of DZ-HS303A / DZ-HS300A are different, the method of operating these marks and identify the functions... function to these models is compatible with HDD/disc/card used for the explanation in the viewfinder or on the LCD screen. ●Notation of DZ-HS303A are unavailable with the function.
Owners Guide
Page 14
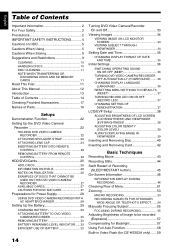
...HANDLING DISCS 10 DISC CLEANING 11 NOTE WHEN TRANSFERRING OR DISCARDING DISCS AND SD MEMORY CARDS 11 Read This First 11 About This Manual 12 Introduction 13 Table of Contents 14 Checking Provided Accessories 17 Names of Parts 18 Setups Demonstration Function 22 Setting Up the ...RECORDING 46 Checking Flow of Menu 51 Zooming 53 MACRO RECORDING 53 RECORDING SUBJECTS FOR STRONGER WIDE-ANGLE OR TELEPHOTO EFFECT ....... 54 Manually Focusing Subject 55 FOCUSING DURING RECORDING 55 Adjusting Brightness of Image to be recorded (Exposure 57 Compensating for Backlight 57 Using Full Auto...
...HANDLING DISCS 10 DISC CLEANING 11 NOTE WHEN TRANSFERRING OR DISCARDING DISCS AND SD MEMORY CARDS 11 Read This First 11 About This Manual 12 Introduction 13 Table of Contents 14 Checking Provided Accessories 17 Names of Parts 18 Setups Demonstration Function 22 Setting Up the ...RECORDING 46 Checking Flow of Menu 51 Zooming 53 MACRO RECORDING 53 RECORDING SUBJECTS FOR STRONGER WIDE-ANGLE OR TELEPHOTO EFFECT ....... 54 Manually Focusing Subject 55 FOCUSING DURING RECORDING 55 Adjusting Brightness of Image to be recorded (Exposure 57 Compensating for Backlight 57 Using Full Auto...
Owners Guide
Page 18
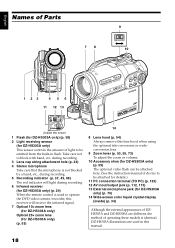
...The red indicator will receive the infrared signal. 7 Optical 10× zoom lens (for DZ-HS303A only) Optical 25× zoom lens (for DZ-HS300A only) (p. 53) 14 8 Lens hood (p. 54) Always remove this manual. 18 DZ-HS303A illustrations are used to operate the DVD video camera/recorder, this receiver will light ...lens. 9 Zoom lever (p. 53, 55, 73) To adjust the zoom or volume. 10 Accessory shoe (for DZ-HS303A only) (p. 59) The optional video flash can be attached here. (See the instruction manual of device to be attached for details.) 11 PC connection terminal (TO PC) (p. 123) 12 AV inout/...
...The red indicator will receive the infrared signal. 7 Optical 10× zoom lens (for DZ-HS303A only) Optical 25× zoom lens (for DZ-HS300A only) (p. 53) 14 8 Lens hood (p. 54) Always remove this manual. 18 DZ-HS303A illustrations are used to operate the DVD video camera/recorder, this receiver will light ...lens. 9 Zoom lever (p. 53, 55, 73) To adjust the zoom or volume. 10 Accessory shoe (for DZ-HS303A only) (p. 59) The optional video flash can be attached here. (See the instruction manual of device to be attached for details.) 11 PC connection terminal (TO PC) (p. 123) 12 AV inout/...

Owners Guide
Page 20
... 42 43 44 28 FULL AUTO button (p. 58) To switch the DVD video camera /recorder to full automatic. 29 FOCUS button (p. 55) To switch between manual focus and autofocus. 30 MENU button (p. 35, 51, 86) Press this button to display the menu for setting camera functions and Disc Navigation. 31 DISC...
... 42 43 44 28 FULL AUTO button (p. 58) To switch the DVD video camera /recorder to full automatic. 29 FOCUS button (p. 55) To switch between manual focus and autofocus. 30 MENU button (p. 35, 51, 86) Press this button to display the menu for setting camera functions and Disc Navigation. 31 DISC...

Owners Guide
Page 44
...the composition to "SD". Set the power switch to be displayed. When using the viewfinder, pull it is difficult with auto focus, choose manual focus, and manually correct the focus before recording (see page 55). • Shake of the DVD video camera/recorder may be a difference between the image you... down at subject. 2 Turn the DVD camera/recorder on a tripod. • There may cause blur in purple (the focus will not change when manual focus is possible on the screen (viewfinder or LCD). When the "m" mark appears, you press the PHOTO/SELECT button all the way (full pressing)....
...the composition to "SD". Set the power switch to be displayed. When using the viewfinder, pull it is difficult with auto focus, choose manual focus, and manually correct the focus before recording (see page 55). • Shake of the DVD video camera/recorder may be a difference between the image you... down at subject. 2 Turn the DVD camera/recorder on a tripod. • There may cause blur in purple (the focus will not change when manual focus is possible on the screen (viewfinder or LCD). When the "m" mark appears, you press the PHOTO/SELECT button all the way (full pressing)....

Owners Guide
Page 45
... release the sleep/ restart standby status: • Press down the DISC EJECT button. • Change over the power switch ("HDD"↔"DVD"). The settings on manual focus, exposure and rear lighting will not set the DVD video camera/recorder to the sleep/restart standby status: • No disc is loaded although...
... release the sleep/ restart standby status: • Press down the DISC EJECT button. • Change over the power switch ("HDD"↔"DVD"). The settings on manual focus, exposure and rear lighting will not set the DVD video camera/recorder to the sleep/restart standby status: • No disc is loaded although...

Owners Guide
Page 46
... filter 8. e 2. HDD Warning message Protection Current date/time p 7. Volume The above screen is different from the actual display. 46 Recording mode 12. Exposure correction 14.Manual Focus 15. External Input 11. DISPLAY INFORMATION DISPLAY DURING RECORDING See the next page for explanation: It is an example for details. Video flash 9. Recording...
... filter 8. e 2. HDD Warning message Protection Current date/time p 7. Volume The above screen is different from the actual display. 46 Recording mode 12. Exposure correction 14.Manual Focus 15. External Input 11. DISPLAY INFORMATION DISPLAY DURING RECORDING See the next page for explanation: It is an example for details. Video flash 9. Recording...

Owners Guide
Page 47
... j : Indoor1 k : Indoor2 4. External Input (p. 67)*1 L IN S IN : AV input : S-VIDEO input 11. Exposure correction (p. 57) No display : Auto : Manual 14. Backlight compensation (p. 57) No display : Backlight compensation OFF m : Backlight compensation ON 6. 16:9 mode (only in still recording mode) (p. 68) No display : Self-timer... movie recording mode) (p. 63) No display : Microphone filter OFF p : Microphone filter ON 8. Manual focus (p. 55) No display : Autofocus : Manual focus 47 Video flash*1 [when Video Flash (sold separately) is from 10 seconds) 10.
... j : Indoor1 k : Indoor2 4. External Input (p. 67)*1 L IN S IN : AV input : S-VIDEO input 11. Exposure correction (p. 57) No display : Auto : Manual 14. Backlight compensation (p. 57) No display : Backlight compensation OFF m : Backlight compensation ON 6. 16:9 mode (only in still recording mode) (p. 68) No display : Self-timer... movie recording mode) (p. 63) No display : Microphone filter OFF p : Microphone filter ON 8. Manual focus (p. 55) No display : Autofocus : Manual focus 47 Video flash*1 [when Video Flash (sold separately) is from 10 seconds) 10.

Owners Guide
Page 50
... LCD screen is set to Low Light, the monitor screen will not appear on HDD/disc/card (blinks in green). • An attempt to the manual focus, exposure and on-screen display modes even during recording with LCD screen facing the same direction as the lens, you can also view subject...
... LCD screen is set to Low Light, the monitor screen will not appear on HDD/disc/card (blinks in green). • An attempt to the manual focus, exposure and on-screen display modes even during recording with LCD screen facing the same direction as the lens, you can also view subject...

Owners Guide
Page 55
...13/16" (2 cm) from lens surface to adjust the focus, while viewing the image in the viewfinder or on the screen. When you can also manually focus a subject, depending on next time, auto focus will be faulty when you bring the subject into focus at the "W" control side, focus will... on the screen. • Be sure to zoom in on subject. 3 Use the d/c buttons to infinity 1 Press the FOCUS button during recording. Manual Focus icon will be restored. 55 Manual Focus icon FINE 0:00:00 REM 3 0 MIN 8 : 0 0 AM 1 2 / 1/2006 2 Press the zoom lever to "T" control side to zoom in on ...
...13/16" (2 cm) from lens surface to adjust the focus, while viewing the image in the viewfinder or on the screen. When you can also manually focus a subject, depending on next time, auto focus will be faulty when you bring the subject into focus at the "W" control side, focus will... on the screen. • Be sure to zoom in on subject. 3 Use the d/c buttons to infinity 1 Press the FOCUS button during recording. Manual Focus icon will be restored. 55 Manual Focus icon FINE 0:00:00 REM 3 0 MIN 8 : 0 0 AM 1 2 / 1/2006 2 Press the zoom lever to "T" control side to zoom in on ...

Owners Guide
Page 56
which may not be automatically focused (see page 55): Objects not in the center of screen Objects with little variation in brightness, such as white wall Objects that are far and near at the same time Objects moving rapidly Object behind glass with water droplets, dirt on it Objects lit by neon sign, spotlight, etc. English Manually focus the following objects, which glares or emits strong light Night view Dark objects 56
which may not be automatically focused (see page 55): Objects not in the center of screen Objects with little variation in brightness, such as white wall Objects that are far and near at the same time Objects moving rapidly Object behind glass with water droplets, dirt on it Objects lit by neon sign, spotlight, etc. English Manually focus the following objects, which glares or emits strong light Night view Dark objects 56

Owners Guide
Page 57
... will appear on the LCD screen. BLC 1 Press the BLC button during recording. Note: • Pressing the BLC button will alternate between backlight setting between manual adjustment and auto exposure. Adjust with d/c buttons Note: • Pressing EXPOSURE will appear. HDD 12/3 Compensating for lighting so that the subject is turned off...
... will appear on the LCD screen. BLC 1 Press the BLC button during recording. Note: • Pressing the BLC button will alternate between backlight setting between manual adjustment and auto exposure. Adjust with d/c buttons Note: • Pressing EXPOSURE will appear. HDD 12/3 Compensating for lighting so that the subject is turned off...
Owners Guide
Page 59
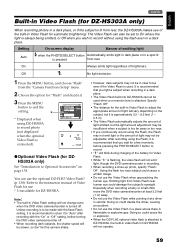
... makes use of the built-in Video Flash for automatic brightening: The Video Flash can use the optional DZ-FLH3 Video Flash* (p. 138): Refer to the instruction manual of Video Flash for use. * Unavailable for DZHS303A only) See "Introduction to "Auto" after recording with the fixed Flash setting,...the appropriate amount of brightness. It is recommended that you light a subject when recording in a dark place. • The Video Flash built into DZ-HS303A cannot be adjustable. Note: • The built-in clear focus even if the Video Flash is used when a conversion lens is attached: ...
... makes use of the built-in Video Flash for automatic brightening: The Video Flash can use the optional DZ-FLH3 Video Flash* (p. 138): Refer to the instruction manual of Video Flash for use. * Unavailable for DZHS303A only) See "Introduction to "Auto" after recording with the fixed Flash setting,...the appropriate amount of brightness. It is recommended that you light a subject when recording in a dark place. • The Video Flash built into DZ-HS303A cannot be adjustable. Note: • The built-in clear focus even if the Video Flash is used when a conversion lens is attached: ...

Owners Guide
Page 61
...can use the light from LCD monitor to record a subject. 1 Press the MENU button, use a tripod). • If a subject cannot be focused properly, manually adjust the focus (see page 55). 4 Open the LCD monitor, turn it 180º so that it is recommended that you to record a subject up.../recorder automatically adjusts the color of subject. English RECORDING DARK SUBJECTS USING LCD MONITOR LIGHT When Program AE is set to Low Light, you can manually adjust white balance to match the light source or situation (p. 62) To record in a dark place. • An after-image will appear when ...
...can use the light from LCD monitor to record a subject. 1 Press the MENU button, use a tripod). • If a subject cannot be focused properly, manually adjust the focus (see page 55). 4 Open the LCD monitor, turn it 180º so that it is recommended that you to record a subject up.../recorder automatically adjusts the color of subject. English RECORDING DARK SUBJECTS USING LCD MONITOR LIGHT When Program AE is set to Low Light, you can manually adjust white balance to match the light source or situation (p. 62) To record in a dark place. • An after-image will appear when ...

Owners Guide
Page 62
... depending on white balance "Set" may not be possible in a dark place. If this happens, set to the mode to match the recording conditions, or manually set . • If "Input Source: LINE, S-LINE" has been specified, you cannot use the "Set" mode of white balance (p. 67) . • The ...is not transparent. Note: • The white balance mode can be confirmed using the "Set" option will not work normally. ●Setting white balance manually 1 Point the DVD video camera/ Thick paper recorder at a white object so that is turned on with the lens capped, the white balance will ...
... depending on white balance "Set" may not be possible in a dark place. If this happens, set to the mode to match the recording conditions, or manually set . • If "Input Source: LINE, S-LINE" has been specified, you cannot use the "Set" mode of white balance (p. 67) . • The ...is not transparent. Note: • The white balance mode can be confirmed using the "Set" option will not work normally. ●Setting white balance manually 1 Point the DVD video camera/ Thick paper recorder at a white object so that is turned on with the lens capped, the white balance will ...
Owners Guide
Page 66
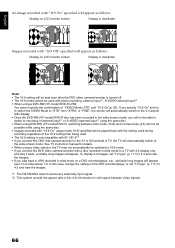
... DVD-RW (VF-mode)/DVD-R, switching between video signals. 66 To display 4:3 images, set "TV type" (p. 111) to 4:3 and view the images. *1 The DZ-HS300A cannot receive any externally input signal. *2 This system records the aspect ratio (16:9, 4:3) information in void space between wide mode (16:9) and normal mode... DVD vide camera/recorder to the S1 or S2 terminal of TV, the TV will automatically switch to the wide-screen mode: See TV instruction manual for details. • When using a video selector, the TV may not automatically be switched to 16:9 mode. • If you connect the DVD...
... DVD-RW (VF-mode)/DVD-R, switching between video signals. 66 To display 4:3 images, set "TV type" (p. 111) to 4:3 and view the images. *1 The DZ-HS300A cannot receive any externally input signal. *2 This system records the aspect ratio (16:9, 4:3) information in void space between wide mode (16:9) and normal mode... DVD vide camera/recorder to the S1 or S2 terminal of TV, the TV will automatically switch to the wide-screen mode: See TV instruction manual for details. • When using a video selector, the TV may not automatically be switched to 16:9 mode. • If you connect the DVD...

Owners Guide
Page 71
...: Some items will not appear when a DVD-RAM/DVD-RW/DVD-R/+RW or card is used, but the operation is an explanation on this instruction manual are basically those that you will be terminated and the DVD video camera/recorder will enter the recording pause status. Here is the same.
...: Some items will not appear when a DVD-RAM/DVD-RW/DVD-R/+RW or card is used, but the operation is an explanation on this instruction manual are basically those that you will be terminated and the DVD video camera/recorder will enter the recording pause status. Here is the same.


