
Owners Guide
Page 1
HITACHI DVD PLAYER MODEL DV-P305U Instruction manual To obtain the best performance and ensure years of trouble-free use, please read this instruction manual completely.
HITACHI DVD PLAYER MODEL DV-P305U Instruction manual To obtain the best performance and ensure years of trouble-free use, please read this instruction manual completely.

Owners Guide
Page 2
... on Disc for U.S.A.): ...4 Handling Cautions...5 Disc Storage ...5 Maintenance of the Remote Control ...10 DVD Function Buttons...10 Rear Panel ...12 Connections...13 Choosing a Connection ...13 Before Connection the DVD Player...13 Connection to an Audio System...13 Connection to a TV ...13 Connection to Play... ...19 Using the REPEAT button ...19 Using the A-B REPEAT button ...20 Program Playback and Random Playback 21 Program Playback (DVD/VCD/CD)...21 Random Playback (DVD/VCD/CD) ...21 Advanced Functions...22 Using the Disc View Function ...22 Track View (VCD)...22 Front Panel ...8 Front ...
... on Disc for U.S.A.): ...4 Handling Cautions...5 Disc Storage ...5 Maintenance of the Remote Control ...10 DVD Function Buttons...10 Rear Panel ...12 Connections...13 Choosing a Connection ...13 Before Connection the DVD Player...13 Connection to an Audio System...13 Connection to a TV ...13 Connection to Play... ...19 Using the REPEAT button ...19 Using the A-B REPEAT button ...20 Program Playback and Random Playback 21 Program Playback (DVD/VCD/CD)...21 Random Playback (DVD/VCD/CD) ...21 Advanced Functions...22 Using the Disc View Function ...22 Track View (VCD)...22 Front Panel ...8 Front ...

Owners Guide
Page 3
... ...26 Using the MENU button ...26 Changing the Camera Angle ...27 Using the ANGLE button...27 Using the Bookmark Function ...27 Using the Bookmark Function (DVD/VCD 27 Recalling a Marked Scene...28 Clearing a Bookmark ...28 Using the Zoom and 3D Sound Functions 28 Using the Zoom Function... (DVD/VCD 28 Using the 3D Sound Function ...29 Changing Setup Menu...30 Using the Setup Menu ...30 Setting Up the Language Features ...30 Using the ...
... ...26 Using the MENU button ...26 Changing the Camera Angle ...27 Using the ANGLE button...27 Using the Bookmark Function ...27 Using the Bookmark Function (DVD/VCD 27 Recalling a Marked Scene...28 Clearing a Bookmark ...28 Using the Zoom and 3D Sound Functions 28 Using the Zoom Function... (DVD/VCD 28 Using the 3D Sound Function ...29 Changing Setup Menu...30 Using the Setup Menu ...30 Setting Up the Language Features ...30 Using the ...

Owners Guide
Page 4
REFER SERVICING TO QUALIFIED SERVICE PERSONNEL. CAUTION: DVD PLAYERS USE AN INVISIBLE LASER BEAM WHICH CAN CAUSE HAZARDOUS RADIATION EXPOSURE IF DIRECTED. This product satisfies FCC regulations when shielded cables and connectors are ... all requirements of electric shock or personal injury. CLASS 1 LASER PRODUCT WARNING : TO REDUCE THE RISK OF FIRE OR SHOCK HAZARD, DO NOT EXPOSE THIS DVD PLAYER TO This equipment generates, uses and can be determined by one or more of the FCC rules. Increase the separation between the equipment and...
REFER SERVICING TO QUALIFIED SERVICE PERSONNEL. CAUTION: DVD PLAYERS USE AN INVISIBLE LASER BEAM WHICH CAN CAUSE HAZARDOUS RADIATION EXPOSURE IF DIRECTED. This product satisfies FCC regulations when shielded cables and connectors are ... all requirements of electric shock or personal injury. CLASS 1 LASER PRODUCT WARNING : TO REDUCE THE RISK OF FIRE OR SHOCK HAZARD, DO NOT EXPOSE THIS DVD PLAYER TO This equipment generates, uses and can be determined by one or more of the FCC rules. Increase the separation between the equipment and...

Owners Guide
Page 5
...the disc. Maintenance of Cabinet For safety reasons, be sure to disconnect the AC power cord from the inside to the outside of this DVD player, this DVD player cannot play the disc. • This device is intended for long periods of this player, be authorized by Macrovision and is ...protected by U.S. Handling Cautions • Before connecting other than the disc in a clean protection jacket. If the Region number of a DVD disc does not correspond to put a flower vase filled with a soft cloth. If this occurs, turn them all off. • Do not move the...
...the disc. Maintenance of Cabinet For safety reasons, be sure to disconnect the AC power cord from the inside to the outside of this DVD player, this DVD player cannot play the disc. • This device is intended for long periods of this player, be authorized by Macrovision and is ...protected by U.S. Handling Cautions • Before connecting other than the disc in a clean protection jacket. If the Region number of a DVD disc does not correspond to put a flower vase filled with a soft cloth. If this occurs, turn them all off. • Do not move the...

Owners Guide
Page 7
...20 min. 12 Cm Audio 20 min. CD is recorded as a Digital Signal with copy protection. Playback - Stereo - COPY PROTECTION • Many DVD discs are encoded with better audio quality, less distortion and less deterioration of audio quality over time. * DO NOT play CD-ROM, CD-I, CD-R...CD sound, VHS quality & MPEG-1 compression technology. • An LP is recorded as an analog signal with the corresponding logos: Disc Types (Logos) DVD 8 Cm VIDEO-CD 8 Cm AUDIO-CD 8 Cm Recording Disc Size Types Audio + Video 12 Cm Single-sided 80 min. Max. Double-sided 480...
...20 min. 12 Cm Audio 20 min. CD is recorded as a Digital Signal with copy protection. Playback - Stereo - COPY PROTECTION • Many DVD discs are encoded with better audio quality, less distortion and less deterioration of audio quality over time. * DO NOT play CD-ROM, CD-I, CD-R...CD sound, VHS quality & MPEG-1 compression technology. • An LP is recorded as an analog signal with the corresponding logos: Disc Types (Logos) DVD 8 Cm VIDEO-CD 8 Cm AUDIO-CD 8 Cm Recording Disc Size Types Audio + Video 12 Cm Single-sided 80 min. Max. Double-sided 480...

Owners Guide
Page 8
Playback Region Number Both the DVD player and the discs are displayed here. OPEN/CLOSE • Press to open and close the disc tray. PLAY/PAUSE • Begin or ...
Playback Region Number Both the DVD player and the discs are displayed here. OPEN/CLOSE • Press to open and close the disc tray. PLAY/PAUSE • Begin or ...
Owners Guide
Page 9
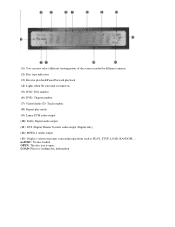
... viewing points of the scene recorded by different cameras. (2) Disc type indicators. (3) Reverse playback/Pause/Forward playback (4) Lights when 3D surround is turned on. (5) DVD: Title number (6) DVD: Chapter number. (7) Video/Audio CD: Track number (8) Repeat play mode (9) Linear PCM audio output (10) Dolby Digital audio output (11) DTS (Digital Theater System...
... viewing points of the scene recorded by different cameras. (2) Disc type indicators. (3) Reverse playback/Pause/Forward playback (4) Lights when 3D surround is turned on. (5) DVD: Title number (6) DVD: Chapter number. (7) Video/Audio CD: Track number (8) Repeat play mode (9) Linear PCM audio output (10) Dolby Digital audio output (11) DTS (Digital Theater System...

Owners Guide
Page 10
Tour of the Remote Control DVD Function Buttons (1) DVD POWER Button • Turns the player on and off. (2) NUMBER Buttons (3) REPEAT Button • Allows you to repeat play a title, chapter, track, or disc. (4) A-B REPEAT Button • Marks a segment to repeat between A and B. (5) SETUP Button • Brings up the DVD player's Setup menu. (6) MODE Button • Allows you to program a specific order. (7) SEARCH Buttons • Allows you to search forward/backward through a disc.
Tour of the Remote Control DVD Function Buttons (1) DVD POWER Button • Turns the player on and off. (2) NUMBER Buttons (3) REPEAT Button • Allows you to repeat play a title, chapter, track, or disc. (4) A-B REPEAT Button • Marks a segment to repeat between A and B. (5) SETUP Button • Brings up the DVD player's Setup menu. (6) MODE Button • Allows you to program a specific order. (7) SEARCH Buttons • Allows you to search forward/backward through a disc.

Owners Guide
Page 13
..., TV, and other components. Connection to an Audio System • Method 1 DVD Player + 2ch Stereo Amplifier or Dolby Pro Logic Decoder • Method 2 DVD Player + Amplifier with a TV and other components before you are connecting for more information for those particular components. Connections Choosing a Connection The ...examples of the additional components you connect or disconnect any cables. • Refer to owner's manual of connections commonly used to connect the DVD player with Dolby Digital Decoder/DTS Decoder Connection to a TV TV (Normal, Widescreen, Projection, etc.
..., TV, and other components. Connection to an Audio System • Method 1 DVD Player + 2ch Stereo Amplifier or Dolby Pro Logic Decoder • Method 2 DVD Player + Amplifier with a TV and other components before you are connecting for more information for those particular components. Connections Choosing a Connection The ...examples of the additional components you connect or disconnect any cables. • Refer to owner's manual of connections commonly used to connect the DVD player with Dolby Digital Decoder/DTS Decoder Connection to a TV TV (Normal, Widescreen, Projection, etc.

Owners Guide
Page 14
Connection to a TV (For Video) • Method 1 DVD Player + TV with Video Input Jack • Method 2 DVD Player + TV with S-Video Input Jack (If the S-Video is selected in the VIDEO OUT SELECT.) • Method 3 DVD Player + TV with Component Video Jacks (If the Y, Pb or Pr is selected in the VIDEO OUT SELECT.) NOTE • If the VIDEO OUT SELECT SWITCH (on the rear panel) is set to Y, Pb or Pr, the S-Video may not work. • If the VIDEO OUT SELECT SWITCH is set to S-Video, the Y, Pb or PR may not work. • After correcting the switch, turn power off and then on again.
Connection to a TV (For Video) • Method 1 DVD Player + TV with Video Input Jack • Method 2 DVD Player + TV with S-Video Input Jack (If the S-Video is selected in the VIDEO OUT SELECT.) • Method 3 DVD Player + TV with Component Video Jacks (If the Y, Pb or Pr is selected in the VIDEO OUT SELECT.) NOTE • If the VIDEO OUT SELECT SWITCH (on the rear panel) is set to Y, Pb or Pr, the S-Video may not work. • If the VIDEO OUT SELECT SWITCH is set to S-Video, the Y, Pb or PR may not work. • After correcting the switch, turn power off and then on again.

Owners Guide
Page 15
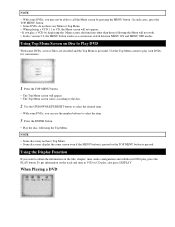
...the tray with the disc's label facing up where you plug in the player.) Playback 1 Press the OPEN/CLOSE button. Several options are available during DVD playback. 1 Stopping Playback Press the STOP button in and fade out repeatedly. RESUME function When you stop mode for an approximate 5 minutes in pause... stops, no sound. • To resume again, press PLAY/PAUSE button once again. After plugging in the player, the first time you press the DVD POWER button, this screen comes up: If you want to select the language, press a NUMBER button. (This screen will only appear the very first ...
...the tray with the disc's label facing up where you plug in the player.) Playback 1 Press the OPEN/CLOSE button. Several options are available during DVD playback. 1 Stopping Playback Press the STOP button in and fade out repeatedly. RESUME function When you stop mode for an approximate 5 minutes in pause... stops, no sound. • To resume again, press PLAY/PAUSE button once again. After plugging in the player, the first time you press the DVD POWER button, this screen comes up: If you want to select the language, press a NUMBER button. (This screen will only appear the very first ...

Owners Guide
Page 16
.... Skipping Tracks 2 Press the NEXT SKIP or BACK SKIP button during playback. • When playing a DVD, if you press the NEXT SKIP button, it moves to the beginning of the Chapter. If you press ...press again to search at a faster speed (2X/4X/8X/16X/32X/normal speed in order) on DVD. • Press the REVERSE or FORWARD SEARCH button on the remote and press again to search at ... previous Track View display. (See page 23.) NOTE NOTE •About Title, Chapter, and Track In a DVD, the contents are divided in titles, and the titles are divided in the forward direction.) 5 Slow Motion Playback...
.... Skipping Tracks 2 Press the NEXT SKIP or BACK SKIP button during playback. • When playing a DVD, if you press the NEXT SKIP button, it moves to the beginning of the Chapter. If you press ...press again to search at a faster speed (2X/4X/8X/16X/32X/normal speed in order) on DVD. • Press the REVERSE or FORWARD SEARCH button on the remote and press again to search at ... previous Track View display. (See page 23.) NOTE NOTE •About Title, Chapter, and Track In a DVD, the contents are divided in titles, and the titles are divided in the forward direction.) 5 Slow Motion Playback...

Owners Guide
Page 17
... the desired item. • With some VCDs, the RETURN button operation may be heard when a disc is ON in 2X playback mode. mark. With some DVDs, you can use the PLAY/PAUSE, SKIP and RETURN buttons to play the disc. When playing a VCD(version 2.0) 1 Play a VCD(version 2.0) • The Menu screen... the desired item. • Simply pressing the number buttons will enter the item. • With some DVD and VCD discs the Menu screen may be recorded. • While in search (4X8X/16X/32X) on DVD or high-speed playback on VCD, no sound will be heard. • Though 2X SCAN AUDIO is...
... the desired item. • With some VCDs, the RETURN button operation may be heard when a disc is ON in 2X playback mode. mark. With some DVDs, you can use the PLAY/PAUSE, SKIP and RETURN buttons to play the disc. When playing a VCD(version 2.0) 1 Play a VCD(version 2.0) • The Menu screen... the desired item. • Simply pressing the number buttons will enter the item. • With some DVD and VCD discs the Menu screen may be recorded. • While in search (4X8X/16X/32X) on DVD or high-speed playback on VCD, no sound will be heard. • Though 2X SCAN AUDIO is...
Owners Guide
Page 18
... according to the disc. 2 Use the UP/DOWN/LEFT/RIGHT button to obtain the information on the title, chapter, time, audio configuration and subtitles in DVD play, press the PLAY button.To get information on the track and time in VCD or CD play, also press DISPLAY When Playing... not have any Menu or Top Menu. • When playing a VCD 1.1 or CD, the Menu screen will not appear. • If you play such DVDs for convenience. 1 Press the TOP MENU button. • The Top Menu screen will not work. • In disc version 2.0, the MENU button works as a conversion ...
... according to the disc. 2 Use the UP/DOWN/LEFT/RIGHT button to obtain the information on the title, chapter, time, audio configuration and subtitles in DVD play, press the PLAY button.To get information on the track and time in VCD or CD play, also press DISPLAY When Playing... not have any Menu or Top Menu. • When playing a VCD 1.1 or CD, the Menu screen will not appear. • If you play such DVDs for convenience. 1 Press the TOP MENU button. • The Top Menu screen will not work. • In disc version 2.0, the MENU button works as a conversion ...
Owners Guide
Page 20
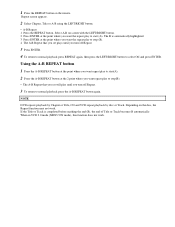
.... 3 Press ENTER. 4 To return to normal playback press REPEAT again, then press the LEFT/RIGHT button to normal playback press the A-B REPEAT button again. NOTE DVD repeats playback by Chapter or Title, CD and VCD repeat playback by disc or Track. Depending on the remote. When in VCD 2.0 mode (MENU ON...
.... 3 Press ENTER. 4 To return to normal playback press REPEAT again, then press the LEFT/RIGHT button to normal playback press the A-B REPEAT button again. NOTE DVD repeats playback by Chapter or Title, CD and VCD repeat playback by disc or Track. Depending on the remote. When in VCD 2.0 mode (MENU ON...
Owners Guide
Page 21
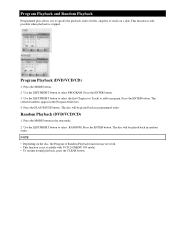
... only possible when playback is not available with VCD 2.0(MENU ON mode). • To resume normal playback, press the CLEAR button. Program Playback (DVD/VCD/CD) 1 Press the MODE button. 2 Use the LEFT/RIGHT button to program. Press the ENTER button. The selected numbers appear in programmed... order. Random Playback (DVD/VCD/CD) 1 Press the MODE button in random order. The disc will be played back in the Program Order box. 4 Press the PLAY/PAUSE...
... only possible when playback is not available with VCD 2.0(MENU ON mode). • To resume normal playback, press the CLEAR button. Program Playback (DVD/VCD/CD) 1 Press the MODE button. 2 Use the LEFT/RIGHT button to program. Press the ENTER button. The selected numbers appear in programmed... order. Random Playback (DVD/VCD/CD) 1 Press the MODE button in random order. The disc will be played back in the Program Order box. 4 Press the PLAY/PAUSE...

Owners Guide
Page 23
• In stop mode on VCD, press the TOP MENU button and the TRACK VIEW will come up. • When pressing the TOP MENU on DVD; INTRO lets you listen to the beginning of each Track for about 10 seconds. The disc's Top Menu will be displayed directly. • When pressing the TOP MENU on CD ; The unit enters the INTRO mode.
• In stop mode on VCD, press the TOP MENU button and the TRACK VIEW will come up. • When pressing the TOP MENU on DVD; INTRO lets you listen to the beginning of each Track for about 10 seconds. The disc's Top Menu will be displayed directly. • When pressing the TOP MENU on CD ; The unit enters the INTRO mode.

Owners Guide
Page 24
...languages are represented by abbreviations. 3 Use the UP/DOWN button to select STEREO, R CHANNEL or L CHANNEL. (On VCD/CD) Using the MENU Button When playing a DVD 1 Press the MENU button. 2 Use the UP/DOWN /LEFT/RIGHT button to select AUDIO information. 3 Press the ENTER button. 4 Use the UP/DOWN /LEFT/...works as a conversion switch between MENU ON and MENU OFF mode. Selecting the Audio Language You can select a desired language quickly and easily with all DVDs. Using the AUDIO Button 1 Press the AUDIO button. 2 Use the UP/DOWN button to select the desired language on the disc and may not ...
...languages are represented by abbreviations. 3 Use the UP/DOWN button to select STEREO, R CHANNEL or L CHANNEL. (On VCD/CD) Using the MENU Button When playing a DVD 1 Press the MENU button. 2 Use the UP/DOWN /LEFT/RIGHT button to select AUDIO information. 3 Press the ENTER button. 4 Use the UP/DOWN /LEFT/...works as a conversion switch between MENU ON and MENU OFF mode. Selecting the Audio Language You can select a desired language quickly and easily with all DVDs. Using the AUDIO Button 1 Press the AUDIO button. 2 Use the UP/DOWN button to select the desired language on the disc and may not ...

Owners Guide
Page 25
• A DVD disc can contain up to 8 Audio languages. • How to "Setting Up the Language Features" on page 30. Refer to have the same Audio language come up whenever you play back a DVD;
• A DVD disc can contain up to 8 Audio languages. • How to "Setting Up the Language Features" on page 30. Refer to have the same Audio language come up whenever you play back a DVD;


