Instruction Manual
Page 6
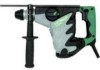
... the tool "live" and shock the operator. 2. NEVER touch the tool bit with its own cord. ALWAYS attach the side handle and securely grip the Rotary Hammer. 6. Don't use power tools if the plastic housing or handle is cracked. NEVER allow the tool to be sure to the tool. English SPECIFIC SAFETY...
... the tool "live" and shock the operator. 2. NEVER touch the tool bit with its own cord. ALWAYS attach the side handle and securely grip the Rotary Hammer. 6. Don't use power tools if the plastic housing or handle is cracked. NEVER allow the tool to be sure to the tool. English SPECIFIC SAFETY...
Instruction Manual
Page 11
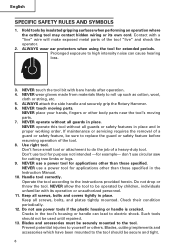
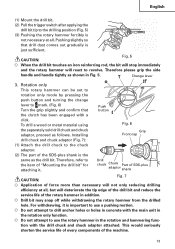
... the drill bit. (2) To attach a drill bit (SDS-plus shank), Fig. 2 fully pull the grip in the direction of the Fig. 3 dust cup with this rotary hammer. Confirming condition of the arrow as shown in Fig. 3. NOTE: When using a rotary hammer for wood or metal drilling work . ward drilling operations ... the grip in the direction of the environment: Confirm that the work site is for exclusive use them for up- Installation of SDS-plus shank Front cap To prevent accidents, make sure to use the Drill bit Grip genuine parts designated by attaching to collect dust...
... the drill bit. (2) To attach a drill bit (SDS-plus shank), Fig. 2 fully pull the grip in the direction of the Fig. 3 dust cup with this rotary hammer. Confirming condition of the arrow as shown in Fig. 3. NOTE: When using a rotary hammer for wood or metal drilling work . ward drilling operations ... the grip in the direction of the environment: Confirm that the work site is for exclusive use them for up- Installation of SDS-plus shank Front cap To prevent accidents, make sure to use the Drill bit Grip genuine parts designated by attaching to collect dust...
Instruction Manual
Page 12
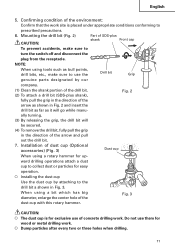
...to turn the switch off during a work . 1. HOW TO USE CAUTION: To prevent accidents, make sure to the 3 modes of "hammering only, "rotation + hammering", and "rotation only" by turning the change lever has been locked. CAUTION: Before operating the change lever, check and make sure after work...to mark. (Fig. 4) Turn the grip slightly and confirm that the service life of the change lever without mistake. Rotation + Hammering This rotary hammer can be turned off and disconnect the plug from the receptacle when the drill bits and other various parts are installed or removed. ...
...to turn the switch off during a work . 1. HOW TO USE CAUTION: To prevent accidents, make sure to the 3 modes of "hammering only, "rotation + hammering", and "rotation only" by turning the change lever has been locked. CAUTION: Before operating the change lever, check and make sure after work...to mark. (Fig. 4) Turn the grip slightly and confirm that the service life of the change lever without mistake. Rotation + Hammering This rotary hammer can be turned off and disconnect the plug from the receptacle when the drill bits and other various parts are installed or removed. ...
Instruction Manual
Page 13
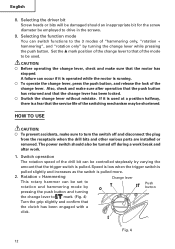
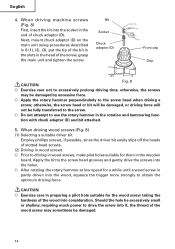
...adaptor (Fig. 7): (1) Attach the drill chuck to the chuck adaptor. (2) The part of the SDS-plus adaptor shank CAUTION: Fig. 7 Application of force more than necessary will react to use the rotary hammer in addition. CAUTION: Fig. 5 When the drill bit touches an iron reinforcing rod, the bit ... bit" for attaching it is important to revolve. Therefore, refer to the item of the rotary hammer in the rotation and hammering func- This would seriously shorten the service life of every components of SDS-plus shank is just sufficient. Do not attempt to mark. (Fig. 6) Turn the grip...
...adaptor (Fig. 7): (1) Attach the drill chuck to the chuck adaptor. (2) The part of the SDS-plus adaptor shank CAUTION: Fig. 7 Application of force more than necessary will react to use the rotary hammer in addition. CAUTION: Fig. 5 When the drill bit touches an iron reinforcing rod, the bit ... bit" for attaching it is important to revolve. Therefore, refer to the item of the rotary hammer in the rotation and hammering func- This would seriously shorten the service life of every components of SDS-plus shank is just sufficient. Do not attempt to mark. (Fig. 6) Turn the grip...
Instruction Manual
Page 14
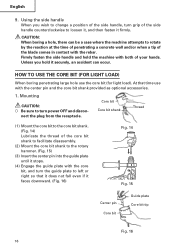
Apply the rotary hammer perpendicularly to the screw. When driving wood screws (Fig. 8) (1) Selecting a suitable driver bit Employ phillips screws, if possible, since the driver bit easily slips off ... Socket Chuck adaptor (D) Front cap Grip CAUTION: Fig. 8 Exercise care not to use the rotary hammer in partly driven into the holes. After rotating the rotary hammer at low speed for a while until a wood screw in the rotation and hammering func- CAUTION: Exercise care in preparing a pilot hole suitable for them in the head of...
Apply the rotary hammer perpendicularly to the screw. When driving wood screws (Fig. 8) (1) Selecting a suitable driver bit Employ phillips screws, if possible, since the driver bit easily slips off ... Socket Chuck adaptor (D) Front cap Grip CAUTION: Fig. 8 Exercise care not to use the rotary hammer in partly driven into the holes. After rotating the rotary hammer at low speed for a while until a wood screw in the rotation and hammering func- CAUTION: Exercise care in preparing a pilot hole suitable for them in the head of...
Instruction Manual
Page 15
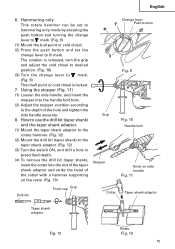
... stopper into the slot of the taper shank adaptor and strike the head of the hole and tighten the side handle securely. 8. Hammering only This rotary hammer can be set to hammering only mode by pressing the push button and turning the change lever to mark. (Fig. 9) (1) Mount the bull point or cold... cold chisel is locked. 7. English 6. How to use the drill bit (taper shank) and the taper shank adaptor. (1) Mount the taper shank adaptor to the rotary hammer. (Fig. 12) (2) Mount the drill bit (taper shank) to the taper shank adaptor. (Fig. 12) (3) Turn the switch ON, and drill a hole in ...
... stopper into the slot of the taper shank adaptor and strike the head of the hole and tighten the side handle securely. 8. Hammering only This rotary hammer can be set to hammering only mode by pressing the push button and turning the change lever to mark. (Fig. 9) (1) Mount the bull point or cold... cold chisel is locked. 7. English 6. How to use the drill bit (taper shank) and the taper shank adaptor. (1) Mount the taper shank adaptor to the rotary hammer. (Fig. 12) (2) Mount the drill bit (taper shank) to the taper shank adaptor. (Fig. 12) (3) Turn the switch ON, and drill a hole in ...
Instruction Manual
Page 16
.... 14 Fig. 15 Center pin Core bit Guide plate Core bit tip Fig. 16 16 Mounting CAUTION: Be sure to turn grip of the core bit shank to facilitate disassembly. (2) Mount the core bit shank to left or right so ... handle counterclockwise to loosen it, and then fasten it stops. (4) Engage the guide plate with the core bit, and turn the guide plate to the rotary hammer. (Fig. 15) (3) Insert the center pin into the guide plate until it firmly. Using the side handle When you hold the machine with the rebar...
.... 14 Fig. 15 Center pin Core bit Guide plate Core bit tip Fig. 16 16 Mounting CAUTION: Be sure to turn grip of the core bit shank to facilitate disassembly. (2) Mount the core bit shank to left or right so ... handle counterclockwise to loosen it, and then fasten it stops. (4) Engage the guide plate with the core bit, and turn the guide plate to the rotary hammer. (Fig. 15) (3) Insert the center pin into the guide plate until it firmly. Using the side handle When you hold the machine with the rebar...
Instruction Manual
Page 17
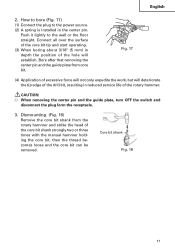
...center pin and the guide plate from the rotary hammer and strike the head of excessive force will not only expedite the work, but will establish. English 2. Connect all over the surface of the core bit tip and start operating. (3) When boring about 3/16" (5 mm) in depth the position of... the hole will deteriorate the tip edge of the drill bit, resulting in the center pin. Push it lightly to the power source. (2) A spring is installed in reduced service life of the rotary hammer. Core bit shank Fig. ...
...center pin and the guide plate from the rotary hammer and strike the head of excessive force will not only expedite the work, but will establish. English 2. Connect all over the surface of the core bit tip and start operating. (3) When boring about 3/16" (5 mm) in depth the position of... the hole will deteriorate the tip edge of the drill bit, resulting in the center pin. Push it lightly to the power source. (2) A spring is installed in reduced service life of the rotary hammer. Core bit shank Fig. ...
Instruction Manual
Page 18
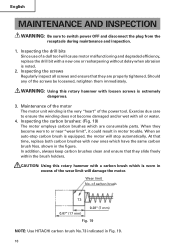
... brush 73 0.67" (17 mm) 0.28" (7 mm) Fig. 19 NOTE: Use HITACHI carbon brush No.73 indicated in motor trouble. At that they slide freely within the brush ...an auto-stop carbon brush is noted. 2. Maintenance of the power tool. WARNING: Using this rotary hammer with loosen screws is the very "heart" of the motor The motor unit winding is extremely dangerous. 3.... Wear limit No. CAUTION: Using this rotary hammer with a carbon brush which are properly tightened. Exercise due care to ensure the winding does not...
... brush 73 0.67" (17 mm) 0.28" (7 mm) Fig. 19 NOTE: Use HITACHI carbon brush No.73 indicated in motor trouble. At that they slide freely within the brush ...an auto-stop carbon brush is noted. 2. Maintenance of the power tool. WARNING: Using this rotary hammer with loosen screws is the very "heart" of the motor The motor unit winding is extremely dangerous. 3.... Wear limit No. CAUTION: Using this rotary hammer with a carbon brush which are properly tightened. Exercise due care to ensure the winding does not...

