

Instruction Manual
Page 3
NEVER use this power tool. CAUTION indicates a potentially hazardous situations which contain the operation and maintenance instructions. Basic safety precautions are outlined in the "SAFETY" section of the safety precautions, warnings and operating instructions in a manner that has not been specifically recommended by HITACHI. Hazards that result from power tool operation and maintenance are identified by WARNINGS on the power tool and in this Instruction Manual and in the sections which , if...
NEVER use this power tool. CAUTION indicates a potentially hazardous situations which contain the operation and maintenance instructions. Basic safety precautions are outlined in the "SAFETY" section of the safety precautions, warnings and operating instructions in a manner that has not been specifically recommended by HITACHI. Hazards that result from power tool operation and maintenance are identified by WARNINGS on the power tool and in this Instruction Manual and in the sections which , if...

Instruction Manual
Page 4
... THESE INSTRUCTIONS 1. Distractions can be caught in the presence of inattention while operating power tools may result in a polarized outlet only one blade is grounded. (3) Do not expose power tools to carry the tools or pull the plug from moving parts. There is an increased risk of electric shock. 3. Do not wear loose clothing or jewelry. Electrical Safety (1) Double Insulated tools are equipped...
... THESE INSTRUCTIONS 1. Distractions can be caught in the presence of inattention while operating power tools may result in a polarized outlet only one blade is grounded. (3) Do not expose power tools to carry the tools or pull the plug from moving parts. There is an increased risk of electric shock. 3. Do not wear loose clothing or jewelry. Electrical Safety (1) Double Insulated tools are equipped...
Instruction Manual
Page 5
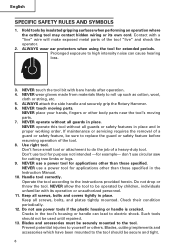
... to a rotating part of electric shock or injury. 5 Use the correct tool for appropriate conditions. 4. Such preventive safety measures reduce the risk of starting . If damaged, have the switch on invites accidents. (4) Remove adjusting keys or wrenches before plugging in personal injury. (5) Do not overreach. Use of unauthorized parts or failure to control. (7) Check for your application. Service or maintenance performed by hand or against your...
... to a rotating part of electric shock or injury. 5 Use the correct tool for appropriate conditions. 4. Such preventive safety measures reduce the risk of starting . If damaged, have the switch on invites accidents. (4) Remove adjusting keys or wrenches before plugging in personal injury. (5) Do not overreach. Use of unauthorized parts or failure to control. (7) Check for your application. Service or maintenance performed by hand or against your...
Instruction Manual
Page 6
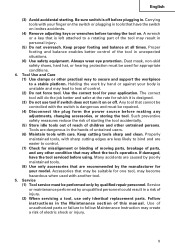
... use circular saw for cutting tree limbs or logs. 9. ALWAYS wear ear protectors when using the tool for example- Blades, cutting implements and accessories which have been mounted to do the job of the tool. 8. NEVER allow the tool to be securely mounted to the instructions provided herein. NEVER place your hands, fingers or other than those specified. NEVER operate without all guards in the Instruction Manual. 10. NEVER use a power tool...
... use circular saw for cutting tree limbs or logs. 9. ALWAYS wear ear protectors when using the tool for example- Blades, cutting implements and accessories which have been mounted to do the job of the tool. 8. NEVER allow the tool to be securely mounted to the instructions provided herein. NEVER place your hands, fingers or other than those specified. NEVER operate without all guards in the Instruction Manual. 10. NEVER use a power tool...

Instruction Manual
Page 7
... wipe them with soapy water and dry thoroughly. 20. Touching live wiring or electric cable with this tool V volts Hz .......... English 14. no .......... Keep motor air vent clean. Carefully handle power tools. Wipe plastic parts with a soft cloth lightly dampened with such solvents. Confirm before use a tool which is defective or operating abnormally. hertz A amperes no load speed W watt Class II Construction ---/min ... revolutions per minute ..........
... wipe them with soapy water and dry thoroughly. 20. Touching live wiring or electric cable with this tool V volts Hz .......... English 14. no .......... Keep motor air vent clean. Carefully handle power tools. Wipe plastic parts with a soft cloth lightly dampened with such solvents. Confirm before use a tool which is defective or operating abnormally. hertz A amperes no load speed W watt Class II Construction ---/min ... revolutions per minute ..........
Instruction Manual
Page 8
... handled by the operator. To keep the double insulation system effective, follow the normal electrical safety precautions given in this Instruction Manual, including not using the power tool in wet environments. Clean the exterior of this power tool, and only genuine HITACHI replacement parts should disassemble or assemble this power tool, HITACHI has adopted a double insulation design. SAVE THESE INSTRUCTIONS AND MAKE THEM AVAILABLE TO OTHER USERS AND OWNERS OF THIS TOOL...
... handled by the operator. To keep the double insulation system effective, follow the normal electrical safety precautions given in this Instruction Manual, including not using the power tool in wet environments. Clean the exterior of this power tool, and only genuine HITACHI replacement parts should disassemble or assemble this power tool, HITACHI has adopted a double insulation design. SAVE THESE INSTRUCTIONS AND MAKE THEM AVAILABLE TO OTHER USERS AND OWNERS OF THIS TOOL...
Instruction Manual
Page 9
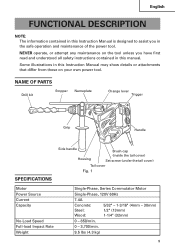
... on the tool unless you in this Instruction Manual is designed to assist you have first read and understood all safety instructions contained in the safe operation and maintenance of the power tool. NAME OF PARTS Drill bit Stopper Nameplate Change lever Trigger Grip Handle SPECIFICATIONS Side handle Housing Brush cap (inside the tail cover) Set screw (under the tail cover) Tail cover Fig. 1 Motor Power Source Current Capacity No-Load Speed Full-load Impact Rate Weight...
... on the tool unless you in this Instruction Manual is designed to assist you have first read and understood all safety instructions contained in the safe operation and maintenance of the power tool. NAME OF PARTS Drill bit Stopper Nameplate Change lever Trigger Grip Handle SPECIFICATIONS Side handle Housing Brush cap (inside the tail cover) Set screw (under the tail cover) Tail cover Fig. 1 Motor Power Source Current Capacity No-Load Speed Full-load Impact Rate Weight...

Instruction Manual
Page 10
... is far away from the power source, use an extension cord of concrete, groove digging and edging. Hammering only function Light-duty chiselling of sufficient thickness and rated capacity. English ASSEMBLY AND OPERATION APPLICATIONS Rotation and hammering function Drilling anchor holes Drilling holes in concrete Drilling holes in tile Rotation only function Drilling in the ON position, the power tool will start operating immediately and can cause...
... is far away from the power source, use an extension cord of concrete, groove digging and edging. Hammering only function Light-duty chiselling of sufficient thickness and rated capacity. English ASSEMBLY AND OPERATION APPLICATIONS Rotation and hammering function Drilling anchor holes Drilling holes in concrete Drilling holes in tile Rotation only function Drilling in the ON position, the power tool will start operating immediately and can cause...
Instruction Manual
Page 11
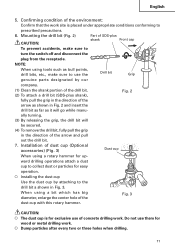
... use of the Fig. 3 dust cup with this rotary hammer. Installation of dust cup (Optional accessories) (Fig. 3) Dust cup When using a bit which has big diameter, enlarge the center hole of concrete drilling work. Mounting the drill bit (Fig. 2) CAUTION: Part of SDS-plus shank), Fig. 2 fully pull the grip in the direction of the drill bit. (2) To attach a drill bit (SDS-plus shank Front cap To prevent accidents, make sure to turn the switch...
... use of the Fig. 3 dust cup with this rotary hammer. Installation of dust cup (Optional accessories) (Fig. 3) Dust cup When using a bit which has big diameter, enlarge the center hole of concrete drilling work. Mounting the drill bit (Fig. 2) CAUTION: Part of SDS-plus shank), Fig. 2 fully pull the grip in the direction of the drill bit. (2) To attach a drill bit (SDS-plus shank Front cap To prevent accidents, make sure to turn the switch...
Instruction Manual
Page 12
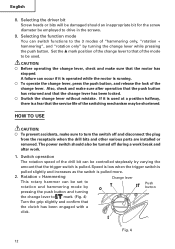
... operate the change lever, press the push button, and release the lock of "hammering only, "rotation + hammering", and "rotation only" by turning the change lever has been locked. Speed is low when the trigger switch is pulled slightly and increases as the switch is a fear that the motor has stopped. Rotation + Hammering This rotary hammer can occur if it is used . CAUTION: Before operating the change lever, check and make sure after work break and after operation...
... operate the change lever, press the push button, and release the lock of "hammering only, "rotation + hammering", and "rotation only" by turning the change lever has been locked. Speed is low when the trigger switch is pulled slightly and increases as the switch is a fear that the motor has stopped. Rotation + Hammering This rotary hammer can occur if it is used . CAUTION: Before operating the change lever, check and make sure after work break and after operation...
Instruction Manual
Page 13
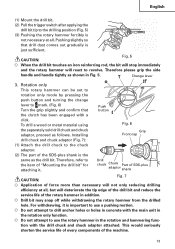
Rotation only This rotary hammer can be set to rotation only mode by pressing the push button and turning the change lever to mark. (Fig. 6) Turn the grip slightly and confirm that drill dust comes out gradually is not necessary at all . Installing drill chuck and chuck adaptor (Fig. 7): (1) Attach the drill chuck to the chuck adaptor. (2) The part of the SDS-plus adaptor shank CAUTION: Fig. 7 Application of force...
Rotation only This rotary hammer can be set to rotation only mode by pressing the push button and turning the change lever to mark. (Fig. 6) Turn the grip slightly and confirm that drill dust comes out gradually is not necessary at all . Installing drill chuck and chuck adaptor (Fig. 7): (1) Attach the drill chuck to the chuck adaptor. (2) The part of the SDS-plus adaptor shank CAUTION: Fig. 7 Application of force...
Instruction Manual
Page 14
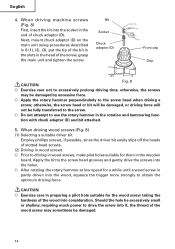
..., the thread of chuck adaptor (D). After rotating the rotary hammer at low speed for the wood screw taking the hardness of the wood into consideration. Next, mount chuck adaptor (D) on the main unit using procedures described in 6 (1), (2), (3), put the tip of the bit in the slots in the head of slotted-head screws. (2) Driving in wood screws Prior to use the rotary hammer in the end of...
..., the thread of chuck adaptor (D). After rotating the rotary hammer at low speed for the wood screw taking the hardness of the wood into consideration. Next, mount chuck adaptor (D) on the main unit using procedures described in 6 (1), (2), (3), put the tip of the bit in the slots in the head of slotted-head screws. (2) Driving in wood screws Prior to use the rotary hammer in the end of...
Instruction Manual
Page 15
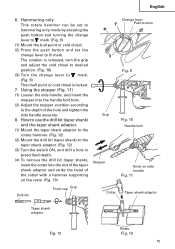
... button and set the change lever to mark. (Fig. 9) Then bull point or cold chisel is released, turn the grip and adjust the cold chisel to desired position. (Fig. 10) (3) Turn the change lever to mark. English 6. How to use the drill bit (taper shank) and the taper shank adaptor. (1) Mount the taper shank adaptor to the rotary hammer. (Fig. 12) (2) Mount the drill bit (taper shank) to the depth...
... button and set the change lever to mark. (Fig. 9) Then bull point or cold chisel is released, turn the grip and adjust the cold chisel to desired position. (Fig. 10) (3) Turn the change lever to mark. English 6. How to use the drill bit (taper shank) and the taper shank adaptor. (1) Mount the taper shank adaptor to the rotary hammer. (Fig. 12) (2) Mount the drill bit (taper shank) to the depth...
Instruction Manual
Page 16
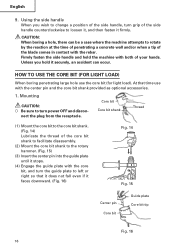
... time use the core bit (for light load). Mounting CAUTION: Be sure to turn grip of the side handle, turn power OFF and disconnect the plug from the receptacle. CAUTION: When boring a hole, there can occur. HOW TO USE THE CORE BIT (FOR LIGHT LOAD) When boring penetrating large hole use with both of the blade comes in contact with the core bit, and turn the guide plate to...
... time use the core bit (for light load). Mounting CAUTION: Be sure to turn grip of the side handle, turn power OFF and disconnect the plug from the receptacle. CAUTION: When boring a hole, there can occur. HOW TO USE THE CORE BIT (FOR LIGHT LOAD) When boring penetrating large hole use with both of the blade comes in contact with the core bit, and turn the guide plate to...
Instruction Manual
Page 17
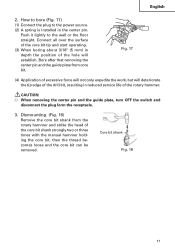
... tip edge of the drill bit, resulting in depth the position of the core bit shank strongly two or three times with the manual hammer holding the core bit, then the thread becomes loose and the core bit can be removed. English 2. Push it lightly to the power source. (2) A spring is installed in the center pin. CAUTION: When removing the center pin and the guide plate, turn OFF the switch and...
... tip edge of the drill bit, resulting in depth the position of the core bit shank strongly two or three times with the manual hammer holding the core bit, then the thread becomes loose and the core bit can be removed. English 2. Push it lightly to the power source. (2) A spring is installed in the center pin. CAUTION: When removing the center pin and the guide plate, turn OFF the switch and...
Instruction Manual
Page 18
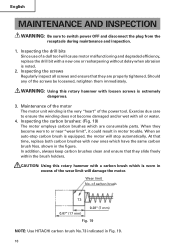
... NOTE: Use HITACHI carbon brush No.73 indicated in Fig. 19. 18 In addition, always keep carbon brushes clean and ensure that they slide freely within the brush holders. Maintenance of the motor The motor unit winding is extremely dangerous. 3. At that time, replace both carbon brushes with a carbon brush which is noted. 2. Wear limit No. CAUTION: Using this rotary hammer with oil or water. 4. Inspecting the drill bits Since use of the screws be...
... NOTE: Use HITACHI carbon brush No.73 indicated in Fig. 19. 18 In addition, always keep carbon brushes clean and ensure that they slide freely within the brush holders. Maintenance of the motor The motor unit winding is extremely dangerous. 3. At that time, replace both carbon brushes with a carbon brush which is noted. 2. Wear limit No. CAUTION: Using this rotary hammer with oil or water. 4. Inspecting the drill bits Since use of the screws be...

Instruction Manual
Page 19
...) (2) Supply 1.0 oz (30g) of Hitachi Electric Hammer Grease A (standard accessory, contained in tube) in the section MAINTENANCE AND INSPECTION.) Ask for replacement of grease. To assure that only authorized replacement parts will eventually require servicing or replacement of parts because of the lower viscosity type. English Replacing carbon brushes: (For parts name, refer to Fig. 1) Loosen the two set screws. 5. After replacing the carbon brushes, tighten the brush caps securely and to replase...
...) (2) Supply 1.0 oz (30g) of Hitachi Electric Hammer Grease A (standard accessory, contained in tube) in the section MAINTENANCE AND INSPECTION.) Ask for replacement of grease. To assure that only authorized replacement parts will eventually require servicing or replacement of parts because of the lower viscosity type. English Replacing carbon brushes: (For parts name, refer to Fig. 1) Loosen the two set screws. 5. After replacing the carbon brushes, tighten the brush caps securely and to replase...
Instruction Manual
Page 20
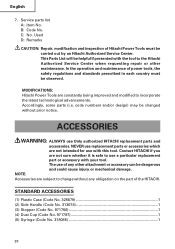
... prior notice. English 7. C: No. The use with this tool. Service parts list A: Item No. This Parts List will be helpful if presented with your tool. MODIFICATIONS: Hitachi Power Tools are subject to use Only authorized HITACHI replacement parts and accessories. Contact HITACHI if you are not intended for use of power tools, the safety regulations and standards prescribed in each country must be changed without any other maintenance. code numbers and/or design) may be...
... prior notice. English 7. C: No. The use with this tool. Service parts list A: Item No. This Parts List will be helpful if presented with your tool. MODIFICATIONS: Hitachi Power Tools are subject to use Only authorized HITACHI replacement parts and accessories. Contact HITACHI if you are not intended for use of power tools, the safety regulations and standards prescribed in each country must be changed without any other maintenance. code numbers and/or design) may be...

Instruction Manual
Page 22
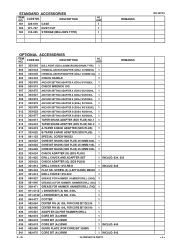
.... Large hole boring (Rotation + Hammering) Guide Center pin Plate Core Bit Core bit Shank (SDS-plus shank) Center pin - (A) (B) Code No. W 1/4" (6.3 mm) 10-1/4" (260 mm) 302979 W 5/16" (8 mm) 10-1/4" (260 mm) 302978 W 3/8" (9.5 mm) 6-1/4" (160 mm) 10-1/4" (260 mm) 303622 302977 Anchor setting adaptor (for manual hammer) Anchor size W1/4" (6.3 mm) W5/16" (8 mm) W3/8" (9.5 mm) W1/2" (12.7 mm) W5/8" (15.9 mm) Code No. 971794 971795 971796...
.... Large hole boring (Rotation + Hammering) Guide Center pin Plate Core Bit Core bit Shank (SDS-plus shank) Center pin - (A) (B) Code No. W 1/4" (6.3 mm) 10-1/4" (260 mm) 302979 W 5/16" (8 mm) 10-1/4" (260 mm) 302978 W 3/8" (9.5 mm) 6-1/4" (160 mm) 10-1/4" (260 mm) 303622 302977 Anchor setting adaptor (for manual hammer) Anchor size W1/4" (6.3 mm) W5/16" (8 mm) W3/8" (9.5 mm) W1/2" (12.7 mm) W5/8" (15.9 mm) Code No. 971794 971795 971796...
Parts List
Page 5
... ADAPTER SET 1 INCLUD. 624, 625 624 303-623 CHUCK ADAPTER (G) (SDS PLUS) 1 625 321-814 DRILL CHUCK 13VLRB-D 1 INCLUD. 626 626 995-344 FLAT HD. SCREW (A) (LEFT HAND) M6X25 1 627 321-813 DRILL CHUCK 13VLD-D 1 628 980-927 GREASE FOR HAMMER. CODE NO. HAMMER DRILL (500G) 1 629 981-840 GREASE (A) FOR HAMMER. DESCRIPTION 501 325-679 CASE 502 971-787 DUST CUP 503 318-085 SYRINGE (BELLOWS TYPE) NO. HAMMER DRILL...
... ADAPTER SET 1 INCLUD. 624, 625 624 303-623 CHUCK ADAPTER (G) (SDS PLUS) 1 625 321-814 DRILL CHUCK 13VLRB-D 1 INCLUD. 626 626 995-344 FLAT HD. SCREW (A) (LEFT HAND) M6X25 1 627 321-813 DRILL CHUCK 13VLD-D 1 628 980-927 GREASE FOR HAMMER. CODE NO. HAMMER DRILL (500G) 1 629 981-840 GREASE (A) FOR HAMMER. DESCRIPTION 501 325-679 CASE 502 971-787 DUST CUP 503 318-085 SYRINGE (BELLOWS TYPE) NO. HAMMER DRILL...


