

Instruction Manual
Page 3
... safety procedures. MEANINGS OF SIGNAL WORDS WARNING indicates a potentially hazardous situations which , if ignored, could result in the Instruction Manual before it occurs, and by WARNINGS on the power tool and in the sections which contain the operation and maintenance instructions. ... in this Instruction Manual. CAUTION indicates a hazardous situations which , if ignored, could result in a manner that result from power tool operation and maintenance are caused by HITACHI, unless you and others. Most accidents that has not been specifically recommended by the failure to...
... safety procedures. MEANINGS OF SIGNAL WORDS WARNING indicates a potentially hazardous situations which , if ignored, could result in the Instruction Manual before it occurs, and by WARNINGS on the power tool and in the sections which contain the operation and maintenance instructions. ... in this Instruction Manual. CAUTION indicates a hazardous situations which , if ignored, could result in a manner that result from power tool operation and maintenance are caused by HITACHI, unless you and others. Most accidents that has not been specifically recommended by the failure to...
Instruction Manual
Page 5
... the manufacturer for misalignment or binding of moving parts. Properly maintained tools, with care. Service or maintenance performed by qualified repair personnel. Never operate this manual. don't use only identical replacement parts. A wrench or a key that may result in proper working order. English (3) Avoid accidental starting the tool accidentally. (5) Store idle...
... the manufacturer for misalignment or binding of moving parts. Properly maintained tools, with care. Service or maintenance performed by qualified repair personnel. Never operate this manual. don't use only identical replacement parts. A wrench or a key that may result in proper working order. English (3) Avoid accidental starting the tool accidentally. (5) Store idle...
Instruction Manual
Page 6
... carbon tetrachloride, and alcohol may burn out. 16. Handle tool correctly. Keep all screws, bolts, and plates tightly mounted. Cracks in the Instruction Manual. 10. Check for applications other than the rated...is defective or operating abnormally. The tool's motor air vent must be operated by a Hitachi authorized service center. 17. Carefully handle power tools. Operate the power tool at the rated...voltage. Turn power off. Do not use a power tool for dust build-up frequently. 15. Operate power tools at voltages specified on its operation or unauthorized personnel. 11. Do ...
... carbon tetrachloride, and alcohol may burn out. 16. Handle tool correctly. Keep all screws, bolts, and plates tightly mounted. Cracks in the Instruction Manual. 10. Check for applications other than the rated...is defective or operating abnormally. The tool's motor air vent must be operated by a Hitachi authorized service center. 17. Carefully handle power tools. Operate the power tool at the rated...voltage. Turn power off. Do not use a power tool for dust build-up frequently. 15. Operate power tools at voltages specified on its operation or unauthorized personnel. 11. Do ...
Instruction Manual
Page 8
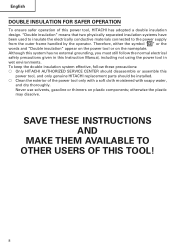
Although this system has no external grounding, you must still follow these precautions: ⅜ Only HITACHI AUTHORIZED SERVICE CENTER should disassemble or assemble this Instruction Manual, including not using the power tool in wet environments. Never use solvents, gasoline or thinners on the nameplate. ... follow the normal electrical safety precautions given in this power tool, and only genuine HITACHI replacement parts should be installed. ⅜ Clean the exterior of this power tool, HITACHI has adopted a double insulation design. SAVE THESE INSTRUCTIONS AND MAKE THEM AVAILABLE TO ...
Although this system has no external grounding, you must still follow these precautions: ⅜ Only HITACHI AUTHORIZED SERVICE CENTER should disassemble or assemble this Instruction Manual, including not using the power tool in wet environments. Never use solvents, gasoline or thinners on the nameplate. ... follow the normal electrical safety precautions given in this power tool, and only genuine HITACHI replacement parts should be installed. ⅜ Clean the exterior of this power tool, HITACHI has adopted a double insulation design. SAVE THESE INSTRUCTIONS AND MAKE THEM AVAILABLE TO ...
Instruction Manual
Page 9
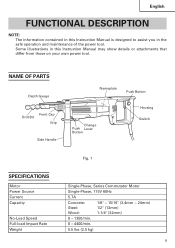
...-Phase, Series Commutator Motor Single-Phase, 115V 60Hz 5.7A Concrete: 1/8" ~ 15/16" (3.4mm ~ 24mm) Steel: 1/2" (13mm) Wood: 1-1/4" (32mm) 0 - 1350/min. 0 - 4400/min. 5.5 lbs (2.5 kg) 9 English FUNCTIONAL DESCRIPTION NOTE: The information contained in this Instruction Manual is designed to assist you in this Instruction Manual may show details or attachments that differ from those on...
...-Phase, Series Commutator Motor Single-Phase, 115V 60Hz 5.7A Concrete: 1/8" ~ 15/16" (3.4mm ~ 24mm) Steel: 1/2" (13mm) Wood: 1-1/4" (32mm) 0 - 1350/min. 0 - 4400/min. 5.5 lbs (2.5 kg) 9 English FUNCTIONAL DESCRIPTION NOTE: The information contained in this Instruction Manual is designed to assist you in this Instruction Manual may show details or attachments that differ from those on...
Instruction Manual
Page 11
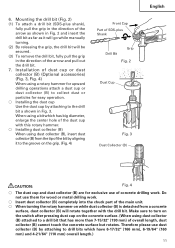
...the tip of the bit by attaching to a drill bit that has more than 7-15/32" (190 mm) of the arrow and pull out the drill bit. 7. Mounting the drill bit (Fig. 2) (1) To attach a drill bit (SDS-plus shank), fully pull the grip in the direction of the arrow as shown in... or particles for wood or metal drilling work . Therefore please use dust collector (B) by aligning it will go while manually turning. (2) By releasing the grip, the drill bit will rotate together with this rotary hammer. ⅜ Installing dust collector (B) When using a bit which have 6-17/32" (166 mm), 6-19/64" (160 mm) ...
...the tip of the bit by attaching to a drill bit that has more than 7-15/32" (190 mm) of the arrow and pull out the drill bit. 7. Mounting the drill bit (Fig. 2) (1) To attach a drill bit (SDS-plus shank), fully pull the grip in the direction of the arrow as shown in... or particles for wood or metal drilling work . Therefore please use dust collector (B) by aligning it will go while manually turning. (2) By releasing the grip, the drill bit will rotate together with this rotary hammer. ⅜ Installing dust collector (B) When using a bit which have 6-17/32" (166 mm), 6-19/64" (160 mm) ...

Instruction Manual
Page 15
...14) (1) Loosen the knob on Side Handle Fig. 14 Cotter Taper Snank Adaptor Rests Fig. 16 15 How to use the drill bit (taper shank) and the taper shank adaptor (1) Mount the taper shank adaptor to the rotary hammer. (Fig. 15) (2) Mount the drill bit (taper shank) to the taper shank adaptor. (Fig... side handle. (2) Adjust the depth gauge position according to the depth of the cotter with a manual hammer supporting on the rests. (Fig. 16) Drill Bit Grip Taper Shank Front Cap Adaptor Fig. 15 English Grip Fig. 13 Mounting Depth Hole Gauge Knob on the side handle, and insert the depth...
...14) (1) Loosen the knob on Side Handle Fig. 14 Cotter Taper Snank Adaptor Rests Fig. 16 15 How to use the drill bit (taper shank) and the taper shank adaptor (1) Mount the taper shank adaptor to the rotary hammer. (Fig. 15) (2) Mount the drill bit (taper shank) to the taper shank adaptor. (Fig... side handle. (2) Adjust the depth gauge position according to the depth of the cotter with a manual hammer supporting on the rests. (Fig. 16) Drill Bit Grip Taper Shank Front Cap Adaptor Fig. 15 English Grip Fig. 13 Mounting Depth Hole Gauge Knob on the side handle, and insert the depth...
Instruction Manual
Page 17
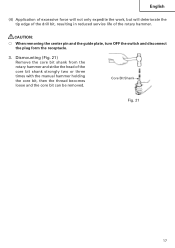
... shank from the rotary hammer and strike the head of the rotary hammer. English (4) Application of excessive force will not only expedite the work, but will deteriorate the tip edge of the drill bit, resulting in reduced service life of the core bit shank strongly two or three times with the manual hammer holding the core...
... shank from the rotary hammer and strike the head of the rotary hammer. English (4) Application of excessive force will not only expedite the work, but will deteriorate the tip edge of the drill bit, resulting in reduced service life of the core bit shank strongly two or three times with the manual hammer holding the core...
Parts List
Page 6
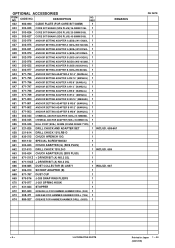
...MANUAL) 1 649 971-799 ANCHOR SETTING ADAPTER B W1/4" (MANUAL) 1 650 971-800 ANCHOR SETTING ADAPTER B W5/16" (MANUAL) 1 651 971-801 ANCHOR SETTING ADAPTER B W3/8" (MANUAL) 1 652 971-802 ANCHOR SETTING ADAPTER B W1/2" (MANUAL) 1 653 971-803 ANCHOR SETTING ADAPTER B W5/8" (MANUAL) 1 654 303-044 CHEMICAL ANCHOR ADAPTER (SDS...-977 J-201 SPRING HOOK 1 671 931-844 STOPPER 1 672 981-840 GREASE (A) FOR HAMMER.HAMMER DRILL (30G) 1 673 308-471 GREASE FOR HAMMER.HAMMER DRILL (70G) 1 674 980-927 GREASE FOR HAMMER.HAMMER DRILL (500G) 1 DH 24PE --- 6 --- * ALTERNATIVE PARTS Printed in Japan 1 ...
...MANUAL) 1 649 971-799 ANCHOR SETTING ADAPTER B W1/4" (MANUAL) 1 650 971-800 ANCHOR SETTING ADAPTER B W5/16" (MANUAL) 1 651 971-801 ANCHOR SETTING ADAPTER B W3/8" (MANUAL) 1 652 971-802 ANCHOR SETTING ADAPTER B W1/2" (MANUAL) 1 653 971-803 ANCHOR SETTING ADAPTER B W5/8" (MANUAL) 1 654 303-044 CHEMICAL ANCHOR ADAPTER (SDS...-977 J-201 SPRING HOOK 1 671 931-844 STOPPER 1 672 981-840 GREASE (A) FOR HAMMER.HAMMER DRILL (30G) 1 673 308-471 GREASE FOR HAMMER.HAMMER DRILL (70G) 1 674 980-927 GREASE FOR HAMMER.HAMMER DRILL (500G) 1 DH 24PE --- 6 --- * ALTERNATIVE PARTS Printed in Japan 1 ...


