
Instruction Manual
Page 4
... 1. Do not use common sense when operating a power tool. Keep your work area clean and well lit. Use of any other batteries may ignite the dust of fire. 3. Cluttered benches and dark areas invite accidents. (2) Do not operate power tools in explosive atmospheres,...in serious personal injury. (2) Dress properly. A charger that have the switch on invites accidents. (4) Remove adjusting keys or wrenches before inserting battery. Carrying tools with your finger on . Always wear eye protection. Proper footing and balance enable better control of drugs, alcohol, or medication....
... 1. Do not use common sense when operating a power tool. Keep your work area clean and well lit. Use of any other batteries may ignite the dust of fire. 3. Cluttered benches and dark areas invite accidents. (2) Do not operate power tools in explosive atmospheres,...in serious personal injury. (2) Dress properly. A charger that have the switch on invites accidents. (4) Remove adjusting keys or wrenches before inserting battery. Carrying tools with your finger on . Always wear eye protection. Proper footing and balance enable better control of drugs, alcohol, or medication....

Instruction Manual
Page 5
...: ● Lead from lead-based paints, ● Crystalline silica from bricks and cement and other condition that cannot be repaired. (4) Disconnect battery pack from these exposures varies, depending on or off position before using. Service or maintenance performed by qualified repair personnel. Your risk from tool ...unauthorized parts or failure to cause cancer, birth defects or other small metal objects that are recommended by power sanding, sawing, grinding, drilling, and other construction activities contains chemicals known [to the State of electric shock or injury.
...: ● Lead from lead-based paints, ● Crystalline silica from bricks and cement and other condition that cannot be repaired. (4) Disconnect battery pack from these exposures varies, depending on or off position before using. Service or maintenance performed by qualified repair personnel. Your risk from tool ...unauthorized parts or failure to cause cancer, birth defects or other small metal objects that are recommended by power sanding, sawing, grinding, drilling, and other construction activities contains chemicals known [to the State of electric shock or injury.
Instruction Manual
Page 8
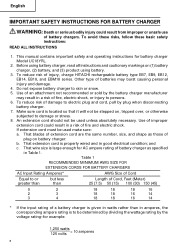
... of extension cord are the same number, size, and shape as specified in good electrical condition; To reduce risk of injury, charge HITACHI rechargeable battery type EB7, EB9, EB12, EB14, EB18, and EBM18 series. An extension cord should not be determined by dividing the wattage rating by... the voltage rating-for battery charger Model UC18YRL. 2. To avoid these risks, follow these basic safety instructions: READ ALL INSTRUCTIONS 1. To reduce risk of damage to rain ...
... of extension cord are the same number, size, and shape as specified in good electrical condition; To reduce risk of injury, charge HITACHI rechargeable battery type EB7, EB9, EB12, EB14, EB18, and EBM18 series. An extension cord should not be determined by dividing the wattage rating by... the voltage rating-for battery charger Model UC18YRL. 2. To avoid these risks, follow these basic safety instructions: READ ALL INSTRUCTIONS 1. To reduce risk of damage to rain ...
Instruction Manual
Page 9
...any maintenance or cleaning. ALWAYS wait at least 15 minutes between charges to the battery charger may overheat and damage the charger. 13. English 9. Do not operate battery charger if it to HITACHI battery operated tools as a standard accessory. take it has received a sharp blow,... been dropped, or otherwise damaged in a fire. 3. REMEMBER: USE ONLY HITACHI BATTERY TYPES EB7 SERIES, EB9 SERIES, EB12 SERIES, EB14 ...
...any maintenance or cleaning. ALWAYS wait at least 15 minutes between charges to the battery charger may overheat and damage the charger. 13. English 9. Do not operate battery charger if it to HITACHI battery operated tools as a standard accessory. take it has received a sharp blow,... been dropped, or otherwise damaged in a fire. 3. REMEMBER: USE ONLY HITACHI BATTERY TYPES EB7 SERIES, EB9 SERIES, EB12 SERIES, EB14 ...

Instruction Manual
Page 10
After that, you are pulling the switch, the motor may stop. When the battery power remaining runs out (the battery voltage drops to stop . If the tool is not the trouble but the result of overloading. This is overloaded, the motor may stop the output. ... the cases of 1 and 2 described below, when using this case, release the switch of tool and eliminate causes of protection function. 1. English CAUTION ON LITHIUM-ION BATTERY To extend the lifetime, the lithium-ion battery equips with the protection function to about 12V), the motor stops.
After that, you are pulling the switch, the motor may stop. When the battery power remaining runs out (the battery voltage drops to stop . If the tool is not the trouble but the result of overloading. This is overloaded, the motor may stop the output. ... the cases of 1 and 2 described below, when using this case, release the switch of tool and eliminate causes of protection function. 1. English CAUTION ON LITHIUM-ION BATTERY To extend the lifetime, the lithium-ion battery equips with the protection function to about 12V), the motor stops.
Instruction Manual
Page 11
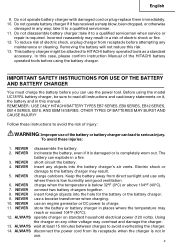
... PARTS 1. NEVER operate, or attempt any maintenance on your own power tool. Cordless Reciprocating Saw (CR18DL) Blade holder Lever Brush cap Front cover Lock-off button Blade Base Rubber cap Housing ⅜ Battery (EBM1830) Terminal hole Switch trigger Handle Battery Latch Nameplate Fig. 1 11 Some illustrations in the safe operation and maintenance of the...
... PARTS 1. NEVER operate, or attempt any maintenance on your own power tool. Cordless Reciprocating Saw (CR18DL) Blade holder Lever Brush cap Front cover Lock-off button Blade Base Rubber cap Housing ⅜ Battery (EBM1830) Terminal hole Switch trigger Handle Battery Latch Nameplate Fig. 1 11 Some illustrations in the safe operation and maintenance of the...
Instruction Manual
Page 12
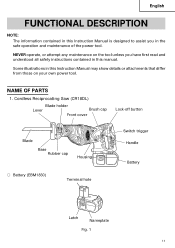
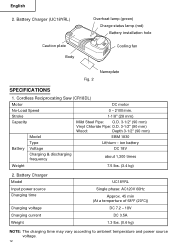
...) Caution plate Body Overheat lamp (green) Charge status lamp (red) Battery installation hole Cooling fan Fig. 2 Nameplate SPECIFICATIONS 1. ion battery Battery Voltage DC 18V Charging & discharging frequency about 1,300 times Weight 7.5 lbs. (3.4 kg) 2. Cordless Reciprocating Saw (CR18DL) Motor DC motor No-Load Speed 0 - 2100/min. Stroke 1-1/8" (28 mm) Capacity Mild Steel Pipe: O.D. 3-1/2" (90 mm) Vinyl Chloride Pipe...
...) Caution plate Body Overheat lamp (green) Charge status lamp (red) Battery installation hole Cooling fan Fig. 2 Nameplate SPECIFICATIONS 1. ion battery Battery Voltage DC 18V Charging & discharging frequency about 1,300 times Weight 7.5 lbs. (3.4 kg) 2. Cordless Reciprocating Saw (CR18DL) Motor DC motor No-Load Speed 0 - 2100/min. Stroke 1-1/8" (28 mm) Capacity Mild Steel Pipe: O.D. 3-1/2" (90 mm) Vinyl Chloride Pipe...

Instruction Manual
Page 13
... pressing the latches (2 pcs.) on the nameplate, the charger will burn out. 13 If charged at voltage higher than indicated on the sides of the battery. (Fig. 3) CHARGING METHOD The following points. ⅜ The power source voltage is stated on the nameplate. If not, it into the receptacle, make... sure the following is not damaged. REMOVAL AND INSTALLATION METHOD OF BATTERY CAUTION: Be sure to keep the switch turned off and the lock-off button moved to right position (lock position). (See Fig. 21) ...
... pressing the latches (2 pcs.) on the nameplate, the charger will burn out. 13 If charged at voltage higher than indicated on the sides of the battery. (Fig. 3) CHARGING METHOD The following points. ⅜ The power source voltage is stated on the nameplate. If not, it into the receptacle, make... sure the following is not damaged. REMOVAL AND INSTALLATION METHOD OF BATTERY CAUTION: Be sure to keep the switch turned off and the lock-off button moved to right position (lock position). (See Fig. 21) ...

Instruction Manual
Page 14
... (See Table 2) NOTE: If the pilot lamp flikers in red, pull out the plug from the receptacle and check if the battery is properly mounted. ⅜ When the battery is fully charged, the pilot lamp will blink in red slowly. (At 1-second intervals) (See Table 2) 14 Make sure it... repaired immediately. 2. Battery Charge status lamp (red) Overheat lamp (green) Fig. 4 3. Have it contacts the bottom of battery charger has been inserted into the receptacle, the charge status lamp will bilink in red. (At 1-second intervals...
... (See Table 2) NOTE: If the pilot lamp flikers in red, pull out the plug from the receptacle and check if the battery is properly mounted. ⅜ When the battery is fully charged, the pilot lamp will blink in red slowly. (At 1-second intervals) (See Table 2) 14 Make sure it... repaired immediately. 2. Battery Charge status lamp (red) Overheat lamp (green) Fig. 4 3. Have it contacts the bottom of battery charger has been inserted into the receptacle, the charge status lamp will bilink in red. (At 1-second intervals...

Instruction Manual
Page 15
... the plug out of the receptacle by pulling on the cord. Make sure to grasp the plug when removing from the battery charger. Supporting the battery charger with hand, pull out the battery from the receptacle. Regarding electric discharge in the impossible (RED) for 0.1 seconds. (off for an extended period is a temporary phenomenon...
... the plug out of the receptacle by pulling on the cord. Make sure to grasp the plug when removing from the battery charger. Supporting the battery charger with hand, pull out the battery from the receptacle. Regarding electric discharge in the impossible (RED) for 0.1 seconds. (off for an extended period is a temporary phenomenon...
Instruction Manual
Page 16
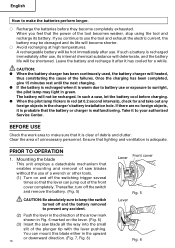
... to prevent any foreign objects in the charger's battery installation hole. The battery will be shortened. BEFORE USE Check the work area to your authorized Service Center. If you feel that enables mounting and removal of saw blade all the way into the small slit of a wrench or other... tools. (1) Turn on the lever. (Fig. 6) (3) Insert the saw blades without the use . In such a case, let the battery cool before they become shorter. ⅜ Avoid recharging at 0.2 second intervals), check for a while. If there are no foreign...
... to prevent any foreign objects in the charger's battery installation hole. The battery will be shortened. BEFORE USE Check the work area to your authorized Service Center. If you feel that enables mounting and removal of saw blade all the way into the small slit of a wrench or other... tools. (1) Turn on the lever. (Fig. 6) (3) Insert the saw blades without the use . In such a case, let the battery cool before they become shorter. ⅜ Avoid recharging at 0.2 second intervals), check for a while. If there are no foreign...

Instruction Manual
Page 17
Dismounting the blade (1) Turn on and off and the battery removed to pull it from the back. The metal is broken and remains inside the small slit, hook the broken blade using the procedures explained below. (1) If a part of the broken saw blade, be absolutely sure to prevent any accident. If it ... and take the blade out. (2) If the broken saw blade is hidden inside the small slit of the plunger, it should fall out if you push the lever in Fig. 6, turn off the switch and remove the battery. (Fig. 5) CAUTION: Be absolutely sure to keep the switch turned off the switching ...
Dismounting the blade (1) Turn on and off and the battery removed to pull it from the back. The metal is broken and remains inside the small slit, hook the broken blade using the procedures explained below. (1) If a part of the broken saw blade, be absolutely sure to prevent any accident. If it ... and take the blade out. (2) If the broken saw blade is hidden inside the small slit of the plunger, it should fall out if you push the lever in Fig. 6, turn off the switch and remove the battery. (Fig. 5) CAUTION: Be absolutely sure to keep the switch turned off the switching ...

Instruction Manual
Page 18
...Tighten the set screw slightly, ensure the base does not move the base forward, as shown in personal injury. (Fig. 14) 3. Ensure that the battery is installed can function smoothly. (2) As shown in Fig. 12, carry out lubrication around the blade holder on a periodic basis by use of an arrow... mark as shown in the direction of cutting fluid, etc. Otherwise, the saw blade with an Allen wrench and move back and forth, and firmly tighten the set screw with a worn-out blade hole. Adjusting the base ...
...Tighten the set screw slightly, ensure the base does not move the base forward, as shown in personal injury. (Fig. 14) 3. Ensure that the battery is installed can function smoothly. (2) As shown in Fig. 12, carry out lubrication around the blade holder on a periodic basis by use of an arrow... mark as shown in the direction of cutting fluid, etc. Otherwise, the saw blade with an Allen wrench and move back and forth, and firmly tighten the set screw with a worn-out blade hole. Adjusting the base ...
Instruction Manual
Page 19
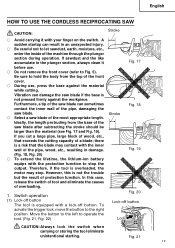
...wall of overloading. 1. However, this case, release the switch of tool and eliminate the causes of the pipe, damaging the saw blade. ⅜ Select a saw blade if the base is overloaded, the motor may contact with your finger on the switch. there is equipped with the ... Fig. 5). English HOW TO USE THE CORDLESS RECIPROCATING SAW CAUTION: ⅜ Avoid carrying it before use , press the base against the workpiece. A sudden startup can result in damage. (Fig. 18, Fig. 20) ⅜ To extend the lifetime, the lithium-ion battery equips with a lock-off button Lock CAUTION: ...
...wall of overloading. 1. However, this case, release the switch of tool and eliminate the causes of the pipe, damaging the saw blade. ⅜ Select a saw blade if the base is overloaded, the motor may contact with your finger on the switch. there is equipped with the ... Fig. 5). English HOW TO USE THE CORDLESS RECIPROCATING SAW CAUTION: ⅜ Avoid carrying it before use , press the base against the workpiece. A sudden startup can result in damage. (Fig. 18, Fig. 20) ⅜ To extend the lifetime, the lithium-ion battery equips with a lock-off button Lock CAUTION: ...
Instruction Manual
Page 22
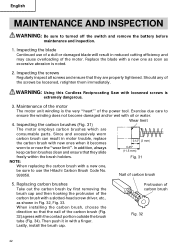
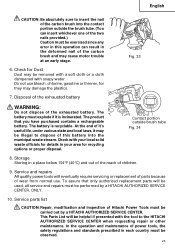
... motor The motor unit winding is extremely dangerous. 3. Inspecting the blade Continued use the Hitachi Carbon Brush Code No. 999058. Maintenance of the carbon brush with oil or water. ... in with a new one , be loosened, retighten them immediately. WARNING: Using this Cordless Reciprocating Saw with new ones when it in motor trouble, replace the carbon brush with loosened screws is ...Then push it becomes 0.12" (3 mm) worn to turned off the switch and remove the battery before maintenance and inspection. 1. Inspecting the carbon brushes (Fig. 31) Wear limit The motor ...
... motor The motor unit winding is extremely dangerous. 3. Inspecting the blade Continued use the Hitachi Carbon Brush Code No. 999058. Maintenance of the carbon brush with oil or water. ... in with a new one , be loosened, retighten them immediately. WARNING: Using this Cordless Reciprocating Saw with new ones when it in motor trouble, replace the carbon brush with loosened screws is ...Then push it becomes 0.12" (3 mm) worn to turned off the switch and remove the battery before maintenance and inspection. 1. Inspecting the carbon brushes (Fig. 31) Wear limit The motor ...
Instruction Manual
Page 23
... that you have purchased contains a rechargeable battery. Disposal of the exhausted battery WARNING: Do not dispose of children. 9. Storage Storing in the deformed nail of the carbon brush and may be helpful if presented with the tool to the HITACHI AUTHORIZED SERVICE CENTER when requesting repair or ...since any error in your area for details in this battery into the contact portion outside brush tube Fig. 34 8. Fig. 33 6. The battery must be illegal to dispose of this operation can insert whichever one of Hitachi Power Tools must explode if it may damage the plastics....
... that you have purchased contains a rechargeable battery. Disposal of the exhausted battery WARNING: Do not dispose of children. 9. Storage Storing in the deformed nail of the carbon brush and may be helpful if presented with the tool to the HITACHI AUTHORIZED SERVICE CENTER when requesting repair or ...since any error in your area for details in this battery into the contact portion outside brush tube Fig. 34 8. Fig. 33 6. The battery must be illegal to dispose of this operation can insert whichever one of Hitachi Power Tools must explode if it may damage the plastics....
Instruction Manual
Page 26
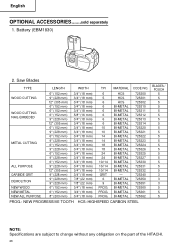
... 725362 PROG.: NEW PROGRESSIVE TOOTH HCS: HIGHSPEED CARBON STEEL BLADES / POUCH 5 5 5 5 5 5 5 5 5 5 5 5 5 5 5 5 5 5 5 3 3 3 5 5 5 NOTE: Specifications are subject to change without any obligation on the part of the HITACHI. 26 Battery (EBM1830) 2. Saw Blades TYPE LENGTH WIDTH TPI MATERIAL CODE NO.
... 725362 PROG.: NEW PROGRESSIVE TOOTH HCS: HIGHSPEED CARBON STEEL BLADES / POUCH 5 5 5 5 5 5 5 5 5 5 5 5 5 5 5 5 5 5 5 3 3 3 5 5 5 NOTE: Specifications are subject to change without any obligation on the part of the HITACHI. 26 Battery (EBM1830) 2. Saw Blades TYPE LENGTH WIDTH TPI MATERIAL CODE NO.

Instruction Manual
Page 77
...SPEED CONTROL SWITCH 53 NAME PLATE 54 TAPPING SCREW (W/FLANGE) D4 × 20 55 HEAT SINK 56 MACHINE SCREW (W/WASHERS) M3 × 12 57 BATTERY EBM1830 501 BLADES NO.103 503 HEX. SOCKET HD. WASHER) D5 × 30 4 27 GEAR COVER ASS'Y 1 28 SEAL LOCK HEX. BOLT ... D10 SHAFT 1 39 BALL BEARING 6001VVCMPS2L 1 40 BEARING COVER (A) 1 41 ARMATURE ASS'Y DC 18V 1 42 BALL BEARING 608VVC2PS2L 1 43 MAGNET 1 44 BRUSH BLOCK 1 45 HOUSING (A).(B) SET 1 46 BRUSH CAP 2 47 CARBON BRUSH 2 48 HITACHI LABEL 1 Item No. SOCKET FLAT HD. SOCKET FLAT HD. SOCKET HD. Item No. Part ...
...SPEED CONTROL SWITCH 53 NAME PLATE 54 TAPPING SCREW (W/FLANGE) D4 × 20 55 HEAT SINK 56 MACHINE SCREW (W/WASHERS) M3 × 12 57 BATTERY EBM1830 501 BLADES NO.103 503 HEX. SOCKET HD. WASHER) D5 × 30 4 27 GEAR COVER ASS'Y 1 28 SEAL LOCK HEX. BOLT ... D10 SHAFT 1 39 BALL BEARING 6001VVCMPS2L 1 40 BEARING COVER (A) 1 41 ARMATURE ASS'Y DC 18V 1 42 BALL BEARING 608VVC2PS2L 1 43 MAGNET 1 44 BRUSH BLOCK 1 45 HOUSING (A).(B) SET 1 46 BRUSH CAP 2 47 CARBON BRUSH 2 48 HITACHI LABEL 1 Item No. SOCKET FLAT HD. SOCKET FLAT HD. SOCKET HD. Item No. Part ...

Parts List
Page 4
...WRENCH 4MM 1 603 959-610 SABER SAW BLADES NO. 1 (5 PCS.) 1 604 958-182 SABER SAW BLADES NO. 2 (5 PCS.) 1 605 958-183 SABER SAW BLADES NO. 3 (5 PCS.) 1 606 959-611 SABER SAW BLADES NO. 4 (5 PCS.) 1 607 958-185 SABER SAW BLADES NO. 5 (5 PCS.) 1 608 958-188 SABER SAW BLADES NO. 8 (5 PCS.) 1 ...121 305L P. 6 (5 PCS.) 1 621 318-620 SABER SAW BLADES NO. 131 305L P. 10/14 (5 PCS.) 1 622 318-621 SABER SAW BLADES NO. 132 203L (5 PCS.) 1 REMARKS CR 18DL --- 4 --- * ALTERNATIVE PARTS Printed in Japan 8 -- 06 (060825N) USED 601 326-241 BATTERY EBM 1830 (USA, CAN) 1 602 944-458 HEX....
...WRENCH 4MM 1 603 959-610 SABER SAW BLADES NO. 1 (5 PCS.) 1 604 958-182 SABER SAW BLADES NO. 2 (5 PCS.) 1 605 958-183 SABER SAW BLADES NO. 3 (5 PCS.) 1 606 959-611 SABER SAW BLADES NO. 4 (5 PCS.) 1 607 958-185 SABER SAW BLADES NO. 5 (5 PCS.) 1 608 958-188 SABER SAW BLADES NO. 8 (5 PCS.) 1 ...121 305L P. 6 (5 PCS.) 1 621 318-620 SABER SAW BLADES NO. 131 305L P. 10/14 (5 PCS.) 1 622 318-621 SABER SAW BLADES NO. 132 203L (5 PCS.) 1 REMARKS CR 18DL --- 4 --- * ALTERNATIVE PARTS Printed in Japan 8 -- 06 (060825N) USED 601 326-241 BATTERY EBM 1830 (USA, CAN) 1 602 944-458 HEX....


