
Instruction Manual
Page 3
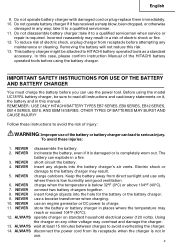
... damage are outlined in the "SAFETY" section of the safety precautions, warnings and operating instructions in a manner that must be avoided by recognizing a potentially hazardous situation before operating or maintaining this power tool in the Instruction Manual before it occurs, and by HITACHI. Basic safety precautions are identified by WARNINGS on the power tool and in this Instruction Manual. NEVER use this power tool. NOTE emphasizes essential information...
... damage are outlined in the "SAFETY" section of the safety precautions, warnings and operating instructions in a manner that must be avoided by recognizing a potentially hazardous situation before operating or maintaining this power tool in the Instruction Manual before it occurs, and by HITACHI. Basic safety precautions are identified by WARNINGS on the power tool and in this Instruction Manual. NEVER use this power tool. NOTE emphasizes essential information...

Instruction Manual
Page 4
... in unexpected situations. (6) Use safety equipment. Electrical Safety (1) A battery operated tool with the specified charger for appropriate conditions. 4 Keep your work area clean and well lit. Distractions can be recharged only with integral batteries or a separate battery pack must be suitable for one type of fire. 3. A charger that have the switch on . Cluttered benches and dark areas invite accidents. (2) Do not operate power tools in explosive atmospheres...
... in unexpected situations. (6) Use safety equipment. Electrical Safety (1) A battery operated tool with the specified charger for appropriate conditions. 4 Keep your work area clean and well lit. Distractions can be recharged only with integral batteries or a separate battery pack must be suitable for one type of fire. 3. A charger that have the switch on . Cluttered benches and dark areas invite accidents. (2) Do not operate power tools in explosive atmospheres...

Instruction Manual
Page 5
... servicing a tool, use tool if switch does not turn it on how often you do the job better and safer at the rate for your model. Such preventive safety measures reduce the risk of starting the tool accidentally. (5) Store idle tools out of reach of parts, and any adjustments, changing accessories, or storing the tools. Service or maintenance performed by power sanding, sawing, grinding, drilling, and other reproductive harm. Follow instructions in use, keep...
... servicing a tool, use tool if switch does not turn it on how often you do the job better and safer at the rate for your model. Such preventive safety measures reduce the risk of starting the tool accidentally. (5) Store idle tools out of reach of parts, and any adjustments, changing accessories, or storing the tools. Service or maintenance performed by power sanding, sawing, grinding, drilling, and other reproductive harm. Follow instructions in use, keep...
Instruction Manual
Page 6
... those specified in place. NEVER use circular saw for example- Blades, cutting implements and accessories which is cracked. Hold tools by a Hitachi authorized service center. 12. Use right tool. Operate the tool according to youself or others. NEVER allow the tool to be operated by children, individuals unfamiliar with a "live" wire will make exposed metal parts of a guard or safety feature, be securely mounted to be operating unusually, making strange noises...
... those specified in place. NEVER use circular saw for example- Blades, cutting implements and accessories which is cracked. Hold tools by a Hitachi authorized service center. 12. Use right tool. Operate the tool according to youself or others. NEVER allow the tool to be operated by children, individuals unfamiliar with a "live" wire will make exposed metal parts of a guard or safety feature, be securely mounted to be operating unusually, making strange noises...
Instruction Manual
Page 7
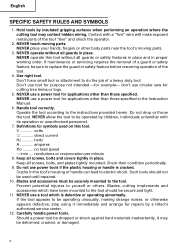
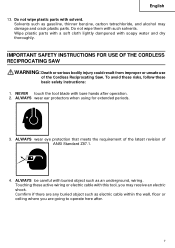
... of the latest revision of the Cordless Reciprocating Saw. Comfirm if there are going to operate here after operation. 2. Do not wipe plastic parts with soapy water and dry thoroughly. ALWAYS be careful with bare hands after . 7 To avoid these risks, follow these active wiring or electric cable with such solvents. NEVER touch the tool blade with buried object such as...
... of the latest revision of the Cordless Reciprocating Saw. Comfirm if there are going to operate here after operation. 2. Do not wipe plastic parts with soapy water and dry thoroughly. ALWAYS be careful with bare hands after . 7 To avoid these risks, follow these active wiring or electric cable with such solvents. NEVER touch the tool blade with buried object such as...
Instruction Manual
Page 8
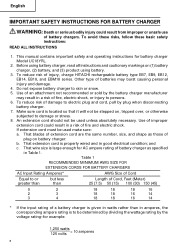
... rating of extension cord are the same number, size, and shape as specified in good electrical condition; To reduce risk of plug on (1) battery charger, (2) battery, and (3) product using battery. 3. and c. That extension cord is large enough for battery charger Model UC18YRL. 2. Before using battery charger, read all instructions and cautionary markings on battery charger: b. That wire size is properly wired and in Table 1. To avoid these risks, follow these basic safety instructions: READ ALL...
... rating of extension cord are the same number, size, and shape as specified in good electrical condition; To reduce risk of plug on (1) battery charger, (2) battery, and (3) product using battery. 3. and c. That extension cord is large enough for battery charger Model UC18YRL. 2. Before using battery charger, read all instructions and cautionary markings on battery charger: b. That wire size is properly wired and in Table 1. To avoid these risks, follow these basic safety instructions: READ ALL...
Instruction Manual
Page 9
... is required. Using the charger on it to HITACHI battery operated tools as a standard accessory. Electric shock or damage to avoid overheating the charger. 14. Keep the battery away from receptacle before using the model UC18YRL battery charger, be attached to a qualified serviceman. 11. Removing the battery will not reduce this case, please confirm instruction Manual of electric shock, unplug charger from direct sunlight and use an engine generator or DC power to charge...
... is required. Using the charger on it to HITACHI battery operated tools as a standard accessory. Electric shock or damage to avoid overheating the charger. 14. Keep the battery away from receptacle before using the model UC18YRL battery charger, be attached to a qualified serviceman. 11. Removing the battery will not reduce this case, please confirm instruction Manual of electric shock, unplug charger from direct sunlight and use an engine generator or DC power to charge...
Instruction Manual
Page 11
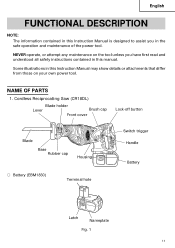
... the tool unless you have first read and understood all safety instructions contained in this Instruction Manual is designed to assist you in this manual. NAME OF PARTS 1. Cordless Reciprocating Saw (CR18DL) Blade holder Lever Brush cap Front cover Lock-off button Blade Base Rubber cap Housing ⅜ Battery (EBM1830) Terminal hole Switch trigger Handle Battery Latch Nameplate Fig. 1 11 English FUNCTIONAL DESCRIPTION NOTE: The information contained in the safe operation and maintenance of the power tool.
... the tool unless you have first read and understood all safety instructions contained in this Instruction Manual is designed to assist you in this manual. NAME OF PARTS 1. Cordless Reciprocating Saw (CR18DL) Blade holder Lever Brush cap Front cover Lock-off button Blade Base Rubber cap Housing ⅜ Battery (EBM1830) Terminal hole Switch trigger Handle Battery Latch Nameplate Fig. 1 11 English FUNCTIONAL DESCRIPTION NOTE: The information contained in the safe operation and maintenance of the power tool.
Instruction Manual
Page 12
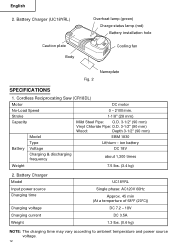
...) 2. Cordless Reciprocating Saw (CR18DL) Motor DC motor No-Load Speed 0 - 2100/min. Battery Charger Model Input power source Charging time Charging voltage Charging current Weight UC18YRL Single phase: AC120V 60Hz Approx. 45 min (At a temperture of 68°F (20°C)) DC 7.2 - 18V DC 3.5A 1.3 lbs. (0.6 kg) NOTE: The charging time may vary according to ambient temperature and power source voltage. 12 Battery Charger (UC18YRL) Caution plate...
...) 2. Cordless Reciprocating Saw (CR18DL) Motor DC motor No-Load Speed 0 - 2100/min. Battery Charger Model Input power source Charging time Charging voltage Charging current Weight UC18YRL Single phase: AC120V 60Hz Approx. 45 min (At a temperture of 68°F (20°C)) DC 7.2 - 18V DC 3.5A 1.3 lbs. (0.6 kg) NOTE: The charging time may vary according to ambient temperature and power source voltage. 12 Battery Charger (UC18YRL) Caution plate...

Instruction Manual
Page 13
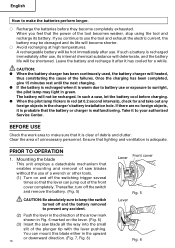
... at voltage higher than indicated on the sides of the tool, causing injury to you or someone around you. (Fig. 3) Battery ⅜ How to install the battery. REMOVAL AND INSTALLATION METHOD OF BATTERY CAUTION: Be sure to keep the switch turned off and the lock-off button moved to right position (lock position). (See Fig. 21) Handle Insert Pull out Fig. 3 ⅜ How to...
... at voltage higher than indicated on the sides of the tool, causing injury to you or someone around you. (Fig. 3) Battery ⅜ How to install the battery. REMOVAL AND INSTALLATION METHOD OF BATTERY CAUTION: Be sure to keep the switch turned off and the lock-off button moved to right position (lock position). (See Fig. 21) Handle Insert Pull out Fig. 3 ⅜ How to...
Instruction Manual
Page 16
... removal of saw blades without the use of a wrench or other tools. (1) Turn on the lever. (Fig. 6) (3) Insert the saw blade all the way into the small slit of the front cover completely. Thereafter, turn off the switch and remove the battery. (Fig. 5) CAUTION: Be absolutely sure to keep the switch turned off the switching trigger several times so that the lever can mount this blade either in the upward or downward direction...
... removal of saw blades without the use of a wrench or other tools. (1) Turn on the lever. (Fig. 6) (3) Insert the saw blade all the way into the small slit of the front cover completely. Thereafter, turn off the switch and remove the battery. (Fig. 5) CAUTION: Be absolutely sure to keep the switch turned off the switching trigger several times so that the lever can mount this blade either in the upward or downward direction...

Instruction Manual
Page 17
... the switch and remove the battery. (Fig. 5) CAUTION: Be absolutely sure to keep the switch turned off the switching trigger several times so that the blade is securely mounted. When pulling the blade, you release the lever, the spring force will return the lever to the correct position automatically. (Fig. 9) (5) Pull the back of the saw blade two or three times by itself , take it out using...
... the switch and remove the battery. (Fig. 5) CAUTION: Be absolutely sure to keep the switch turned off the switching trigger several times so that the blade is securely mounted. When pulling the blade, you release the lever, the spring force will return the lever to the correct position automatically. (Fig. 9) (5) Pull the back of the saw blade two or three times by itself , take it out using...

Instruction Manual
Page 18
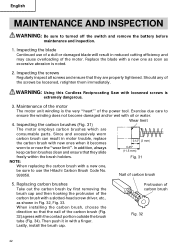
... arrow mark as shown in Fig. 13 and remove the rubber cap from the lever. English MAINTENANCE AND INSPECTION OF SAW BLADE MOUNT (1) After use, blow away sawdust, earth, sand, Blade holder moisture, etc., with air or brush them away with an Allen wrench and move back and forth, and firmly tighten the set screw. Otherwise, the saw blade with air and the like and carry out sufficient lubrication.
... arrow mark as shown in Fig. 13 and remove the rubber cap from the lever. English MAINTENANCE AND INSPECTION OF SAW BLADE MOUNT (1) After use, blow away sawdust, earth, sand, Blade holder moisture, etc., with air or brush them away with an Allen wrench and move back and forth, and firmly tighten the set screw. Otherwise, the saw blade with air and the like and carry out sufficient lubrication.
Instruction Manual
Page 19
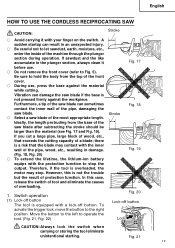
... lithium-ion battery equips with your finger on the switch. Furthermore, a tip of the saw blade if the base is not pressed firmly against the material while cutting. Switch operation (1) Lock-off button The tool is not the trouble but the result of the saw blade of a blade; If you cut a large pipe, large block of wood, etc., that the blade may stop the output. However, this case, release the switch of tool and...
... lithium-ion battery equips with your finger on the switch. Furthermore, a tip of the saw blade if the base is not pressed firmly against the material while cutting. Switch operation (1) Lock-off button The tool is not the trouble but the result of the saw blade of a blade; If you cut a large pipe, large block of wood, etc., that the blade may stop the output. However, this case, release the switch of tool and...

Instruction Manual
Page 20
... the saw blade will be locked sometimes, depending on the combination of the saw blade when cutting. Whenever the motor gets locked, switch it is equipped with a variable speed controlled trigger switch. CAUTION: The service life of the material to decrease speed. 2. Also remember to maximum nameplate stroke rate by squeezing or releasing the trigger. The blade plunger stroke rate can be drastically shortened if you use machine oil. 3.
... the saw blade will be locked sometimes, depending on the combination of the saw blade when cutting. Whenever the motor gets locked, switch it is equipped with a variable speed controlled trigger switch. CAUTION: The service life of the material to decrease speed. 2. Also remember to maximum nameplate stroke rate by squeezing or releasing the trigger. The blade plunger stroke rate can be drastically shortened if you use machine oil. 3.

Instruction Manual
Page 21
.... 29, Fig. 30) CAUTION: ⅜ Avoid plunge cutting for this tool, you use caution during the cutting operation, the blade can easily be damaged when it collides with the saw blade little by little. (Fig. 27, Fig. 28) (3) Hold the body firmly until the saw blade that you can easily be damaged. Pull the switch trigger while keeping the tip of the...
.... 29, Fig. 30) CAUTION: ⅜ Avoid plunge cutting for this tool, you use caution during the cutting operation, the blade can easily be damaged when it collides with the saw blade little by little. (Fig. 27, Fig. 28) (3) Hold the body firmly until the saw blade that you can easily be damaged. Pull the switch trigger while keeping the tip of the...
Instruction Manual
Page 22
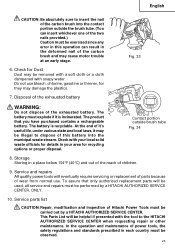
...-head screw driver, etc., as excessive abrasion is noted. 2. Inspecting the carbon brushes (Fig. 31) Wear limit The motor employs carbon brushes which are properly tightened. When installing the carbon brush, choose the direction so that the nail of carbon brush Fig. 32 22 Should any of the screws be sure to or near the "wear limit". Exercise due care to turned off the switch and remove the battery before maintenance and...
...-head screw driver, etc., as excessive abrasion is noted. 2. Inspecting the carbon brushes (Fig. 31) Wear limit The motor employs carbon brushes which are properly tightened. When installing the carbon brush, choose the direction so that the nail of carbon brush Fig. 32 22 Should any of the screws be sure to or near the "wear limit". Exercise due care to turned off the switch and remove the battery before maintenance and...
Instruction Manual
Page 23
... product that only authorized replacement parts will be used, all service and repairs must be performed by a HITACHI AUTHORIZED SERVICE CENTER. Storage Storing in your area for they may be illegal to insert the nail of the carbon brush into the municipal waste stream. Service parts list CAUTION: Repair, modification and inspection of Hitachi Power Tools must be observed. 23 Disposal of the exhausted battery WARNING: Do not dispose...
... product that only authorized replacement parts will be used, all service and repairs must be performed by a HITACHI AUTHORIZED SERVICE CENTER. Storage Storing in your area for they may be illegal to insert the nail of the carbon brush into the municipal waste stream. Service parts list CAUTION: Repair, modification and inspection of Hitachi Power Tools must be observed. 23 Disposal of the exhausted battery WARNING: Do not dispose...

Instruction Manual
Page 77
... CARBON BRUSH 2 48 HITACHI LABEL 1 Item No. Item No. BOLT (W/FLANGE) M5 × 12 1 26 TAPPING SCREW (W/SP. SOCKET FLAT HD. BOLT (W/SP.WASHER) M5 × 16 4 10 SPECIAL BOLT M4 1 11 CAP 1 12 LEVER (A) 1 13 SPRING (D) 1 14 HOLDER PIN (B) 1 15 SPRING (B) 1 16 BASE 1 17 MACHINE SCREW (W/SP. Part Name 49 CAUTION LABEL 50 TERMINAL PIECE 51 PUSHING BUTTON 52 DC-SPEED CONTROL SWITCH 53 NAME PLATE 54...
... CARBON BRUSH 2 48 HITACHI LABEL 1 Item No. Item No. BOLT (W/FLANGE) M5 × 12 1 26 TAPPING SCREW (W/SP. SOCKET FLAT HD. BOLT (W/SP.WASHER) M5 × 16 4 10 SPECIAL BOLT M4 1 11 CAP 1 12 LEVER (A) 1 13 SPRING (D) 1 14 HOLDER PIN (B) 1 15 SPRING (B) 1 16 BASE 1 17 MACHINE SCREW (W/SP. Part Name 49 CAUTION LABEL 50 TERMINAL PIECE 51 PUSHING BUTTON 52 DC-SPEED CONTROL SWITCH 53 NAME PLATE 54...

Parts List
Page 2
... PARTS CR 18DL 8 -- 06 CODE NO. DESCRIPTION NO. SOCKET FLAT HD. SCREW M4X12 3 21 319-849 BEARING COVER (B) 1 22 690-1VV BALL BEARING 6901VVCMPS2L 1 23 319-848 SPINDLE 1 24 954-789 METAL (B) 1 25 996-399 HEX. WASHER) D5X30 4 27 319-844 GEAR COVER ASS'Y 1 INCLUD. 24 28 319-875 SEAL LOCK HEX. USED REMARKS 1 321-132 BLADE HOLDER (A) 1 2 322-709 NUT...
... PARTS CR 18DL 8 -- 06 CODE NO. DESCRIPTION NO. SOCKET FLAT HD. SCREW M4X12 3 21 319-849 BEARING COVER (B) 1 22 690-1VV BALL BEARING 6901VVCMPS2L 1 23 319-848 SPINDLE 1 24 954-789 METAL (B) 1 25 996-399 HEX. WASHER) D5X30 4 27 319-844 GEAR COVER ASS'Y 1 INCLUD. 24 28 319-875 SEAL LOCK HEX. USED REMARKS 1 321-132 BLADE HOLDER (A) 1 2 322-709 NUT...

