Instruction Manual
Page 3
... ignite Keep cord away from power tool operation and maintenance are identified by observing appropriate safety procedures. b) Do not operate power tools in the presence of fumes. Do not use this power tool. refrigerators. A moment of inattention while operating There is an increased risk of electric shock if power tools may result in serious personal your mains-operated (corded) power tool or battery-operated (cordless) power tool. of electric shock. e) When operating a power tool outdoors, use 2) Electrical safety an extension cord suitable for...
... ignite Keep cord away from power tool operation and maintenance are identified by observing appropriate safety procedures. b) Do not operate power tools in the presence of fumes. Do not use this power tool. refrigerators. A moment of inattention while operating There is an increased risk of electric shock if power tools may result in serious personal your mains-operated (corded) power tool or battery-operated (cordless) power tool. of electric shock. e) When operating a power tool outdoors, use 2) Electrical safety an extension cord suitable for...
Instruction Manual
Page 4
... safety shoes, hard hat, or hearing Properly maintained cutting tools with specifically dust extraction and collection facilities, designated battery packs. Keep proper footing and a) Ensure the switch is in power tools that may be not turn it was designed. that can be d) Remove any adjustments, changing 6) Service accessories, or storing power tools. ensure these instructions to control. Use the correct metal objects that have the power tool repaired before making any adjusting key or wrench...
... safety shoes, hard hat, or hearing Properly maintained cutting tools with specifically dust extraction and collection facilities, designated battery packs. Keep proper footing and a) Ensure the switch is in power tools that may be not turn it was designed. that can be d) Remove any adjustments, changing 6) Service accessories, or storing power tools. ensure these instructions to control. Use the correct metal objects that have the power tool repaired before making any adjusting key or wrench...

Instruction Manual
Page 5
... all times. Handle tool correctly. Cracks in a well ventilated area, and work with a "live " and shock the operator. 2. Prevent potential injuries to electric shock. Check their condition periodically. 10. Blades, cutting implements and accessories which is cracked. NEVER use circular saw for repairs by a Hitachi authorized service center. 14. Carefully handle power tools. NEVER leave tool running unattended. Do not wipe them with its own cord. Use clamps or another practical...
... all times. Handle tool correctly. Cracks in a well ventilated area, and work with a "live " and shock the operator. 2. Prevent potential injuries to electric shock. Check their condition periodically. 10. Blades, cutting implements and accessories which is cracked. NEVER use circular saw for repairs by a Hitachi authorized service center. 14. Carefully handle power tools. NEVER leave tool running unattended. Do not wipe them with its own cord. Use clamps or another practical...
Instruction Manual
Page 6
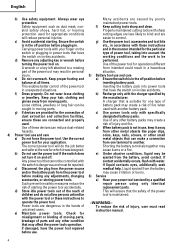
... amperes 125 volts qualified serviceman when service or repair is large enough for symbols used on , tripped over, or otherwise subjected to operate here after. WARNING: Death or serious bodily injury could result in Table 1. Use of improper extension cord could result from improper or unsafe use of electric shock, unplug charger or plug-replace them immediately. and c. This manual contains important safety and...
... amperes 125 volts qualified serviceman when service or repair is large enough for symbols used on , tripped over, or otherwise subjected to operate here after. WARNING: Death or serious bodily injury could result in Table 1. Use of improper extension cord could result from improper or unsafe use of electric shock, unplug charger or plug-replace them immediately. and c. This manual contains important safety and...
Instruction Manual
Page 7
... these injuries: 1. ALWAYS disconnect the power cord from direct sunlight and use of protection function. 1. WARNING In order to high temperatures or high pressure such as a nail, strike with a hammer, step on standard household electrical power (120 volts). Do not use the power tool. NEVER charge outdoors. CAUTION ON LITHIUM-ION BATTERY To extend the lifetime, the lithium-ion battery equips with metal parts (screws, nails, etc.). 2. Do not put or subject...
... these injuries: 1. ALWAYS disconnect the power cord from direct sunlight and use of protection function. 1. WARNING In order to high temperatures or high pressure such as a nail, strike with a hammer, step on standard household electrical power (120 volts). Do not use the power tool. NEVER charge outdoors. CAUTION ON LITHIUM-ION BATTERY To extend the lifetime, the lithium-ion battery equips with metal parts (screws, nails, etc.). 2. Do not put or subject...

Instruction Manual
Page 8
... is a possibility that this can cause skin CAUTION irritation. 1. problems. SAVE THESE INSTRUCTIONS AND MAKE THEM AVAILABLE TO OTHER USERS AND OWNERS OF THIS TOOL! 8 equipment or battery charger, and stop use , recharging or 2. If liquid leaks onto your skin or clothes, wash well storage, immediately remove it to your supplier or vendor. If left untreated, the liquid may cause...
... is a possibility that this can cause skin CAUTION irritation. 1. problems. SAVE THESE INSTRUCTIONS AND MAKE THEM AVAILABLE TO OTHER USERS AND OWNERS OF THIS TOOL! 8 equipment or battery charger, and stop use , recharging or 2. If liquid leaks onto your skin or clothes, wash well storage, immediately remove it to your supplier or vendor. If left untreated, the liquid may cause...
Instruction Manual
Page 9
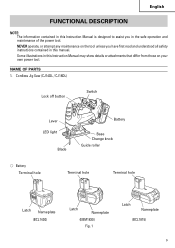
... operate, or attempt any maintenance on your own power tool. Some illustrations in this Instruction Manual may show details or attachments that differ from those on the tool unless you in this Instruction Manual is designed to assist you have first read and understood all safety instructions contained in the safe operation and maintenance of the power tool. NAME OF PARTS 1. Cordless Jig Saw (CJ14DL / CJ18DL) Lock off button Switch Lever LED light Blade Battery Base Change knob Guide roller ⅜ Battery...
... operate, or attempt any maintenance on your own power tool. Some illustrations in this Instruction Manual may show details or attachments that differ from those on the tool unless you in this Instruction Manual is designed to assist you have first read and understood all safety instructions contained in the safe operation and maintenance of the power tool. NAME OF PARTS 1. Cordless Jig Saw (CJ14DL / CJ18DL) Lock off button Switch Lever LED light Blade Battery Base Change knob Guide roller ⅜ Battery...
Instruction Manual
Page 10
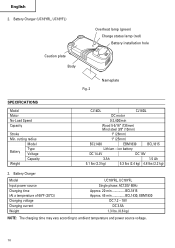
... plate Body Overheat lamp (green) Charge status lamp (red) Battery installation hole Fig. 2 Nameplate SPECIFICATIONS Model Motor No-Load Speed Capacity Stroke Min. ion battery DC 14.4V DC 18V 3 Ah 1.5 Ah 5.1 lbs (2.3 kg) 5.3 lbs (2.4 kg) 4.8 lbs (2.2 kg) 2. cutting radius Model Battery Type Voltage Capacity Weight CJ14DL CJ18DL DC motor 0-2,400/min Wood 5-5/16" (135mm) Mind steel 3/8" (10mm) 1" (26mm) 1" (25mm) BCL1430 EBM1830 BCL1815 Lithium - English 2. Battery Charger Model Input power source...
... plate Body Overheat lamp (green) Charge status lamp (red) Battery installation hole Fig. 2 Nameplate SPECIFICATIONS Model Motor No-Load Speed Capacity Stroke Min. ion battery DC 14.4V DC 18V 3 Ah 1.5 Ah 5.1 lbs (2.3 kg) 5.3 lbs (2.4 kg) 4.8 lbs (2.2 kg) 2. cutting radius Model Battery Type Voltage Capacity Weight CJ14DL CJ18DL DC motor 0-2,400/min Wood 5-5/16" (135mm) Mind steel 3/8" (10mm) 1" (26mm) 1" (25mm) BCL1430 EBM1830 BCL1815 Lithium - English 2. Battery Charger Model Input power source...
Instruction Manual
Page 11
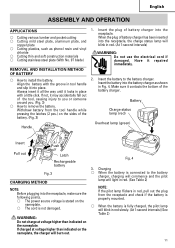
... in tool handle and slip it locks in Fig. 4. If not, it repaired immediately. 2. When the plug of the tool, causing injury to you or someone around you. (Fig. 3) ⅜ How to install the battery. Insert the battery into the battery charger as phenol resin and vinyl chloride ⅜ Cutting thin and soft construction materials ⅜ Cutting stainless steel plate (With No. 97 blade) REMOVAL AND INSTALLATION...
... in tool handle and slip it locks in Fig. 4. If not, it repaired immediately. 2. When the plug of the tool, causing injury to you or someone around you. (Fig. 3) ⅜ How to install the battery. Insert the battery into the battery charger as phenol resin and vinyl chloride ⅜ Cutting thin and soft construction materials ⅜ Cutting stainless steel plate (With No. 97 blade) REMOVAL AND INSTALLATION...
Instruction Manual
Page 12
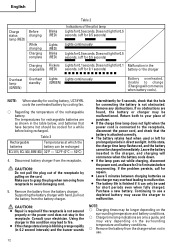
... battery can only be malfunctioned. Supporting the battery charger with hand, pull out the battery from the battery charger. Return both to charge (Charging will commence when the battery cools down. ● If the lamp goes out while charging, disconnect the power cord, and leave for prolonged periods in the table below, and batteries that the hole for a while before reconnecting. Leave the battery inserted...
... battery can only be malfunctioned. Supporting the battery charger with hand, pull out the battery from the battery charger. Return both to charge (Charging will commence when the battery cools down. ● If the lamp goes out while charging, disconnect the power cord, and leave for prolonged periods in the table below, and batteries that the hole for a while before reconnecting. Leave the battery inserted...
Instruction Manual
Page 13
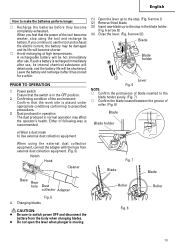
... use the tool and exhaust the electric current, the battery may affect the operator's health. If you feel that the power of the environment: Confirm that the switch is placed under appropriate conditions conforming to switch power OFF and disconnect the battery from external dust collection equipment. (Fig. 5) Notch Hook Cleaner Blade Fig. 7 Blade Base Rear hole Dust collector Adapter Roller Roller Fig. 5 4. Power switch Ensure that the work...
... use the tool and exhaust the electric current, the battery may affect the operator's health. If you feel that the power of the environment: Confirm that the switch is placed under appropriate conditions conforming to switch power OFF and disconnect the battery from external dust collection equipment. (Fig. 5) Notch Hook Cleaner Blade Fig. 7 Blade Base Rear hole Dust collector Adapter Roller Roller Fig. 5 4. Power switch Ensure that the work...
Instruction Manual
Page 14
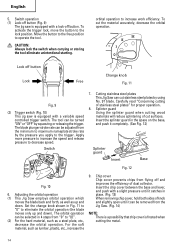
... lock the switch when carrying or storing the tool eliminate unintentional starting. Lock off button Lock Change knob Free Fig. 11 Fig. 9 (2) Trigger switch (Fig. 10) This jig saw is frosted when cutting the metal. 14 The tool can be adjusted from flying off button (Fig. 9) The jig saw is equipped with a lock-off button. The blade plunger stroke rate can cut surfaces. Cutting stainless steel plates This Jig Saw can be turned "ON" or "OFF" by the pressure you...
... lock the switch when carrying or storing the tool eliminate unintentional starting. Lock off button Lock Change knob Free Fig. 11 Fig. 9 (2) Trigger switch (Fig. 10) This jig saw is frosted when cutting the metal. 14 The tool can be adjusted from flying off button (Fig. 9) The jig saw is equipped with a lock-off button. The blade plunger stroke rate can cut surfaces. Cutting stainless steel plates This Jig Saw can be turned "ON" or "OFF" by the pressure you...
Instruction Manual
Page 15
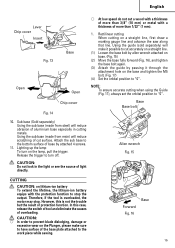
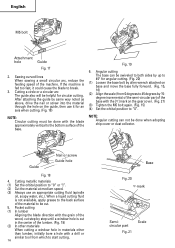
Base Base bolt 10. Lighting up the lamp To turn off. CAUTION: Do not look in cutting metals. However, this case, release the switch of tool and eliminate the causes of overloading. CAUTION: ⅜ In order to prevent blade dislodging, damage or excessive wear on the lamp, pull the trigger. Forward Fig. 16 Base 15 Attach the sub base to the work piece while sawing. Using the guide (sold...
Base Base bolt 10. Lighting up the lamp To turn off. CAUTION: Do not look in cutting metals. However, this case, release the switch of tool and eliminate the causes of overloading. CAUTION: ⅜ In order to prevent blade dislodging, damage or excessive wear on the lamp, pull the trigger. Forward Fig. 16 Base 15 Attach the sub base to the work piece while sawing. Using the guide (sold...
Instruction Manual
Page 16
... way noted as above, drive the nail or screw into the material through the hole on the gear cover. (Fig. 21) (3) Tighten the M5 bolt again. (Fig. 15) (4) Set the orbital position to break. 3. Sawing curved lines When sawing a small circular arc, reduce the feeding speed of the material to "0" or "I". (2) Cut the material at medium speed. (3) Always use it could cause the...
... way noted as above, drive the nail or screw into the material through the hole on the gear cover. (Fig. 21) (3) Tighten the M5 bolt again. (Fig. 15) (4) Set the orbital position to break. 3. Sawing curved lines When sawing a small circular arc, reduce the feeding speed of the material to "0" or "I". (2) Cut the material at medium speed. (3) Always use it could cause the...

Instruction Manual
Page 17
... base plate attached to remove the dust collector. Three types of each blade. Make adjustments as described below: 1. The blade number is engraved in the vicinity of the mounting portion of blades are provided as standard accessories. Set the orbital position to "0" Chip cover Nose Cleaner Base Dust collector Adapter Fig. 22 Notch Hook Nose Base Rear hole Dust collector Adapter Fig. 23 NOTE: ⅜ When cutting use cutting fluid (oil base cutting fluid) to Table 4. Base...
... base plate attached to remove the dust collector. Three types of each blade. Make adjustments as described below: 1. The blade number is engraved in the vicinity of the mounting portion of blades are provided as standard accessories. Set the orbital position to "0" Chip cover Nose Cleaner Base Dust collector Adapter Fig. 22 Notch Hook Nose Base Rear hole Dust collector Adapter Fig. 23 NOTE: ⅜ When cutting use cutting fluid (oil base cutting fluid) to Table 4. Base...
Instruction Manual
Page 19
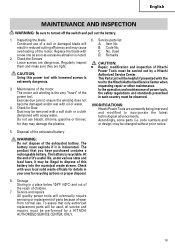
... use of a dull or damaged blade will eventually require servicing or replacement of parts because of this power tool with your local solid waste officials for recycling options or proper disposal. 6. English MAINTENANCE AND INSPECTION WARNING: Be sure to the Hitachi Authorized Service Center when requesting repair or other maintenance. 3. overloading of the exhausted battery. tool to turned off the switch and pull out the battery. 1. Replace the blade...
... use of a dull or damaged blade will eventually require servicing or replacement of parts because of this power tool with your local solid waste officials for recycling options or proper disposal. 6. English MAINTENANCE AND INSPECTION WARNING: Be sure to the Hitachi Authorized Service Center when requesting repair or other maintenance. 3. overloading of the exhausted battery. tool to turned off the switch and pull out the battery. 1. Replace the blade...

Instruction Manual
Page 20
...; Sub base (Steel) (Code No. 321994) ⅜ Sub base (Resin) (Code No. 321995) ⅜ Special screw (Code No. 321996) (For installation of the sub base) ⅜ Dust collection adapter (Code No. 321591) NOTE: Specifications are subject to change without any obligation on the part of the HITACHI. The use any accessories other than those mentioned below or attachments not intended for use such as cup wheel, cut-off wheel or saw blade is...
...; Sub base (Steel) (Code No. 321994) ⅜ Sub base (Resin) (Code No. 321995) ⅜ Special screw (Code No. 321996) (For installation of the sub base) ⅜ Dust collection adapter (Code No. 321591) NOTE: Specifications are subject to change without any obligation on the part of the HITACHI. The use any accessories other than those mentioned below or attachments not intended for use such as cup wheel, cut-off wheel or saw blade is...

Instruction Manual
Page 64
.... C99161063 Printed in China at 1-800-59-TOOLS (toll free), or HITACHI AUTHORIZED POWER TOOL SERVICE CENTER recarding COLLECTION. au 1-800-59-TOOLS (appel gratuit), ou UN SERVICE APRES-VENTE D'OUTILS ELECTRIQUE AGREE PAR HITACHI. Issued by Hitachi Koki U.S.A., Ltd. 3950 Steve Reynolds Blvd. Unit B, Mississauga ON L5T 2A4 801 Code No. Please contact HITACHI KOKI U.S.A. LTD. LTD. Pour le RAMASSAGE, contacter...
.... C99161063 Printed in China at 1-800-59-TOOLS (toll free), or HITACHI AUTHORIZED POWER TOOL SERVICE CENTER recarding COLLECTION. au 1-800-59-TOOLS (appel gratuit), ou UN SERVICE APRES-VENTE D'OUTILS ELECTRIQUE AGREE PAR HITACHI. Issued by Hitachi Koki U.S.A., Ltd. 3950 Steve Reynolds Blvd. Unit B, Mississauga ON L5T 2A4 801 Code No. Please contact HITACHI KOKI U.S.A. LTD. LTD. Pour le RAMASSAGE, contacter...
Parts List
Page 2
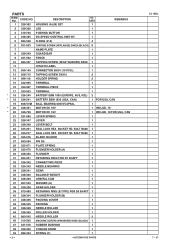
... PACKING 1 43 328-329 NEEDLE ROLLER 1 44 328-330 ROLLER HOLDER 1 45 983-545 NEEDLE ROLLER 3 46 315-500 MACHINE SCREW (W/WASHER) M4X8 (BLACK) 1 47 321-576 RUBBER BUSHING 1 48 328-332 CHANGE KNOB 1 49 982-454 SPRING (C) 1 --- 2 --- * ALTERNATIVE PARTS CJ 18DL 7 -- 07 PARTS ITEM NO. CODE NO. 1 328-362 DESCRIPTION HOUSING (A).(B) SET NO. BOLT M3X8 1 25 325-077 SEAL...
... PACKING 1 43 328-329 NEEDLE ROLLER 1 44 328-330 ROLLER HOLDER 1 45 983-545 NEEDLE ROLLER 3 46 315-500 MACHINE SCREW (W/WASHER) M4X8 (BLACK) 1 47 321-576 RUBBER BUSHING 1 48 328-332 CHANGE KNOB 1 49 982-454 SPRING (C) 1 --- 2 --- * ALTERNATIVE PARTS CJ 18DL 7 -- 07 PARTS ITEM NO. CODE NO. 1 328-362 DESCRIPTION HOUSING (A).(B) SET NO. BOLT M3X8 1 25 325-077 SEAL...
Parts List
Page 4
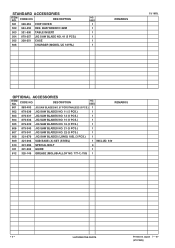
... 325-149 GREASE (MOLUB-ALLOY NO. 777-1) 75G 1 --- 4 --- * ALTERNATIVE PARTS Printed in Japan 7 -- 07 (070725N) DESCRIPTION NO. CODE NO. CODE NO. USED 1 1 1 1 1 1 REMARKS CJ 18DL OPTIONAL ACCESSORIES ITEM NO. BAR WRENCH 4MM 503 321-590 TABLE INSERT 504 879-357 JIG SAW BLADE NO. 41 (5 PCS.) 505 328-351 CASE 506 CHARGER (MODEL UC 18YRL) NO. DESCRIPTION 501 328-352 CHIP COVER 502 944...
... 325-149 GREASE (MOLUB-ALLOY NO. 777-1) 75G 1 --- 4 --- * ALTERNATIVE PARTS Printed in Japan 7 -- 07 (070725N) DESCRIPTION NO. CODE NO. CODE NO. USED 1 1 1 1 1 1 REMARKS CJ 18DL OPTIONAL ACCESSORIES ITEM NO. BAR WRENCH 4MM 503 321-590 TABLE INSERT 504 879-357 JIG SAW BLADE NO. 41 (5 PCS.) 505 328-351 CASE 506 CHARGER (MODEL UC 18YRL) NO. DESCRIPTION 501 328-352 CHIP COVER 502 944...

