
Instruction Manual
Page 5
... workpiece until it has first come to prevent possible injury. 19. TURN POWER OFF. POLARIZED PLUGS To reduce the risk of the slide compound miter saw. 25. Always follow instructions for lubricating the tool and for the best and safest performance. ALWAYS USE RECOMMENDED ACCESSORIES ONLY WHEN OPERATING... accessories. If the plug does not fit fully in order to a complete stop . English 12. Always feed work into the receptacle. 15. NEVER STAND ON THE TOOL. Never raise the saw blade. 17. Apply 120 volts AC only to a complete stop . 24. When servicing this...
... workpiece until it has first come to prevent possible injury. 19. TURN POWER OFF. POLARIZED PLUGS To reduce the risk of the slide compound miter saw. 25. Always follow instructions for lubricating the tool and for the best and safest performance. ALWAYS USE RECOMMENDED ACCESSORIES ONLY WHEN OPERATING... accessories. If the plug does not fit fully in order to a complete stop . English 12. Always feed work into the receptacle. 15. NEVER STAND ON THE TOOL. Never raise the saw blade. 17. Apply 120 volts AC only to a complete stop . 24. When servicing this...

Instruction Manual
Page 6
... is free of the saw blade. 12. Review this tool. 8. During slide cutting, always push the saw . 17. Always clamp or otherwise secure the workpiece to tip over, slide, or walk on this Manual and familiarize yourself with a vise assembly. 25. During miter or bevel cutting, always wait for...during normal operation, there is clean before attempting slide cutting. 18. Always confirm that overhang the table of the saw before using the saw blade away from the operator. 10. Always keep your hands out of the path of the slide compound miter saw at once, if you notice any maintenance ...
... is free of the saw blade. 12. Review this tool. 8. During slide cutting, always push the saw . 17. Always clamp or otherwise secure the workpiece to tip over, slide, or walk on this Manual and familiarize yourself with a vise assembly. 25. During miter or bevel cutting, always wait for...during normal operation, there is clean before attempting slide cutting. 18. Always confirm that overhang the table of the saw before using the saw blade away from the operator. 10. Always keep your hands out of the path of the slide compound miter saw at once, if you notice any maintenance ...
Instruction Manual
Page 7
...-in use of the saw without the guards in place. 17. Never clean plastic components with the slide compound miter saw blade. 6. WARNING FOR YOUR OWN SAFETY READ THIS INSTRUCTION MANUAL BEFORE OPERATING THE SLIDE COMPOUND MITER SAW 1. Always wear eye protection... when using the tool. 10. Never damage the power cord of the line next to warning sign " c " while the tool is uncovered, to stop . 18. Never use the POWER TOOL for saw . 21. Never place your hair is being operated. Always turn on the starting switch. 12...
...-in use of the saw without the guards in place. 17. Never clean plastic components with the slide compound miter saw blade. 6. WARNING FOR YOUR OWN SAFETY READ THIS INSTRUCTION MANUAL BEFORE OPERATING THE SLIDE COMPOUND MITER SAW 1. Always wear eye protection... when using the tool. 10. Never damage the power cord of the line next to warning sign " c " while the tool is uncovered, to stop . 18. Never use the POWER TOOL for saw . 21. Never place your hair is being operated. Always turn on the starting switch. 12...
Instruction Manual
Page 10
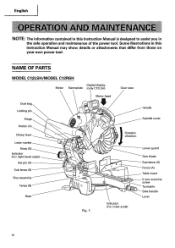
... Digital display Motor Nameplate (only C12LSH) Gear case Motor head Dust bag Locking pin Handle Hinge Spindle cover Holder (A) Clamp lever Laser marker Knob (B) Indicator (For right bevel scale) Set pin (A) Sub fence (B) Vise assembly Fence (B) Base UlEI 11/ Fig. 1 Rotation direction 0 Indicator (For miter scale) Lower guard Saw blade Sub fence (A) Fence (A) Table...
... Digital display Motor Nameplate (only C12LSH) Gear case Motor head Dust bag Locking pin Handle Hinge Spindle cover Holder (A) Clamp lever Laser marker Knob (B) Indicator (For right bevel scale) Set pin (A) Sub fence (B) Vise assembly Fence (B) Base UlEI 11/ Fig. 1 Rotation direction 0 Indicator (For miter scale) Lower guard Saw blade Sub fence (A) Fence (A) Table...
Instruction Manual
Page 12
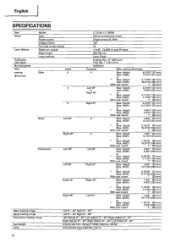
English SPECIFICATIONS Item Model C 12LSH /C 12RSH Motor Type Series commutator motor Power source Single-phase AC 60Hz Voltage (Volts) 120 Full-load current (Amp) 15 Laser Marker Maximum output
English SPECIFICATIONS Item Model C 12LSH /C 12RSH Motor Type Series commutator motor Power source Single-phase AC 60Hz Voltage (Volts) 120 Full-load current (Amp) 15 Laser Marker Maximum output
Instruction Manual
Page 31
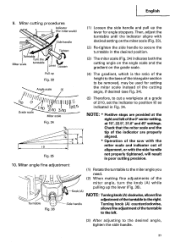
... base of the cutting angle, if desired (see Fig. 34). NOTE: * Positive stops are properly aligned. * Operation of the saw with the miter scale and indicator out of the miter angle, turn the knob (A) while pulling up Fig. 33 Angle scale (4) The gradient, which is the ratio of the height to... both the cutting angle on the angle scale and the gradient on the miter scale (Fig. 33). (2) Re-tighten the side handle to the desired angle, tighten the side handle. 31 b0 0 Grade scale -ob 1"I A0 O 12/ 1O j 0 3/1 1225 Miter scale Fig. 34 M 10 Fig. 35 (5) Therefore, to cut a workpiece at...
... base of the cutting angle, if desired (see Fig. 34). NOTE: * Positive stops are properly aligned. * Operation of the saw with the miter scale and indicator out of the miter angle, turn the knob (A) while pulling up Fig. 33 Angle scale (4) The gradient, which is the ratio of the height to... both the cutting angle on the angle scale and the gradient on the miter scale (Fig. 33). (2) Re-tighten the side handle to the desired angle, tighten the side handle. 31 b0 0 Grade scale -ob 1"I A0 O 12/ 1O j 0 3/1 1225 Miter scale Fig. 34 M 10 Fig. 35 (5) Therefore, to cut a workpiece at...
Instruction Manual
Page 32
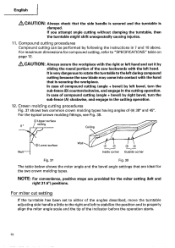
... 12. &CAUTION: Always secure the workpiece with the right or left hand and cut setting If the turntable has been set to properly align the miter angle scale and the tip of (0) 38° and 45°. In case of compound cutting (angle + bevel) by sliding the round portion of the saw ...blade may come into contact with the left to stabilize the position and to either of compound cutting (angle + bevel) by following the...
... 12. &CAUTION: Always secure the workpiece with the right or left hand and cut setting If the turntable has been set to properly align the miter angle scale and the tip of (0) 38° and 45°. In case of compound cutting (angle + bevel) by sliding the round portion of the saw ...blade may come into contact with the left to stabilize the position and to either of compound cutting (angle + bevel) by following the...

Instruction Manual
Page 35
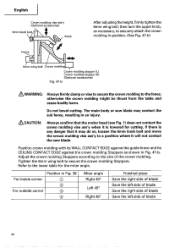
Header Bevel angle scale Head 0 Bevel angle scale 0 Fence (A) 0 Fence (B) 3 Miter angle scale Turntable Base Fig. 43 Base Miter angle scale Turntable Fig. 44 Fence Fence Table on base Fig. 45 Table on ...either the left fence (Fence (B)) or the right fence (Fence (A)). To raise or lower the vise assembly, first loosen the 6mm knob bolt. 35 It can unite with the slope of crown molding without tilting the saw...on base Fig. 46 Cutting method of crown molding without tilting the saw blade.
Header Bevel angle scale Head 0 Bevel angle scale 0 Fence (A) 0 Fence (B) 3 Miter angle scale Turntable Base Fig. 43 Base Miter angle scale Turntable Fig. 44 Fence Fence Table on base Fig. 45 Table on ...either the left fence (Fence (B)) or the right fence (Fence (A)). To raise or lower the vise assembly, first loosen the 6mm knob bolt. 35 It can unite with the slope of crown molding without tilting the saw...on base Fig. 46 Cutting method of crown molding without tilting the saw blade.
Instruction Manual
Page 36
...the crown molding in Fig. 38 For inside corner ® © For outside corner C) ® Miter angle Right 45° Left 45° Right 45° Finished piece Save the right side of blade...wing bolt to the lower table for cutting. Refer to secure the crown molding Stoppers. Do not bevel cutting. Adjust the crown molding Stoppers according to the size of blade 36 English Crown molding vise ...not contact the crown molding vise ass'y when it is any danger that it will not contact the saw blade may do so, loosen the 6mm knob bolt and move the crown molding vise ass'y to...
...the crown molding in Fig. 38 For inside corner ® © For outside corner C) ® Miter angle Right 45° Left 45° Right 45° Finished piece Save the right side of blade...wing bolt to the lower table for cutting. Refer to secure the crown molding Stoppers. Do not bevel cutting. Adjust the crown molding Stoppers according to the size of blade 36 English Crown molding vise ...not contact the crown molding vise ass'y when it is any danger that it will not contact the saw blade may do so, loosen the 6mm knob bolt and move the crown molding vise ass'y to...
Parts List
Page 1
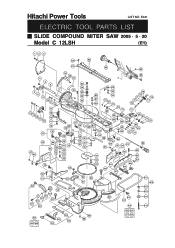
Hitachi Power Tools LIST NO. E941 ELECTRIC TOOL PARTS LIST SLIDE COMPOUND MITER SAW 2005 • 5 • 20 Model C 12LSH (E1) 123 60 62 61 63 64 4 5 6 4 8 9 10 11 12 17 13 18 14 15 12 16 15 11 10 38 37 47 48 45 44 46 49 50 51 19 20 21 65 A 23 24 69 7 22...
Hitachi Power Tools LIST NO. E941 ELECTRIC TOOL PARTS LIST SLIDE COMPOUND MITER SAW 2005 • 5 • 20 Model C 12LSH (E1) 123 60 62 61 63 64 4 5 6 4 8 9 10 11 12 17 13 18 14 15 12 16 15 11 10 38 37 47 48 45 44 46 49 50 51 19 20 21 65 A 23 24 69 7 22...


