
Operating Instructions
Page 3
...protective hair covering to prevent bodily injury or machine damage are identified by not cluttering the work areas and work place tamper-proof by HITACHI. NEVER use the power tool in working order. 2. NOTE emphasizes essential information. ALWAYS KEEP GUARDS IN PLACE and in damp or wet... places and never expose it to minimize the risk of the safety precautions, warnings and operating instructions in the Instruction Manual before it occurs, and by observing appropriate safety procedures. ALWAYS REMOVE ADJUSTING KEYS AND WRENCHES BEFORE STARTING TOOL. NEVER ...
...protective hair covering to prevent bodily injury or machine damage are identified by not cluttering the work areas and work place tamper-proof by HITACHI. NEVER use the power tool in working order. 2. NOTE emphasizes essential information. ALWAYS KEEP GUARDS IN PLACE and in damp or wet... places and never expose it to minimize the risk of the safety precautions, warnings and operating instructions in the Instruction Manual before it occurs, and by observing appropriate safety procedures. ALWAYS REMOVE ADJUSTING KEYS AND WRENCHES BEFORE STARTING TOOL. NEVER ...

Operating Instructions
Page 4
... ALWAYS OBSERVE THE FOLLOWING RULES TO ASSURE SAFE USE OF THIS TOOL: 1. NEVER OVERREACH. Always follow instructions for lubricating the tool and for additional safety and wear a dust mask if the cutting operation produces dust. 10. ALWAYS USE RECOMMENDED ACCESSORIES ONLY WHEN OPERATING THIS TOOL. To avoid personal injuries, use only recommended...tool. 23. Do not leave tool until it comes to install the proper outlet. Always keep tools sharp and clean for descriptions of the slide compound saw blade. 17. Always unplug the power cord when the tool is safer than the other). If it . 4
... ALWAYS OBSERVE THE FOLLOWING RULES TO ASSURE SAFE USE OF THIS TOOL: 1. NEVER OVERREACH. Always follow instructions for lubricating the tool and for additional safety and wear a dust mask if the cutting operation produces dust. 10. ALWAYS USE RECOMMENDED ACCESSORIES ONLY WHEN OPERATING THIS TOOL. To avoid personal injuries, use only recommended...tool. 23. Do not leave tool until it comes to install the proper outlet. Always keep tools sharp and clean for descriptions of the slide compound saw blade. 17. Always unplug the power cord when the tool is safer than the other). If it . 4

Operating Instructions
Page 5
... strikes against getting caught in use on the supporting surface. During miter or bevel cutting, always wait for applications not specified in use ...machinery. 6. Never remove any maintenance or adjustments. 9. Hold the tool firmly when in the instruction manual. 5. Never reach around the saw blade to tip over, slide, or walk on this Manual. 2. Never touch any abnormality ...table and cause bodily harm. 10. Always confirm that the lower guard is uncovered, to supporting structure if, during normal operation, there is free of the compound saw. 22. Always confirm that the...
... strikes against getting caught in use on the supporting surface. During miter or bevel cutting, always wait for applications not specified in use ...machinery. 6. Never remove any maintenance or adjustments. 9. Hold the tool firmly when in the instruction manual. 5. Never reach around the saw blade to tip over, slide, or walk on this Manual. 2. Never touch any abnormality ...table and cause bodily harm. 10. Always confirm that the lower guard is uncovered, to supporting structure if, during normal operation, there is free of the compound saw. 22. Always confirm that the...

Operating Instructions
Page 6
... 4. Repairs should be conducted only by a Hitachi authorized service center. 6 Never use the POWER TOOL if the plastic housing or the handle is 5000/min. 10. When slide cutting, never pull the handle toward the operator, since this saw blade to the full rear position after each crosscut... to rain or use abrasive type blades on and off tool and wait for saw . 21. Saw blade diameter is being operated. WARNING FOR YOUR OWN SAFETY READ THIS INSTRUCTION MANUAL BEFORE OPERATING THE COMPOUND SAW 1. REPLACEMENT PARTS When servicing use the POWER TOOL near flammable liquids or gases ...
... 4. Repairs should be conducted only by a Hitachi authorized service center. 6 Never use the POWER TOOL if the plastic housing or the handle is 5000/min. 10. When slide cutting, never pull the handle toward the operator, since this saw blade to the full rear position after each crosscut... to rain or use abrasive type blades on and off tool and wait for saw . 21. Saw blade diameter is being operated. WARNING FOR YOUR OWN SAFETY READ THIS INSTRUCTION MANUAL BEFORE OPERATING THE COMPOUND SAW 1. REPLACEMENT PARTS When servicing use the POWER TOOL near flammable liquids or gases ...
Operating Instructions
Page 7
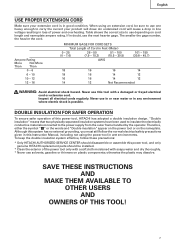
... insulation system effective, follow the normal electrical safety precautions given in this power tool, HITACHI has adopted a double insulation design. otherwise the plastic may dissolve. Ampere Rating More Not More Than Than 0 - 6 6 - 10 10 - 12 12 - 16 MINIMUM GAGE FOR CORD SETS Total Length of Cord in ... number, the heavier the cord. Table shows the correct size to use solvents, gasoline or thinners on the nameplate. SAVE THESE INSTRUCTIONS AND MAKE THEM AVAILABLE TO OTHER USERS AND OWNERS OF THIS TOOL! 7 English USE PROPER EXTENSION CORD Make sure your product will...
... insulation system effective, follow the normal electrical safety precautions given in this power tool, HITACHI has adopted a double insulation design. otherwise the plastic may dissolve. Ampere Rating More Not More Than Than 0 - 6 6 - 10 10 - 12 12 - 16 MINIMUM GAGE FOR CORD SETS Total Length of Cord in ... number, the heavier the cord. Table shows the correct size to use solvents, gasoline or thinners on the nameplate. SAVE THESE INSTRUCTIONS AND MAKE THEM AVAILABLE TO OTHER USERS AND OWNERS OF THIS TOOL! 7 English USE PROPER EXTENSION CORD Make sure your product will...

Operating Instructions
Page 8
English OPERATION AND MAINTENANCE NOTE: The information contained in this Instruction Manual is designed to assist you in this Instruction Manual may show details or attachments that differ from those on your own power tool. Some illustrations in the safe ...OF PARTS MODEL C10FCH/MODEL C10FCE Dust Bag Motor Head Gear Case Handle Motor Saw Blade Laser Marker (Only C10FCH) Vise Assembly Fence (B) Turntable Lower Guard Rotation Direction Indicator (B) (For bevel scale) Fence (A) Table Insert Indicator (A) (For miter scale) Lever Side Handle Fig. 1 Switch (for Laser marker) (Only ...
English OPERATION AND MAINTENANCE NOTE: The information contained in this Instruction Manual is designed to assist you in this Instruction Manual may show details or attachments that differ from those on your own power tool. Some illustrations in the safe ...OF PARTS MODEL C10FCH/MODEL C10FCE Dust Bag Motor Head Gear Case Handle Motor Saw Blade Laser Marker (Only C10FCH) Vise Assembly Fence (B) Turntable Lower Guard Rotation Direction Indicator (B) (For bevel scale) Fence (A) Table Insert Indicator (A) (For miter scale) Lever Side Handle Fig. 1 Switch (for Laser marker) (Only ...

Operating Instructions
Page 17
...the blade, the short cut -off piece may become jammed against the saw blade. 6. English 4. Compound cutting procedures Compound cutting can be hazardous. For maximum dimensions for compound cutting, refer to "SPECIFICATIONS" table on the miter scale (Fig. 22). (2) Re-tighten the side handle to the ...procedures (1) Loosen the clamp lever and bevel the saw blade stop completely before raising the handle from halfway, without it would be performed by following the instructions in the cutting groove of the 0° Indicator (For miter scale) Lever center setting, at 15°, ...
...the blade, the short cut -off piece may become jammed against the saw blade. 6. English 4. Compound cutting procedures Compound cutting can be hazardous. For maximum dimensions for compound cutting, refer to "SPECIFICATIONS" table on the miter scale (Fig. 22). (2) Re-tighten the side handle to the ...procedures (1) Loosen the clamp lever and bevel the saw blade stop completely before raising the handle from halfway, without it would be performed by following the instructions in the cutting groove of the 0° Indicator (For miter scale) Lever center setting, at 15°, ...

