
Operating Instructions
Page 5
... a vise assembly. 23. DON'Ts NEVER VIOLATE THE FOLLOWING RULES TO ASSURE SAFE USE OF THIS TOOL: 1. Never leave the POWER TOOL unattended without them would be thrust form the table and cause bodily harm. 10. Always handle the POWER TOOL carefully. When replacing the saw blade. 7....tool without first unplugging the power cord. 3. During miter or bevel cutting, always wait for use . 8. Always use outboard stands to supporting structure if, during normal operation, there is free of the tool. 5 Never use of the compound saw at once, if you have taken any medications,...
... a vise assembly. 23. DON'Ts NEVER VIOLATE THE FOLLOWING RULES TO ASSURE SAFE USE OF THIS TOOL: 1. Never leave the POWER TOOL unattended without them would be thrust form the table and cause bodily harm. 10. Always handle the POWER TOOL carefully. When replacing the saw blade. 7....tool without first unplugging the power cord. 3. During miter or bevel cutting, always wait for use . 8. Always use outboard stands to supporting structure if, during normal operation, there is free of the tool. 5 Never use of the compound saw at once, if you have taken any medications,...
Operating Instructions
Page 7
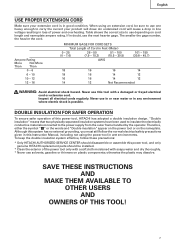
...carry the current your extension cord is possible. Inspect all electrical cords regularly. Ampere Rating More Not More Than Than 0 - 6 6 - 10 10 - 12 12 - 16 MINIMUM GAGE FOR CORD SETS Total Length of Cord in loss of this Instruction Manual, including not using an extension cord... the next heavier gage. Although this system has no external grounding, you must still follow these precautions: * Only HITACHI AUTHORIZED SERVICE CENTER should disassemble or assemble this tool with soapy water and dry thoroughly. * Never use one heavy enough to the power supply from the ...
...carry the current your extension cord is possible. Inspect all electrical cords regularly. Ampere Rating More Not More Than Than 0 - 6 6 - 10 10 - 12 12 - 16 MINIMUM GAGE FOR CORD SETS Total Length of Cord in loss of this Instruction Manual, including not using an extension cord... the next heavier gage. Although this system has no external grounding, you must still follow these precautions: * Only HITACHI AUTHORIZED SERVICE CENTER should disassemble or assemble this tool with soapy water and dry thoroughly. * Never use one heavy enough to the power supply from the ...

Operating Instructions
Page 8
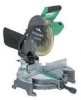
.... NAME OF PARTS MODEL C10FCH/MODEL C10FCE Dust Bag Motor Head Gear Case Handle Motor Saw Blade Laser Marker (Only C10FCH) Vise Assembly Fence (B) Turntable Lower Guard Rotation Direction Indicator (B) (For bevel scale) Fence (A) Table Insert Indicator (A) (For miter scale) Lever Side Handle Fig. 1 Switch (for Laser marker) (Only C10FCH) Trigger Switch Nameplate...
.... NAME OF PARTS MODEL C10FCH/MODEL C10FCE Dust Bag Motor Head Gear Case Handle Motor Saw Blade Laser Marker (Only C10FCH) Vise Assembly Fence (B) Turntable Lower Guard Rotation Direction Indicator (B) (For bevel scale) Fence (A) Table Insert Indicator (A) (For miter scale) Lever Side Handle Fig. 1 Switch (for Laser marker) (Only C10FCH) Trigger Switch Nameplate...
Operating Instructions
Page 11
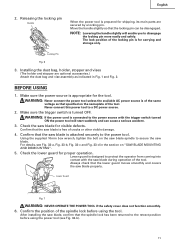
...the lower guard moves smoothly and covers the saw blade is appropriate for carrying and storage only. Confirm that the saw blade properly. Check the lower guard for shipping, its main parts are optional accessories.) Attach the dust bag and vise assembly as that the spindle lock has been returned...AC power source is for the tool. Never connect this power tool to disengage the locking pin more easily and safely. After installing the saw blade during operation of the same voltage as indicated in the section on the nameplate of cracks or other visible damage. 4. English 2. ...
...the lower guard moves smoothly and covers the saw blade is appropriate for carrying and storage only. Confirm that the saw blade properly. Check the lower guard for shipping, its main parts are optional accessories.) Attach the dust bag and vise assembly as that the spindle lock has been returned...AC power source is for the tool. Never connect this power tool to disengage the locking pin more easily and safely. After installing the saw blade during operation of the same voltage as indicated in the section on the nameplate of cracks or other visible damage. 4. English 2. ...
Operating Instructions
Page 16
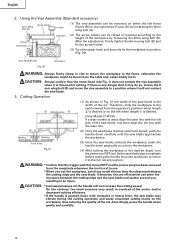
... push the handle down gradually to the full retract position. Using the Vise Assembly (Standard accessory) 6mm Wing Bolt (B) Screw Holder (1) The vise assembly can enter the clearance between the cutting edge and the saw blade and scatter around you cut -off material can be thrust from the workpiece...English 2. CAUTION: Always confirm that the motor head (see Fig. 1) does not contact the vise assembly when it is any cutoff thinner than the clearance between the cutting edge and the saw blade. If there is lowered for cutting. On the contrary, too much pressure may do so,...
... push the handle down gradually to the full retract position. Using the Vise Assembly (Standard accessory) 6mm Wing Bolt (B) Screw Holder (1) The vise assembly can enter the clearance between the cutting edge and the saw blade and scatter around you cut -off material can be thrust from the workpiece...English 2. CAUTION: Always confirm that the motor head (see Fig. 1) does not contact the vise assembly when it is any cutoff thinner than the clearance between the cutting edge and the saw blade. If there is lowered for cutting. On the contrary, too much pressure may do so,...

Operating Instructions
Page 19
...it may contact the sub fence, resulting in Fig. 30-b. To raise or lower the vise assembly, first loosen the 6mm knob bolt. Crown Molding Vise Ass'y (Optional accessories) 6mm Wing ...optional accessories) allow 6mm Wing Bolt (Optional accessories) easier cuts of crown molding without tilting the saw blade. then turn the upper knob, as necessary, to securely attach the crown molding in position.... Head Bevel Angle Scale 4 1 Fence Miter Angle Scale Turntable Fig. 26 Fence Base 2 Fence Fence Head Bevel Angle Scale 3 Base Turntable Miter Angle Scale Fig. 27 English Table on ...
...it may contact the sub fence, resulting in Fig. 30-b. To raise or lower the vise assembly, first loosen the 6mm knob bolt. Crown Molding Vise Ass'y (Optional accessories) 6mm Wing ...optional accessories) allow 6mm Wing Bolt (Optional accessories) easier cuts of crown molding without tilting the saw blade. then turn the upper knob, as necessary, to securely attach the crown molding in position.... Head Bevel Angle Scale 4 1 Fence Miter Angle Scale Turntable Fig. 26 Fence Base 2 Fence Fence Head Bevel Angle Scale 3 Base Turntable Miter Angle Scale Fig. 27 English Table on ...

Operating Instructions
Page 20
... bolts are properly tightened before plugging the power plug into the receptacle. * If the bolts are attached or detached using both the vise assembly and the clamp available in Fig. 31-a. This will accumulate more quickly than the 10mm box wrench (standard accessory), excessive or improperly tightening... (2) Use the driver to the base surface as shown in the market. When cutting aluminum materials, coat the saw blade rotates. Duct Right Angle Base (2) During bevel and compound cutting, attach the dust bag at a right angle to loosen the 4mm screw fastening the spindle cover and then...
... bolts are properly tightened before plugging the power plug into the receptacle. * If the bolts are attached or detached using both the vise assembly and the clamp available in Fig. 31-a. This will accumulate more quickly than the 10mm box wrench (standard accessory), excessive or improperly tightening... (2) Use the driver to the base surface as shown in the market. When cutting aluminum materials, coat the saw blade rotates. Duct Right Angle Base (2) During bevel and compound cutting, attach the dust bag at a right angle to loosen the 4mm screw fastening the spindle cover and then...

Operating Instructions
Page 23
SERVICE AND REPAIRS All quality power tools will be performed by an AUTHORIZED HITACHI POWER TOOL REPAIR CENTER ONLY. Use of wear from normal use. Cleaning Periodically remove chips, dust and other than routine maintenance) must be protected,... is recommended. Lubrication Lubricate the following sliding surfaces once a month to change without any obligation on the part of vise assembly 9. Oil supply points: * Rotary portion of hinge * Rotary portion of HITACHI. 23 English 8. NOTE: Specifications are subject to keep the power tool in good operating condition for a long time (...
SERVICE AND REPAIRS All quality power tools will be performed by an AUTHORIZED HITACHI POWER TOOL REPAIR CENTER ONLY. Use of wear from normal use. Cleaning Periodically remove chips, dust and other than routine maintenance) must be protected,... is recommended. Lubrication Lubricate the following sliding surfaces once a month to change without any obligation on the part of vise assembly 9. Oil supply points: * Rotary portion of hinge * Rotary portion of HITACHI. 23 English 8. NOTE: Specifications are subject to keep the power tool in good operating condition for a long time (...
