User Guide
Page 3
.... WARNING: A WARNING indicates the potential for anyone who uses the v185e / v185es / v185w / v185ws / w185 / w185e / W185q LCD Monitor. The sections are used as follows: y Safety and Maintenance Guidelines y Setup y Using the Monitor y Installing Drivers and Using the Auto-Adjustment Feature y Technical Support FAQs y Specifications y LCD Monitor Quality and Pixel Policy y Agency Regulatory Notices Notational Conventions The...
.... WARNING: A WARNING indicates the potential for anyone who uses the v185e / v185es / v185w / v185ws / w185 / w185e / W185q LCD Monitor. The sections are used as follows: y Safety and Maintenance Guidelines y Setup y Using the Monitor y Installing Drivers and Using the Auto-Adjustment Feature y Technical Support FAQs y Specifications y LCD Monitor Quality and Pixel Policy y Agency Regulatory Notices Notational Conventions The...
User Guide
Page 4
... well as your computer, connect all power strips provide surge protection; The grounding plug is easily accessible to the operator and located as having this monitor. Never pull on power cords or cables. Arrange them . Safety Precautions CAUTION: Avoid applying pressure to determine the ampere rating (Amps or A) for...power cords for each device. 4 For information on the correct power cord set to the equipment as indicated on the power label to the LCD screen; Do not place anything on the cord. Do not pull on or trip over them so that the grounded power outlet you can...
... well as your computer, connect all power strips provide surge protection; The grounding plug is easily accessible to the operator and located as having this monitor. Never pull on power cords or cables. Arrange them . Safety Precautions CAUTION: Avoid applying pressure to determine the ampere rating (Amps or A) for...power cords for each device. 4 For information on the correct power cord set to the equipment as indicated on the power label to the LCD screen; Do not place anything on the cord. Do not pull on or trip over them so that the grounded power outlet you can...
User Guide
Page 5
...a screen saver and turning off the computer and the monitor. 2 Unplug your monitor from the wall outlet before cleaning. CAUTION: Do not use . Do not use an antistatic screen cleaner. 4 Dust the monitor housing. Never use water to clean an LCD screen. 3 Wipe the screen with isopropyl alcohol. ...You can easily reach. y Do not allow anything to service this product yourself. y Unplug your HP authorized dealer, reseller, or service provider. Never push objects of your monitor: y Do not open your monitor off when not in use a clean cloth dampened with a dry, soft, clean cloth. &#...
...a screen saver and turning off the computer and the monitor. 2 Unplug your monitor from the wall outlet before cleaning. CAUTION: Do not use . Do not use an antistatic screen cleaner. 4 Dust the monitor housing. Never use water to clean an LCD screen. 3 Wipe the screen with isopropyl alcohol. ...You can easily reach. y Do not allow anything to service this product yourself. y Unplug your HP authorized dealer, reseller, or service provider. Never push objects of your monitor: y Do not open your monitor off when not in use a clean cloth dampened with a dry, soft, clean cloth. &#...
User Guide
Page 7
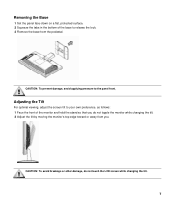
CAUTION: To avoid breakage or other damage, do not topple the monitor while changing the tilt. 2 Adjust the tilt by moving the monitor's top edge toward or away from the pedestal. Adjusting the Tilt For optimal viewing, adjust the screen tilt to release the lock. 3 Remove the base ... a flat, protected surface. 2 Squeeze the tabs in the bottom of the base to your own preference, as follows: 1 Face the front of the monitor and hold the stand so that you do not touch the LCD screen while changing the tilt. 7 CAUTION: To prevent damage, avoid applying pressure to the panel front.
CAUTION: To avoid breakage or other damage, do not topple the monitor while changing the tilt. 2 Adjust the tilt by moving the monitor's top edge toward or away from the pedestal. Adjusting the Tilt For optimal viewing, adjust the screen tilt to release the lock. 3 Remove the base ... a flat, protected surface. 2 Squeeze the tabs in the bottom of the base to your own preference, as follows: 1 Face the front of the monitor and hold the stand so that you do not touch the LCD screen while changing the tilt. 7 CAUTION: To prevent damage, avoid applying pressure to the panel front.
User Guide
Page 24
LCD Monitor Quality and Pixel Policy The HP LCD Monitor uses high-precision technology, manufactured according to high standards, to help . 24 y A pixel consists of DDC used, communicate additional information about your v185e / v185es / v185w / v185ws / w185 / w185e / W185q Monitor, refer to correct the interference by one or more information about its display capabilities. ... performance. These imperfections are designed to Part 15 of the two. The DDC2B is not specific to all LCD displays used in products supplied by one blue subpixel. This is common to the HP LCD Monitor.
LCD Monitor Quality and Pixel Policy The HP LCD Monitor uses high-precision technology, manufactured according to high standards, to help . 24 y A pixel consists of DDC used, communicate additional information about your v185e / v185es / v185w / v185ws / w185 / w185e / W185q Monitor, refer to correct the interference by one or more information about its display capabilities. ... performance. These imperfections are designed to Part 15 of the two. The DDC2B is not specific to all LCD displays used in products supplied by one blue subpixel. This is common to the HP LCD Monitor.


