
HP USB Digital Drive
Page 9
Disconnecting the Digital Drive ✎ Do not attempt to Remove Hardware" message appears on the Digital Drive is in the extended position, return it on your screen. 3. Select the Digital Drive and wait until the "Safe to remove the Digital Drive when the status light on your taskbar. A dialog box displays a list of connected devices. 2. Select the "Safely Remove Hardware" icon on its track for safe storage. 8 User Guide Gently unplug the Digital Drive from the USB port. ✎ If the USB connector cable is flashing. 1.
Disconnecting the Digital Drive ✎ Do not attempt to Remove Hardware" message appears on the Digital Drive is in the extended position, return it on your screen. 3. Select the Digital Drive and wait until the "Safe to remove the Digital Drive when the status light on your taskbar. A dialog box displays a list of connected devices. 2. Select the "Safely Remove Hardware" icon on its track for safe storage. 8 User Guide Gently unplug the Digital Drive from the USB port. ✎ If the USB connector cable is flashing. 1.
HP Compaq notebook single image white paper
Page 7
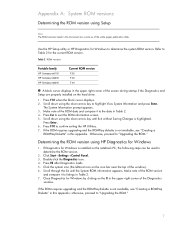
...steps can be used to exit the ROM information screen. 5. Press Esc to determine the ROM version. 2. If Diagnostics for Windows to "Upgrading the ROM." 7 Press Enter. 6. Table 2 ROM versions Portable family HP Compaq nc6100 HP Compaq nc6200 HP Compaq nc8200 Current ROM version F.02 F.03 F....04 „ A block cursor displays in the upper right corner of the screen during startup if the Diagnostics and Setup are current as of ...
...steps can be used to exit the ROM information screen. 5. Press Esc to determine the ROM version. 2. If Diagnostics for Windows to "Upgrading the ROM." 7 Press Enter. 6. Table 2 ROM versions Portable family HP Compaq nc6100 HP Compaq nc6200 HP Compaq nc8200 Current ROM version F.02 F.03 F....04 „ A block cursor displays in the upper right corner of the screen during startup if the Diagnostics and Setup are current as of ...
HP Compaq notebook single image white paper
Page 8
...the ROM version and compare it to listings in Table 2. 3. Press Enter at the Welcome to continue. 7. Press Enter to ROMPaq screen. 4. Press Enter to external power. 2. Determining the ROM Version Using Windows System Information 1. If the ROM requires upgrading and the ... firmware image. 6. Close Windows System Information by clicking OK. Press Fn (Function) and Esc (Escape) keys simultaneously. 2. HP System Information window appears which includes the System BIOS information. Click Start→All Programs→Accessories→System Tools→System Information...
...the ROM version and compare it to listings in Table 2. 3. Press Enter at the Welcome to continue. 7. Press Enter to ROMPaq screen. 4. Press Enter to external power. 2. Determining the ROM Version Using Windows System Information 1. If the ROM requires upgrading and the ... firmware image. 6. Close Windows System Information by clicking OK. Press Fn (Function) and Esc (Escape) keys simultaneously. 2. HP System Information window appears which includes the System BIOS information. Click Start→All Programs→Accessories→System Tools→System Information...
HP Compaq notebook single image white paper
Page 9
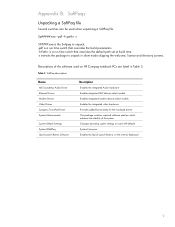
... time switch that overrides the build parameters. -f is a run time switch that overrides the default path set at build time. -s instructs the package to match HP defaults System Firmware Enables the Quick Launch Buttons on HP Compaq notebook PCs are listed in silent mode skipping the welcome, license and directory...
... time switch that overrides the build parameters. -f is a run time switch that overrides the default path set at build time. -s instructs the package to match HP defaults System Firmware Enables the Quick Launch Buttons on HP Compaq notebook PCs are listed in silent mode skipping the welcome, license and directory...
Hardware and Software Guide
Page 4
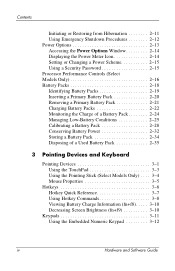
... TouchPad 3-3 Using the Pointing Stick (Select Models Only) . . . . 3-4 Mouse Properties 3-5 Hotkeys 3-6 Hotkey Quick Reference 3-7 Using Hotkey Commands 3-8 Viewing Battery Charge Information (fn+f8). . . . . 3-10 Decreasing Screen Brightness (fn+f9 3-10 Keypads 3-11 Using the Embedded Numeric Keypad 3-12 iv Hardware and Software Guide
... TouchPad 3-3 Using the Pointing Stick (Select Models Only) . . . . 3-4 Mouse Properties 3-5 Hotkeys 3-6 Hotkey Quick Reference 3-7 Using Hotkey Commands 3-8 Viewing Battery Charge Information (fn+f8). . . . . 3-10 Decreasing Screen Brightness (fn+f9 3-10 Keypads 3-11 Using the Embedded Numeric Keypad 3-12 iv Hardware and Software Guide
Hardware and Software Guide
Page 13
... pointer and selects or activates items on an external mouse. (Continued) Hardware and Software Guide 1-3 Functions like the middle button on the screen. Functions like the left button on the screen. Can be set to perform other mouse functions, such as scrolling, selecting, and double-clicking. Functions like the left button on...
... pointer and selects or activates items on an external mouse. (Continued) Hardware and Software Guide 1-3 Functions like the middle button on the screen. Functions like the left button on the screen. Can be set to perform other mouse functions, such as scrolling, selecting, and double-clicking. Functions like the left button on...
Hardware and Software Guide
Page 27
... each device and the approval markings of some of the countries in which the device has been approved Hardware and Software Guide 1-17 If your screen, select Start > Help and Support. ■ Microsoft Certificate of the notebook. ■ Regulatory label-Provides regulatory information about the notebook. This certificate is affixed to...
... each device and the approval markings of some of the countries in which the device has been approved Hardware and Software Guide 1-17 If your screen, select Start > Help and Support. ■ Microsoft Certificate of the notebook. ■ Regulatory label-Provides regulatory information about the notebook. This certificate is affixed to...
Hardware and Software Guide
Page 33
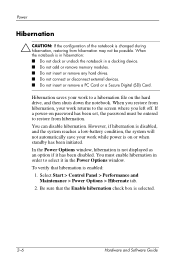
... "Initiating Standby, Hibernation or Shutdown" section, later in this chapter, for details about when to the screen where you left off. ■ Saving your work is saved in random access memory (RAM) and the screen is in standby for extended periods. When you or by the system. They can be initiated by...
... "Initiating Standby, Hibernation or Shutdown" section, later in this chapter, for details about when to the screen where you left off. ■ Saving your work is saved in random access memory (RAM) and the screen is in standby for extended periods. When you or by the system. They can be initiated by...
Hardware and Software Guide
Page 34
.... 2-6 Hardware and Software Guide Be sure that hibernation is on or when standby has been initiated. When you restore from hibernation, your work to the screen where you left off. To verify that the Enable hibernation check box is not displayed as an option if it in the Power Options window...
.... 2-6 Hardware and Software Guide Be sure that hibernation is on or when standby has been initiated. When you restore from hibernation, your work to the screen where you left off. To verify that the Enable hibernation check box is not displayed as an option if it in the Power Options window...
Hardware and Software Guide
Page 35
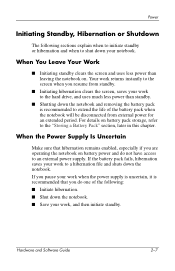
Hardware and Software Guide 2-7 For details on . When You Leave Your Work ■ Initiating standby clears the screen and uses less power than standby. ■ Shutting down the notebook and removing the battery pack is recommended that hibernation remains enabled, ...of the battery pack when the notebook will be disconnected from standby. ■ Initiating hibernation clears the screen, saves your work , and then initiate standby. Your work returns instantly to the screen when you do not have access to an external power supply. If the battery pack fails, hibernation saves...
Hardware and Software Guide 2-7 For details on . When You Leave Your Work ■ Initiating standby clears the screen and uses less power than standby. ■ Shutting down the notebook and removing the battery pack is recommended that hibernation remains enabled, ...of the battery pack when the notebook will be disconnected from standby. ■ Initiating hibernation clears the screen, saves your work , and then initiate standby. Your work returns instantly to the screen when you do not have access to an external power supply. If the battery pack fails, hibernation saves...

Hardware and Software Guide
Page 38
.... ■ The notebook is turned off the notebook.* Save your work and close all open applications. This conserves battery power. *If the system is on -screen instructions (if displayed) for shutting down the notebook with these procedures, refer to the "Using Emergency Shutdown Procedures" section, later in this chapter. 2-10 Hardware...
.... ■ The notebook is turned off the notebook.* Save your work and close all open applications. This conserves battery power. *If the system is on -screen instructions (if displayed) for shutting down the notebook with these procedures, refer to the "Using Emergency Shutdown Procedures" section, later in this chapter. 2-10 Hardware...
Hardware and Software Guide
Page 39
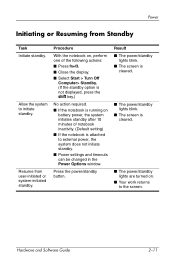
... and timeouts can be changed in the Power Options window. Result ■ The power/standby lights blink. ■ The screen is cleared. ■ The power/standby lights blink. ■ The screen is cleared. ■ The power/standby lights are turned on battery power, the system initiates standby after 10 minutes of... With the notebook on, perform one of notebook inactivity. (Default setting) ■ If the notebook is running on . ■ Your work returns to the screen. Hardware and Software Guide 2-11 Power Initiating or Resuming from user-initiated or system-initiated standby.
... and timeouts can be changed in the Power Options window. Result ■ The power/standby lights blink. ■ The screen is cleared. ■ The power/standby lights blink. ■ The screen is cleared. ■ The power/standby lights are turned on battery power, the system initiates standby after 10 minutes of... With the notebook on, perform one of notebook inactivity. (Default setting) ■ If the notebook is running on . ■ Your work returns to the screen. Hardware and Software Guide 2-11 Power Initiating or Resuming from user-initiated or system-initiated standby.
Hardware and Software Guide
Page 40
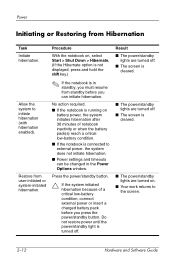
...on . ■ Your work returns to initiate hibernation (with hibernation enabled). Result ■ The power/standby lights are turned off. ■ The screen is cleared. ■ The power/standby lights are turned off . Procedure With the notebook on, select Start > Shut Down > Hibernate. (If ...the Hibernate option is not displayed, press and hold the shift key.) ✎ If the notebook is turned off . ■ The screen is cleared. ■ The power/standby lights are turned on battery power, the system initiates hibernation after 30 minutes of a critical low-battery condition...
...on . ■ Your work returns to initiate hibernation (with hibernation enabled). Result ■ The power/standby lights are turned off. ■ The screen is cleared. ■ The power/standby lights are turned off . Procedure With the notebook on, select Start > Shut Down > Hibernate. (If ...the Hibernate option is not displayed, press and hold the shift key.) ✎ If the notebook is turned off . ■ The screen is cleared. ■ The power/standby lights are turned on battery power, the system initiates hibernation after 30 minutes of a critical low-battery condition...
Hardware and Software Guide
Page 43
Power Setting or Changing a Power Scheme The Power Schemes tab in the lists on the screen. 4. You can also set a power scheme that initiates standby or turns off the display or hard drive after a time interval that prompts you for password ...
Power Setting or Changing a Power Scheme The Power Schemes tab in the lists on the screen. 4. You can also set a power scheme that initiates standby or turns off the display or hard drive after a time interval that prompts you for password ...

Hardware and Software Guide
Page 52
... displays. or - » Select Start > Control Panel > Performance and Maintenance > Power Options > Power Meter tab. 2-24 Hardware and Software Guide Displaying Charge Information on the Screen This section explains how to the "Calibrating a Battery Pack" section, later in this chapter. Viewing Charge Displays To view information about 10 percent of a full...
... displays. or - » Select Start > Control Panel > Performance and Maintenance > Power Options > Power Meter tab. 2-24 Hardware and Software Guide Displaying Charge Information on the Screen This section explains how to the "Calibrating a Battery Pack" section, later in this chapter. Viewing Charge Displays To view information about 10 percent of a full...

Hardware and Software Guide
Page 60
... down the notebook. 2-32 Hardware and Software Guide Conserving Battery Power While You Work To conserve power while you use the volume buttons to adjust screen brightness as you need it . ■ Turn off the local area network (LAN) device when you are not using .
... down the notebook. 2-32 Hardware and Software Guide Conserving Battery Power While You Work To conserve power while you use the volume buttons to adjust screen brightness as you need it . ■ Turn off the local area network (LAN) device when you are not using .

Hardware and Software Guide
Page 61
... battery power. Power Selecting Power Conservation Settings To set the notebook to conserve power: ■ Select a short wait for the screen saver and select a screen saver with low-power-use settings. To access screen saver settings: » Select Start > Control Panel > Appearance and Themes > Choose a Screensaver. ■ Through the operating system, select a power...
... battery power. Power Selecting Power Conservation Settings To set the notebook to conserve power: ■ Select a short wait for the screen saver and select a screen saver with low-power-use settings. To access screen saver settings: » Select Start > Control Panel > Appearance and Themes > Choose a Screensaver. ■ Through the operating system, select a power...

Hardware and Software Guide
Page 65
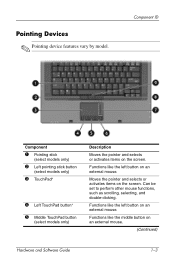
Moves the pointer and selects or activates items on the screen. Scrolls upward or downward. (Continued) 3-2 Hardware and Software Guide Pointing Devices and Keyboard Component 1 Pointing stick (select models only) 2 Left pointing stick button (select... button* 5 Middle TouchPad button (select models only) 6 Right TouchPad button* 7 TouchPad scroll zone* Description Moves the pointer and selects or activates items on the screen. Functions like the right button on an external mouse. Functions like the left button on an external mouse. Functions like the middle button on an...
Moves the pointer and selects or activates items on the screen. Scrolls upward or downward. (Continued) 3-2 Hardware and Software Guide Pointing Devices and Keyboard Component 1 Pointing stick (select models only) 2 Left pointing stick button (select... button* 5 Middle TouchPad button (select models only) 6 Right TouchPad button* 7 TouchPad scroll zone* Description Moves the pointer and selects or activates items on the screen. Functions like the right button on an external mouse. Functions like the left button on an external mouse. Functions like the middle button on an...

Hardware and Software Guide
Page 67
Use the left and right buttons on the screen. Press a replacement cap into place. 3-4 Hardware and Software Guide Gently pull off the notebook. 2. To change the pointing stick cap: 1. Turn off the used pointing stick cap. 3. Pointing Devices and Keyboard Using the Pointing Stick (Select Models Only) Press the pointing stick in the direction you would the left and right pointing stick buttons (select models only) as you want to move the pointer on an external mouse.
Use the left and right buttons on the screen. Press a replacement cap into place. 3-4 Hardware and Software Guide Gently pull off the notebook. 2. To change the pointing stick cap: 1. Turn off the used pointing stick cap. 3. Pointing Devices and Keyboard Using the Pointing Stick (Select Models Only) Press the pointing stick in the direction you would the left and right pointing stick buttons (select models only) as you want to move the pointer on an external mouse.

Hardware and Software Guide
Page 70
Pointing Devices and Keyboard Hotkey Quick Reference Function Key Combination to Activate Function Initiate standby fn+f3 Switch between notebook display and external display fn+f4 View battery information fn+f8 Decrease screen brightness fn+f9 Increase screen brightness fn+f10 Turn on and off the ambient light sensor fn+f11 Display system information fn+esc Key Combination to Deactivate Function Power/standby button fn+f4 fn+f8 fn+f10 fn+f9 fn+f11 fn+esc Hardware and Software Guide 3-7
Pointing Devices and Keyboard Hotkey Quick Reference Function Key Combination to Activate Function Initiate standby fn+f3 Switch between notebook display and external display fn+f4 View battery information fn+f8 Decrease screen brightness fn+f9 Increase screen brightness fn+f10 Turn on and off the ambient light sensor fn+f11 Display system information fn+esc Key Combination to Deactivate Function Power/standby button fn+f4 fn+f8 fn+f10 fn+f9 fn+f11 fn+esc Hardware and Software Guide 3-7


