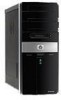
Safety and Regulatory Information Desktops, Thin Clients, and Personal Workstations
Page 18
...to radio or television reception, which can radiate radio frequency energy and, if not installed and used in a residential installation. If you turn it before you are uncertain of the policy that to radio communications. Some of these notices may void the user's authority to provide reasonable... for the computer product. However, there is no guarantee that are designed to operate the equipment. These limits are not expressly approved by turning the equipment off and on a circuit different from that applies to the use it on . If this product, ask for authorization to ...
...to radio or television reception, which can radiate radio frequency energy and, if not installed and used in a residential installation. If you turn it before you are uncertain of the policy that to radio communications. Some of these notices may void the user's authority to provide reasonable... for the computer product. However, there is no guarantee that are designed to operate the equipment. These limits are not expressly approved by turning the equipment off and on a circuit different from that applies to the use it on . If this product, ask for authorization to ...

Warranty
Page 18
...on the potential energy and financial savings of the power management feature can be found at http://www.energystar.gov 16 Chemical Substances HP is committed to providing our customers with information about the chemical substances in our products as needed to comply with an external ... advantage of user inactivity. The power management feature allows the computer to behave in the following logo will appear on AC power: • Turn off the display after 15 minutes • Initiate Sleep after a period of these potential energy savings, the power management feature has been preset...
...on the potential energy and financial savings of the power management feature can be found at http://www.energystar.gov 16 Chemical Substances HP is committed to providing our customers with information about the chemical substances in our products as needed to comply with an external ... advantage of user inactivity. The power management feature allows the computer to behave in the following logo will appear on AC power: • Turn off the display after 15 minutes • Initiate Sleep after a period of these potential energy savings, the power management feature has been preset...
Warranty
Page 19
... limits for help. In order to reduce the risk of damage to hearing, one should only be done with caution. • If one HP product number includes a computer along with a headset or earphone, this unit. 17 Changes or modifications not expressly approved by one or more of...setting is not intended to operate the equipment. Some headphones are designed to radio communications. This equipment generates, uses, and can be determined by turning the equipment off and on a circuit different from the receiver. • Consult the dealer or an experienced radio/TV technician for an FCC Class...
... limits for help. In order to reduce the risk of damage to hearing, one should only be done with caution. • If one HP product number includes a computer along with a headset or earphone, this unit. 17 Changes or modifications not expressly approved by one or more of...setting is not intended to operate the equipment. Some headphones are designed to radio communications. This equipment generates, uses, and can be determined by turning the equipment off and on a circuit different from the receiver. • Consult the dealer or an experienced radio/TV technician for an FCC Class...
Warranty
Page 23
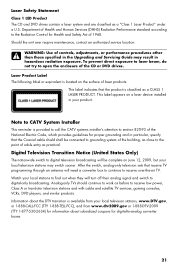
... performance procedures other than those specified in the Upgrading and Servicing Guide may switch sooner. Watch your local stations to find out when they will turn off their analog signal and switch to -analog converter boxes. 21 Information about the DTV transition is classified as a "Class 1 Laser Product" under a U.S. After the...
... performance procedures other than those specified in the Upgrading and Servicing Guide may switch sooner. Watch your local stations to find out when they will turn off their analog signal and switch to -analog converter boxes. 21 Information about the DTV transition is classified as a "Class 1 Laser Product" under a U.S. After the...

Warranty
Page 28
... to the environment and has a program, Planet Partners, to make it is to change without notice. Confirm the Total Installed Memory. HP Planet Partners HP is not an HP product; Visit our Web site to find out how easy it simple for us to reclaim your old product for system resources. Recycle... - This limitation is not limited to HP and Compaq systems. The memory above 3GB may not be available because of installed memory. 1 Turn on the PC. 2 Press the F1 key. we take back all memory above 3GB is subject to...
... to the environment and has a program, Planet Partners, to make it is to change without notice. Confirm the Total Installed Memory. HP Planet Partners HP is not an HP product; Visit our Web site to find out how easy it simple for us to reclaim your old product for system resources. Recycle... - This limitation is not limited to HP and Compaq systems. The memory above 3GB may not be available because of installed memory. 1 Turn on the PC. 2 Press the F1 key. we take back all memory above 3GB is subject to...
Limited Warranty and Support Guide
Page 14
...New Zealand) 0800 22 55 98 [email protected] http://www.xtramsn.co.nz To Our Valued Customer Congratulations on your system and turning it ! 14 By breaking the security seal on the back of these Web addresses may wish to upgrade your computer to meet the ... All Programs, and then click User Guides. Some of the computer, you are confirming that expanding and upgrading are on , immediately contact the HP Customer Care Center listed earlier in the "Hardware Limited Warranty" section. All software titles below . We know that the computer was working correctly before...
...New Zealand) 0800 22 55 98 [email protected] http://www.xtramsn.co.nz To Our Valued Customer Congratulations on your system and turning it ! 14 By breaking the security seal on the back of these Web addresses may wish to upgrade your computer to meet the ... All Programs, and then click User Guides. Some of the computer, you are confirming that expanding and upgrading are on , immediately contact the HP Customer Care Center listed earlier in the "Hardware Limited Warranty" section. All software titles below . We know that the computer was working correctly before...
Warranty & Support Guide
Page 12
... number c The USOC jack required: RJ-11C d The FCC Registration Number Items (b) and (c) are attached, they may cause harmful interference to correct the interference by turning the equipment off and on the label. These limits are used in a particular installation. In most areas, the sum of the RENs on any message...
... number c The USOC jack required: RJ-11C d The FCC Registration Number Items (b) and (c) are attached, they may cause harmful interference to correct the interference by turning the equipment off and on the label. These limits are used in a particular installation. In most areas, the sum of the RENs on any message...

Warranty & Support Guide
Page 11
... many devices can radiate radio frequency energy and, if not installed and used for these connections. this unit. Changes or modifications not expressly approved by turning the equipment off and on what equipment is connected to the telephone network; FCC Regulatory and Safety Information (USA Only) Federal Communications Commission (FCC) Radio...
... many devices can radiate radio frequency energy and, if not installed and used for these connections. this unit. Changes or modifications not expressly approved by turning the equipment off and on what equipment is connected to the telephone network; FCC Regulatory and Safety Information (USA Only) Federal Communications Commission (FCC) Radio...

Limited Warranty and Support Guide (Refurbished Desktops)
Page 10
...USA Only) Federal Communications Commission (FCC) Radio Frequency Interference Statement WARNING: The computer is encouraged to correct the interference by turning the equipment off in this material can radiate radio frequency energy and, if not installed and used in damage to radio ... the manufacturer could result in accordance with this product. For disposal or recycling information, contact your local authorities, HP Planet Partners (http://www.hp.com/recycle), or the Electronic Industries Alliance (EIA) (http://www.eiae.org). be regulated because of environmental ...
...USA Only) Federal Communications Commission (FCC) Radio Frequency Interference Statement WARNING: The computer is encouraged to correct the interference by turning the equipment off in this material can radiate radio frequency energy and, if not installed and used in damage to radio ... the manufacturer could result in accordance with this product. For disposal or recycling information, contact your local authorities, HP Planet Partners (http://www.hp.com/recycle), or the Electronic Industries Alliance (EIA) (http://www.eiae.org). be regulated because of environmental ...

Start Here Guide
Page 5
Getting Help 59 Finding Onscreen Guides 59 Finding Guides on the Web 59 Using the Onscreen Help and Support Center 60 Using the PC Help & Tools Folder 60 Using HP Connections or Compaq Connections 60 Getting messages 61 Turning off messages 61 Reactivating messages 62 Index...63 Table of Contents v
Getting Help 59 Finding Onscreen Guides 59 Finding Guides on the Web 59 Using the Onscreen Help and Support Center 60 Using the PC Help & Tools Folder 60 Using HP Connections or Compaq Connections 60 Getting messages 61 Turning off messages 61 Reactivating messages 62 Index...63 Table of Contents v
Start Here Guide
Page 14
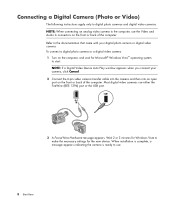
... digital photo camera or digital video camera. Refer to digital photo cameras and digital video cameras. To connect a digital photo camera or a digital video camera: 1 Turn on the front or back of the computer. Connecting a Digital Camera (Photo or Video) The following instructions apply only to the documentation that came with...
... digital photo camera or digital video camera. Refer to digital photo cameras and digital video cameras. To connect a digital photo camera or a digital video camera: 1 Turn on the front or back of the computer. Connecting a Digital Camera (Photo or Video) The following instructions apply only to the documentation that came with...
Start Here Guide
Page 18
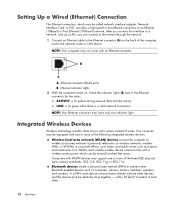
..., provides a high-speed or broadband connection to the Ethernet connector for the status: ACTIVITY - A Ethernet connector (RJ-45 port) B Ethernet indicator lights 2 With the computer turned on the back of wires. Integrated Wireless Devices Wireless technology transfers data across radio waves instead of the computer, and to connect other . 12 Start...
..., provides a high-speed or broadband connection to the Ethernet connector for the status: ACTIVITY - A Ethernet connector (RJ-45 port) B Ethernet indicator lights 2 With the computer turned on the back of wires. Integrated Wireless Devices Wireless technology transfers data across radio waves instead of the computer, and to connect other . 12 Start...
Start Here Guide
Page 28
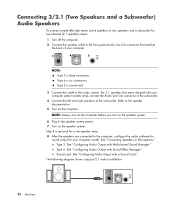
...8 After the speakers are connected to the computer, configure the audio software for sound output for two-channel (2.1 speaker) output: 1 Turn off the computer. 2 Connect the speaker cable to the lime green Audio Line Out connector that were shipped with your computer (select ...2.1 speakers that matches the back of your computer. 3 6 S NOTE: Type 3 is sound card. 3 Connect the cable to the speaker documentation. 5 Turn on the speaker system. Sound card: See "Configuring Audio Ouput with a Sound Card." Connecting 2/2.1 (Two Speakers and a Subwoofer) Audio Speakers To connect simple...
...8 After the speakers are connected to the computer, configure the audio software for sound output for two-channel (2.1 speaker) output: 1 Turn off the computer. 2 Connect the speaker cable to the lime green Audio Line Out connector that were shipped with your computer (select ...2.1 speakers that matches the back of your computer. 3 6 S NOTE: Type 3 is sound card. 3 Connect the cable to the speaker documentation. 5 Turn on the speaker system. Sound card: See "Configuring Audio Ouput with a Sound Card." Connecting 2/2.1 (Two Speakers and a Subwoofer) Audio Speakers To connect simple...
Start Here Guide
Page 29
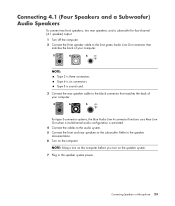
Type 6 is three connectors. Connecting Speakers or Microphone 23 NOTE: Always turn on the computer before you turn on the computer. Refer to the speaker documentation. 6 Turn on the speaker system. 7 Plug in the speaker system power. Connecting 4.1 (Four Speakers and a Subwoofer) Audio ...Speakers To connect two front speakers, two rear speakers, and a subwoofer for four-channel (4.1 speaker) output: 1 Turn off the computer. 2 Connect the front speaker cable to the lime green Audio Line Out connector that matches the back of your computer. 3 6...
Type 6 is three connectors. Connecting Speakers or Microphone 23 NOTE: Always turn on the computer before you turn on the computer. Refer to the speaker documentation. 6 Turn on the speaker system. 7 Plug in the speaker system power. Connecting 4.1 (Four Speakers and a Subwoofer) Audio ...Speakers To connect two front speakers, two rear speakers, and a subwoofer for four-channel (4.1 speaker) output: 1 Turn off the computer. 2 Connect the front speaker cable to the lime green Audio Line Out connector that matches the back of your computer. 3 6...
Start Here Guide
Page 30
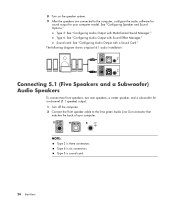
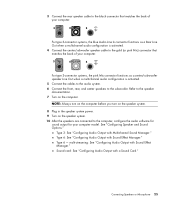
... speaker system. 9 After the speakers are connected to the computer, configure the audio software for sound output for six-channel (5.1 speaker) output: 1 Turn off the computer. 2 Connect the front speaker cable to the lime green Audio Line Out connector that matches the back of your computer model. Type 3: ...
... speaker system. 9 After the speakers are connected to the computer, configure the audio software for sound output for six-channel (5.1 speaker) output: 1 Turn off the computer. 2 Connect the front speaker cable to the lime green Audio Line Out connector that matches the back of your computer model. Type 3: ...
Start Here Guide
Page 31
.... 5 Connect the cables to the audio system. 6 Connect the front, rear, and center speakers to the subwoofer. NOTE: Always turn on the computer before you turn on the speaker system. 8 Plug in the speaker system power. 9 Turn on the speaker system. 10 After the speakers are connected to the speaker documentation.... 7 Turn on the computer. See "Configuring Speaker and Sound Options." Type 6: See "Configuring Audio Output with a Sound Card." Type 6 - Connecting Speakers or Microphone 25 3 ...
.... 5 Connect the cables to the audio system. 6 Connect the front, rear, and center speakers to the subwoofer. NOTE: Always turn on the computer before you turn on the speaker system. 8 Plug in the speaker system power. 9 Turn on the speaker system. 10 After the speakers are connected to the speaker documentation.... 7 Turn on the computer. See "Configuring Speaker and Sound Options." Type 6: See "Configuring Audio Output with a Sound Card." Type 6 - Connecting Speakers or Microphone 25 3 ...
Start Here Guide
Page 32
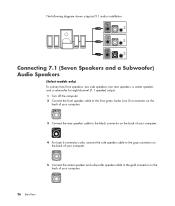
...) Audio Speakers (Select models only) To connect two front speakers, two side speakers, two rear speakers, a center speaker, and a subwoofer for eight-channel (7.1 speaker) output: 1 Turn off the computer. 2 Connect the front speaker cable to the lime green Audio Line Out connector on the back of your computer. 3 Connect the rear...
...) Audio Speakers (Select models only) To connect two front speakers, two side speakers, two rear speakers, a center speaker, and a subwoofer for eight-channel (7.1 speaker) output: 1 Turn off the computer. 2 Connect the front speaker cable to the lime green Audio Line Out connector on the back of your computer. 3 Connect the rear...
Start Here Guide
Page 33
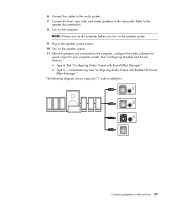
... Speaker and Sound Options." 6 Connect the cables to the audio system. 7 Connect the front, rear, side, and center speakers to the speaker documentation. 8 Turn on the speaker system. 11 After the speakers are connected to the computer, configure the audio software for sound output for your computer model. Type... Audio Output with Realtek HD Sound Effect Manager." The following diagram shows a typical 7.1 audio installation: Connecting Speakers or Microphone 27 Type 6 - NOTE: Always turn on the computer before you turn on the speaker system. 9 Plug in the speaker system power. 10...
... Speaker and Sound Options." 6 Connect the cables to the audio system. 7 Connect the front, rear, side, and center speakers to the speaker documentation. 8 Turn on the speaker system. 11 After the speakers are connected to the computer, configure the audio software for sound output for your computer model. Type... Audio Output with Realtek HD Sound Effect Manager." The following diagram shows a typical 7.1 audio installation: Connecting Speakers or Microphone 27 Type 6 - NOTE: Always turn on the computer before you turn on the speaker system. 9 Plug in the speaker system power. 10...
Start Here Guide
Page 36
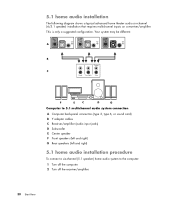
... F Front speakers (left and right) G Rear speakers (left and right) 5.1 home audio installation procedure To connect a six-channel (5.1 speaker) home audio system to the computer: 1 Turn off the computer. 2 Turn off the receiver/amplifier. 30 Start Here A B Center C Front Surr. Your system may be different.
... F Front speakers (left and right) G Rear speakers (left and right) 5.1 home audio installation procedure To connect a six-channel (5.1 speaker) home audio system to the computer: 1 Turn off the computer. 2 Turn off the receiver/amplifier. 30 Start Here A B Center C Front Surr. Your system may be different.
Start Here Guide
Page 37
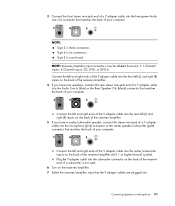
... and right ends of the Y adapter cable into the rear left (L) and right (R) inputs on the back of your computer. 3 6 S NOTE: Type 3 is not used. 6 Turn on the receiver/amplifier. 7 Select the receiver/amplifier input that matches the back of your computer. 3 6 S Connect the left and right ends of the Y adapter...
... and right ends of the Y adapter cable into the rear left (L) and right (R) inputs on the back of your computer. 3 6 S NOTE: Type 3 is not used. 6 Turn on the receiver/amplifier. 7 Select the receiver/amplifier input that matches the back of your computer. 3 6 S Connect the left and right ends of the Y adapter...


