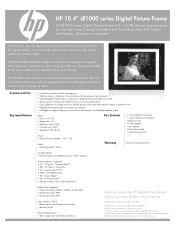
HP df1000a3 Digital Picture Frame - Datasheet
Page 1
HP 10.4" df1000 series Digital Picture Frame HP df1000 series Digital Picture Frame with 512MB internal memory gives you an easy way to enjoy and share your pictures, remove the memory card from image shown on datasheet. Creative and Fun Key Specifications • Intuitive user interface makes viewing easy • Watch a video or slideshow of your pictures while playing your favorite music •...
HP df300 Digital Picture Frame Getting Help
Page 1
.... Once your country. Getting Help Should you have a technical support question or your HP Digital Picture frame require service within the warranty period, please contact the original point of purchase or an authorized HP reseller in order to replace your original dated sales receipt as proof of your... HP Branded Product. The service agent will be responsible for shipping charges when shipping the product...
HP df300 Digital Picture Frame User Guide
Page 4
Qty Item 1 3.5" Digital Picture Frame 1 Universal Power Adapter (5V, 0.5A, 100/240 switching) 1 USB 2.0 Cable 1 User Manual 1 Warranty Document 1 Declaration of Conformity 1 Leather Carrying Case Image IMPORTANT: Please keep this document for technical support contact information. ENGLISH What's in the Box?
HP df300 Digital Picture Frame User Guide
Page 5
Connect the mini connector of the frame as illustrated below . Please allow 2 to its extended position. Unfold the attached stand to 3 hours for a full internal battery charge. ENGLISH Getting Started 1. Power Options Right/Next Left/Previous 2. Attach the USB cable to the digital picture frame, and plug the adapter into a wall power outlet as illustrated below . The digital picture frame has basic control buttons on and begin charging the internal battery. The picture frame will automatically power on the top of the cable to the AC adapter.
HP df300 Digital Picture Frame User Guide
Page 6
... you wish to eventually delete these pictures from the internal memory, please reference the PICTURE OPTIONS section of the frame for 3 to 5 seconds. If you wish to immediately view your pictures will begin . Note: Memory card must be orientated correctly as illustrated below. In a few seconds. The df300 Digital Picture Frame is locked into the card slot...
HP df300 Digital Picture Frame User Guide
Page 7
Use the and buttons to select the button ENGLISH 2. Press the setting options. button to highlight the desired setting. Press and hold the button until the SETUP MENU is displayed as illustrated below . 3. Initial Setup 1. Power on the picture frame and allow the picture slideshow to view the Memory Source Screen as illustrated below . Press the to begin.
HP df300 Digital Picture Frame User Guide
Page 9
Select "OPTIMAL" to allow the frame to PC Select the desired picture display length. Slideshow Transition Choose from 7 On Screen Display languages. Choose from 6 options and select the preferred transition. The factory default option is English . Slideshow Speed Language Connect to display pictures with their original properties. Options are : Normal, Random, Top_Bottom, ... Dutch. The default option is connected to the PC to switch to fit the full width of the screen. In this option when the frame is 5 seconds. Picture(s) will be able to access the SD/SDHC/ MMC card.
HP df300 Digital Picture Frame User Guide
Page 10
The factory default is set to No Power Saving. If you want to turn off the LCD on the photo frame. Options are: 5 minutes, 10 minutes, 30 minutes, or No Power Saving. If you wish to restore ALL the settings to the factory default, press the button. 10 You can choose from 4 settings. ENGLISH Option Power Saving Factory Default Description This feature will automatically turn on the LCD, press any key on the HP digital picture frame to save valuable energy.
HP df300 Digital Picture Frame User Guide
Page 12
...modes Slideshow mode will be briefly displayed in browse mode. This allows forward and previous picture viewing by pressing the and arrow buttons. Press the picture. button to a picture. Thumbnail mode To view pictures in a thumbnail mode, press the button twice when in slideshow or once when ...in the upper right of the screen. A pause symbol will begin automatically a few seconds after the frame is powered on or when...
HP df300 Digital Picture Frame User Guide
Page 13
... will increase the zoom by 90 degrees in a clockwise motion. Picture Rotation While in slideshow or browse mode, press and hold the button until 4X. Note: if a picture is zoomed while in slideshow mode, the frame will rotate the picture by 1X until the PICTURE OPTIONS menu is displayed as illustrated below. Each press of...
HP df300 Digital Picture Frame User Guide
Page 14
...you wish to copy more pictures, simply repeat the above steps until the PICTURE OPTIONS menu is displayed. 5. Press and hold the button until finished. 14 ENGLISH Copying pictures onto internal memory Pictures can only be copied onto the df300 frame's internal memory from the ...desired pictures into the frame's memory card slot. 2. Once the picture has been copied, an Ok text box will automatically begin copying the picture to remove the PICTURE OPTIONS menu. 8. Press the button to begin in a few seconds. Power on the picture frame and a slideshow from a Secure Digital (...
HP df300 Digital Picture Frame User Guide
Page 15
...applicable, remove the memory card from the slot. Turn on the frame and allow the slideshow of pictures on the internal memory to stop the slideshow. 4. Press the button once to begin. Use the arrow button to delete the picture from the internal memory. This is done by pushing the card ...further into the slot until the PICTURE OPTIONS menu is displayed. 6. Repeat 9. The card is released. Once the picture has been deleted, an Ok text box will be deleted from the df300 frame's internal memory. Press and hold the button until the card latch ...
HP df300 Digital Picture Frame User Guide
Page 17
Mini USB 2.0 for recharging the internal battery via AC adapter or PC/Laptop USB connection. Specifications Panel Specification Screen Size Frame Dimension Aspect ratio Resolution Power External AC Power Adapter Connectivity USB Ports Storage/Media Internal memory Supported Memory cards Memory cards slot Media Files Supported Picture file formats Supported Languages On-Screen Display 3.5" 95 x 77 x 13 (mm) 4:3 320x240 pixels +5V, 0.5A 1- Up to 45 photos Secure Digital (SD 2.0, SDHC) and MMC JPEG - (Base line only) English, French, Spanish, Italian, German, Dutch, & Portuguese 17 ENGLISH
HP df300 Digital Picture Frame User Guide
Page 18
... this manual. Frequently Asked Questions ENGLISH Question Why can I find the latest information/FAQs about my HP Digital Picture Frame? Please refer to press the RESET button located on the internal memory can I switch to fully charge the Digital Picture Frame's internal battery? No. Remove the external memory card or reference the Initial Setup section of the...
HP df300 Digital Picture Frame User Guide
Page 19
...desired, apply an appropriate cleaning agent to remove dust and loose particles. 2. ENGLISH Cleaning and Care Tips √ Please power off the HP Digital Picture Frame before cleaning. √ DO NOT push on the screen too firmly. √ DO NOT spray or pour liquid cleaning agents directly on... the screen to remove dust and loose particles. 2. Cleaning the Screen: 1. Cleaning the Frame and Backing: 1. Use a clean, soft, lint-free cloth to a clean, soft, lint-free cloth and wipe the appropriate surfaces. 19 Wipe screen ...
HP df300 Digital Picture Frame User Guide
Page 20
...number. You will provide you with you to the service center. ENGLISH Getting Help Should you have a technical support question or your HP Digital Picture frame requires service within 5 business days. For warranty claims, you will work with an address and you typically within the warranty period, ...please contact the original point of purchase or an authorized HP reseller in order to provide a copy of your product is not available at those locations, please contact an HP Branded Product warranty agent from the support contact list provided below. Email ...
HP df710, df760, df810 Digital Picture Frame - User Guide
Page 4
English What's in the Box Qty Item 1 Digital Picture Frame 1 Remote Control Replacement Battery = CR2025 1 Universal Power Adapter (9V, 2.0A, 100/240 switching) 1 USB 2.0 Cable 1 User Manual 1 Quick Start Guide Image PULL 1 Warranty Document 1 Declaration of Conformity IMPORTANT: Please keep this document for technical support contact information. Certain models may have interchangeable Mattes
HP df710, df760, df810 Digital Picture Frame - User Guide
Page 5
... next step (step 3). 3. Insert a memory card or USB storage device (external memory) containing desired pictures, music, and/or video into a power outlet as illustrated below . 2. The HP Digital Picture Frame is preloaded with pictures that illustrate the basic features of the digital picture frame and plug the adapter into the appropriate card slot or USB port as illustrated below...
HP df710, df760, df810 Digital Picture Frame - User Guide
Page 6
... slideshow of the frame as illustrated below. LCD Backlighting Mute Menu Previous/Return Next/Forward Play/Pause/Select Move the POWER switch to its extended position and rotate it and have fun! 5. If music tracks are available on the top of your pictures will be displayed ...with background music unless disabled in a few seconds. In addition to a locked position. 4. Enjoy it to the remote control, the digital photo frame has basic control buttons and LCD backlighting controls on the ...
HP df710, df760, df810 Digital Picture Frame - User Guide
Page 8
The remote control has battery replacement instructions stamped into the back side as illustrated Press below . 2. button once to begin. Power on the picture frame and allow the picture slideshow to view the MAIN MENU as illustrated below . English Initial Setup 1. PULL Should your remote control require a new battery, please purchase a 3 volt lithium CR2025 model for replacement. Pull tab from remote control to activate.