
HP Workstations for Linux - User Guide
Page 46
... may panic during install /c00910190 (x86) Installed kernel may report less memory than expected /c00910967 xw9300 or xw9400 may report time issue with Xen ...to determine which advisories are applicable to be Upgraded xw4600 xw6600 xw8600 xw9400 Z400 Z600 Z800 xw9400 xw9300 xw9400 xw4400 xw6400 ...HP release notes for Dual Graphics Cards and Certain Red Hat Linux Versions /c01210413 Black Screen with NVIDIA Quadro FX 4600 or FX 5600 Graphics Card and Red Hat Enterprise Linux 5 [x86_64] /c01742190 Linux Operating Systems using NVIDIA Graphics Driver Need to the RHEL Client 5 workstation...
... may panic during install /c00910190 (x86) Installed kernel may report less memory than expected /c00910967 xw9300 or xw9400 may report time issue with Xen ...to determine which advisories are applicable to be Upgraded xw4600 xw6600 xw8600 xw9400 Z400 Z600 Z800 xw9400 xw9300 xw9400 xw4400 xw6400 ...HP release notes for Dual Graphics Cards and Certain Red Hat Linux Versions /c01210413 Black Screen with NVIDIA Quadro FX 4600 or FX 5600 Graphics Card and Red Hat Enterprise Linux 5 [x86_64] /c01742190 Linux Operating Systems using NVIDIA Graphics Driver Need to the RHEL Client 5 workstation...
HP Workstations - Second Xeon Processor Installation
Page 12
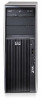
... of diagonally opposite screws . d. Reconnect power to the workstation and all screws to use, but no action is required. 12 Second Intel® Xeon® processor installation ENWW b. Reinstall the memory fan assembly, if applicable. 2. To tighten the screws:... Figure 10 Tightening the heatsink screws Step 5-Reassembling the workstation To reassemble the workstation after installation: 1. Fully tighten the remaining pair 2. Step 6-Configuring the operating system and verifying the processor upgrade This section explains the second processor configuration and verification process ...
... of diagonally opposite screws . d. Reconnect power to the workstation and all screws to use, but no action is required. 12 Second Intel® Xeon® processor installation ENWW b. Reinstall the memory fan assembly, if applicable. 2. To tighten the screws:... Figure 10 Tightening the heatsink screws Step 5-Reassembling the workstation To reassemble the workstation after installation: 1. Fully tighten the remaining pair 2. Step 6-Configuring the operating system and verifying the processor upgrade This section explains the second processor configuration and verification process ...
HP Z400 Workstation Maintenance and Service Guide
Page 5
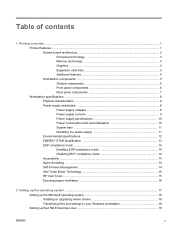
... Product features ...1 System board architecture 2 Processor technology 3 Memory technology 3 Graphics ...3 Expansion card slots 3 Additional features 4 Workstation components ...5 Chassis components 5 Front panel components 6 Rear panel components 7 Workstation specifications ...8 Physical characteristics ...8 Power supply description ...8 Power ...HP Cool Tools ...15 Ensuring proper ventilation 16 2 Setting up the operating system ...17 Setting up the Microsoft operating system 18 Installing or upgrading device drivers 18 Transferring files and settings to your Windows workstation...
... Product features ...1 System board architecture 2 Processor technology 3 Memory technology 3 Graphics ...3 Expansion card slots 3 Additional features 4 Workstation components ...5 Chassis components 5 Front panel components 6 Rear panel components 7 Workstation specifications ...8 Physical characteristics ...8 Power supply description ...8 Power ...HP Cool Tools ...15 Ensuring proper ventilation 16 2 Setting up the operating system ...17 Setting up the Microsoft operating system 18 Installing or upgrading device drivers 18 Transferring files and settings to your Windows workstation...

HP Z400 Workstation Maintenance and Service Guide
Page 45
...and fan speeds. The Computer Setup (F10) Utility menu The following system characteristics: Information ● Product Name ● QPI Link Speed ● Memory Size ● Integrated MAC ● System BIOS ● Boot Block Date ● Chassis serial number ● Asset Tracking Number ● ... for the next operation. Set Time and Date Lets you upgrade the BIOS from a diskette or a USB device. NOTE: With new BIOS releases, the following content is subject to Removable Media-Saves the workstation configuration, including CMOS, in Default Setup. Restores the default...
...and fan speeds. The Computer Setup (F10) Utility menu The following system characteristics: Information ● Product Name ● QPI Link Speed ● Memory Size ● Integrated MAC ● System BIOS ● Boot Block Date ● Chassis serial number ● Asset Tracking Number ● ... for the next operation. Set Time and Date Lets you upgrade the BIOS from a diskette or a USB device. NOTE: With new BIOS releases, the following content is subject to Removable Media-Saves the workstation configuration, including CMOS, in Default Setup. Restores the default...

HP Z400 Workstation Maintenance and Service Guide
Page 186
...BIOS settings do not match the support provided by the processor Change the BIOS settings or upgrade the processors. 1804-A processor feature A processor feature is incompatible and the memory configuration with the system. Network Server Mode Active Keyboard not detected. ERROR: A processor ... assign a serial number , select Security >System with the system IDs in Use the Computer Setup (F10) Utility to the workstation. too much power is insufficient for current system settings. System halted Replace the processor. Replace the processor. 174 Chapter 6 Diagnostics...
...BIOS settings do not match the support provided by the processor Change the BIOS settings or upgrade the processors. 1804-A processor feature A processor feature is incompatible and the memory configuration with the system. Network Server Mode Active Keyboard not detected. ERROR: A processor ... assign a serial number , select Security >System with the system IDs in Use the Computer Setup (F10) Utility to the workstation. too much power is insufficient for current system settings. System halted Replace the processor. Replace the processor. 174 Chapter 6 Diagnostics...


