
Maintenance and Service Guide: HP TouchSmart 9100 Business PC
Page 62
preparing to disassemble the TouchSmart PC 11 stand 15 system board 29 TV tuner module 26 WLAN module 24 removing hard drive 12 removing memory 16 repairing software problems 45 restoring ... software reinstallation 46 SPDIF 5 speakers 3 stand assembly 15 Stereo Audio In 5 system board, removing 29 system recovery options 52 T TouchSmart button 3 TV In 5 TV tuner module, removing 26 U updating drivers 45 USB 2.0 4, 5 V VESA wall mount assembly 10 volume 3 W wall mount assembly 10 webcam 3 webcam light 6 wireless keyboard and mouse 3, 6 wireless keyboard and...
preparing to disassemble the TouchSmart PC 11 stand 15 system board 29 TV tuner module 26 WLAN module 24 removing hard drive 12 removing memory 16 repairing software problems 45 restoring ... software reinstallation 46 SPDIF 5 speakers 3 stand assembly 15 Stereo Audio In 5 system board, removing 29 system recovery options 52 T TouchSmart button 3 TV In 5 TV tuner module, removing 26 U updating drivers 45 USB 2.0 4, 5 V VESA wall mount assembly 10 volume 3 W wall mount assembly 10 webcam 3 webcam light 6 wireless keyboard and mouse 3, 6 wireless keyboard and...
Preparing Your Computer for Wall-Mounting
Page 3
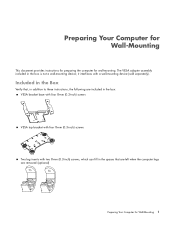
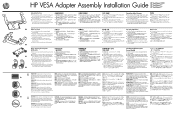
Included in the Box Verify that are left when the computer legs are included in the box: VESA bracket base with four 8-mm (0.3-inch) screws VESA top bracket with four 8-mm (0.3-inch) screws Two leg inserts with a wall-mounting device (sold separately). it interfaces with two 8-mm (0.3-...a wall-mounting device; Preparing Your Computer for Wall-Mounting This document provides instructions for preparing the computer for Wall-Mounting 1 The VESA adapter assembly included in addition to these instructions, the following are removed (optional) Preparing Your Computer for wall-mounting.
Included in the Box Verify that are left when the computer legs are included in the box: VESA bracket base with four 8-mm (0.3-inch) screws VESA top bracket with four 8-mm (0.3-inch) screws Two leg inserts with a wall-mounting device (sold separately). it interfaces with two 8-mm (0.3-...a wall-mounting device; Preparing Your Computer for Wall-Mounting This document provides instructions for preparing the computer for Wall-Mounting 1 The VESA adapter assembly included in addition to these instructions, the following are removed (optional) Preparing Your Computer for wall-mounting.
Preparing Your Computer for Wall-Mounting
Page 4
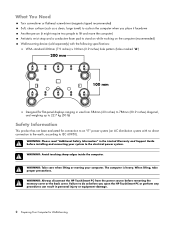
... Avoid touching sharp edges inside the computer. When lifting, take proper precautions. The computer is heavy. WARNING: Always disconnect the HP TouchSmart PC from 584mm (23 inches) to 786mm (30.9 inches) diagonal, and weighing up to 22.7 kg (50 lb) Safety...(sold separately) with the following specifications: VESA standard 200mm (7.9 inches) x 100mm (3.9 inches) hole pattern (holes marked "A") 200 mm A B A B A 100 mm A B A B A Designed for flat-panel displays ranging in size from the power source before you open the HP TouchSmart PC or perform any procedures can result in the...
... Avoid touching sharp edges inside the computer. When lifting, take proper precautions. The computer is heavy. WARNING: Always disconnect the HP TouchSmart PC from 584mm (23 inches) to 786mm (30.9 inches) diagonal, and weighing up to 22.7 kg (50 lb) Safety...(sold separately) with the following specifications: VESA standard 200mm (7.9 inches) x 100mm (3.9 inches) hole pattern (holes marked "A") 200 mm A B A B A 100 mm A B A B A Designed for flat-panel displays ranging in size from the power source before you open the HP TouchSmart PC or perform any procedures can result in the...

Preparing Your Computer for Wall-Mounting
Page 6
... computer stand to an upright position. 3 Remove the screw that secures the access cover to the back of the HP TouchSmart PC. Removing the Stand After completing the preceding steps, and before mounting the VESA adapter assembly to the back of the computer. 4 Preparing Your Computer for Wall-Mounting Hewlett-Packard recommends that you...
... computer stand to an upright position. 3 Remove the screw that secures the access cover to the back of the HP TouchSmart PC. Removing the Stand After completing the preceding steps, and before mounting the VESA adapter assembly to the back of the computer. 4 Preparing Your Computer for Wall-Mounting Hewlett-Packard recommends that you...

Preparing Your Computer for Wall-Mounting
Page 8
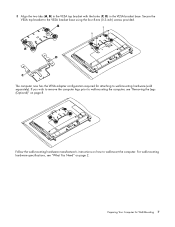
Insert the four 8-mm (0.3-inch) screws provided in the shield so there is no gap between the parts. A A B B 2 Reattach the access cover by sliding the cover slots into the VESA base and replacing the access cover screw. 6 Preparing Your Computer for Wall-Mounting 7 Lift off the computer stand and set it aside. Installing the VESA Adapter Assembly 1 Attach the VESA bracket base to the computer rear shield, aligning the tabs (A, B) to the holes in the same four holes that had attached the computer stand.
Insert the four 8-mm (0.3-inch) screws provided in the shield so there is no gap between the parts. A A B B 2 Reattach the access cover by sliding the cover slots into the VESA base and replacing the access cover screw. 6 Preparing Your Computer for Wall-Mounting 7 Lift off the computer stand and set it aside. Installing the VESA Adapter Assembly 1 Attach the VESA bracket base to the computer rear shield, aligning the tabs (A, B) to the holes in the same four holes that had attached the computer stand.
Preparing Your Computer for Wall-Mounting
Page 9
... for Wall-Mounting 7 Follow the wall-mounting hardware manufacturer's instructions on page 2. Preparing Your Computer for attaching to wall-mount the computer. Secure the VESA top bracket to wall-mounting the computer, see "What You Need" on how to wall-mounting hardware (sold separately). For wall-mounting hardware specifications,... see "Removing the Legs (Optional)" on page 8. If you wish to remove the computer legs prior to the VESA bracket base using the four 8-mm (0.3-inch) screws provided. 3 Align the two tabs (A, B) in the...
... for Wall-Mounting 7 Follow the wall-mounting hardware manufacturer's instructions on page 2. Preparing Your Computer for attaching to wall-mount the computer. Secure the VESA top bracket to wall-mounting the computer, see "What You Need" on how to wall-mounting hardware (sold separately). For wall-mounting hardware specifications,... see "Removing the Legs (Optional)" on page 8. If you wish to remove the computer legs prior to the VESA bracket base using the four 8-mm (0.3-inch) screws provided. 3 Align the two tabs (A, B) in the...
HP VESA Adapter Assembly Installation Guide
Page 1
... power source before touching. Another person (it facedown !! Shut down the computer using the operating system. 3. CAUTION: The TouchSmart PC is turned off and that you are removed (optional) 1 What You Need !! Ensure that the computer is designed to ... ensure that the 3 power adapter or power cord is heavy. HP VESA Adapter Assembly Installation Guide Included in personal injury or equipment damage. VESA bracket base with four 8-mm (0.3-inch) screws 4. VESA top bracket with four 8-mm (0.3-inch) screws for the TouchSmart 9100 and the TouchSmart600 2. WARNING!
... power source before touching. Another person (it facedown !! Shut down the computer using the operating system. 3. CAUTION: The TouchSmart PC is turned off and that you are removed (optional) 1 What You Need !! Ensure that the computer is designed to ... ensure that the 3 power adapter or power cord is heavy. HP VESA Adapter Assembly Installation Guide Included in personal injury or equipment damage. VESA bracket base with four 8-mm (0.3-inch) screws 4. VESA top bracket with four 8-mm (0.3-inch) screws for the TouchSmart 9100 and the TouchSmart600 2. WARNING!
HP VESA Adapter Assembly Installation Guide
Page 3
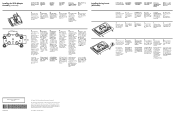
...the screws from 508mm (20 inches) to 582mm (22.9 inches) diagonal, and weighing up to use with the TouchSmart300 supports the 100 mm required VESA standard 100mm A B A B A (3.9 inches) x 100mm (3.9 inches) hole pattern (holes marked with the two 8-mm (0.3-inch) screws ...Inserts (All Models) Installing the Leg Inserts (All Models) NOTE: HP TouchSmart600 and HP TouchSmart 9100 models shown below. 1. The only warranties for technical and editorial errors or omissions contained herein. HP shall not be construed as constituting an additional warranty. Nothing herein ...
...the screws from 508mm (20 inches) to 582mm (22.9 inches) diagonal, and weighing up to use with the TouchSmart300 supports the 100 mm required VESA standard 100mm A B A B A (3.9 inches) x 100mm (3.9 inches) hole pattern (holes marked with the two 8-mm (0.3-inch) screws ...Inserts (All Models) Installing the Leg Inserts (All Models) NOTE: HP TouchSmart600 and HP TouchSmart 9100 models shown below. 1. The only warranties for technical and editorial errors or omissions contained herein. HP shall not be construed as constituting an additional warranty. Nothing herein ...
User Guide
Page 7
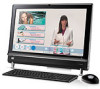
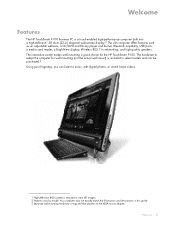
..., USB ports, a media card reader, a BrightView display, Wireless 802.11n networking, and high-quality speakers. Welcome Features The HP TouchSmart 9100 Business PC is required that attaches to adapt the computer for the HP TouchSmart 9100. The hardware to the VESA mount adapter. Your computer may not exactly match the illustrations and descriptions in this guide. 3 Separate wall-mounting...
..., USB ports, a media card reader, a BrightView display, Wireless 802.11n networking, and high-quality speakers. Welcome Features The HP TouchSmart 9100 Business PC is required that attaches to adapt the computer for the HP TouchSmart 9100. The hardware to the VESA mount adapter. Your computer may not exactly match the illustrations and descriptions in this guide. 3 Separate wall-mounting...
User Guide
Page 9
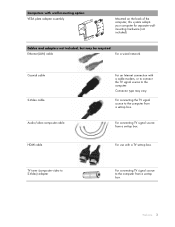
... Ethernet (LAN) cable For a wired network. Welcome 3 Coaxial cable S-Video cable Audio/video composite cable HDMI cable For an Internet connection with wall-mounting option VESA plate adapter assembly Mounted on the back of the computer, this system adapts your computer for separate wallmounting hardware (not included). TV tuner (composite video...
... Ethernet (LAN) cable For a wired network. Welcome 3 Coaxial cable S-Video cable Audio/video composite cable HDMI cable For an Internet connection with wall-mounting option VESA plate adapter assembly Mounted on the back of the computer, this system adapts your computer for separate wallmounting hardware (not included). TV tuner (composite video...