
ProtectTools (Select Models Only) - Windows Vista
Page 4
...and restoring 31 Creating a backup file 31 Restoring certification data from the backup file 31 Changing the owner password 32 Resetting a user password 32 Enabling and disabling Embedded Security 32 Permanently disabling Embedded Security 32 Enabling Embedded Security after permanent disable... 32 Migrating keys with the Migration Wizard 33 5 BIOS Configuration for HP ProtectTools General tasks ...35 Managing boot options ...35 Enabling and disabling system configuration options 36 Advanced tasks ...38 Managing HP ProtectTools settings 38 Enabling and disabling smart card or ...
...and restoring 31 Creating a backup file 31 Restoring certification data from the backup file 31 Changing the owner password 32 Resetting a user password 32 Enabling and disabling Embedded Security 32 Permanently disabling Embedded Security 32 Enabling Embedded Security after permanent disable... 32 Migrating keys with the Migration Wizard 33 5 BIOS Configuration for HP ProtectTools General tasks ...35 Managing boot options ...35 Enabling and disabling system configuration options 36 Advanced tasks ...38 Managing HP ProtectTools settings 38 Enabling and disabling smart card or ...
ProtectTools (Select Models Only) - Windows Vista
Page 77
... permanently 32 Java Card power-on authentication 22 power-on authentication 38 smart card authentication 38 smart card BIOS security 9 stringent security 42 E Embedded Security for HP ProtectTools backup file, creating 31 basic user account 28 Basic User Key 28 Basic User Key password, ...and folders 29 initializing chip 27 migrating keys 33 owner password, changing 32 password 3 permanently disabling 32 Personal Secure Drive 29 resetting user password 32 setup procedures 26 emergency recovery 27 emergency recovery token password definition 4 setting 27 enabling Automatic DriveLock 40 device ...
... permanently 32 Java Card power-on authentication 22 power-on authentication 38 smart card authentication 38 smart card BIOS security 9 stringent security 42 E Embedded Security for HP ProtectTools backup file, creating 31 basic user account 28 Basic User Key 28 Basic User Key password, ...and folders 29 initializing chip 27 migrating keys 33 owner password, changing 32 password 3 permanently disabling 32 Personal Secure Drive 29 resetting user password 32 setup procedures 26 emergency recovery 27 emergency recovery token password definition 4 setting 27 enabling Automatic DriveLock 40 device ...
ProtectTools (Select Models Only) - Windows Vista
Page 78
Computer Setup, managing 40 emergency recovery token 27 guidelines 5 managing 3 owner 27 recovery file 14 resetting user 32 secure, creating 5 setting options 42 setting power-on 41 setting setup 41 smart card administrator 9 ... recovery file password definition 3 Smart Card Security for HP ProtectTools administrator password 9 administrator password, changing 10 administrator password, definition 3 backing up and restoring 14 backup, creating 16 BIOS security mode 8 BIOS security mode, disabling 9 BIOS security mode, enabling 9 BIOS settings, updating 13 Credential Manager 47 initializing 7 PIN...
Computer Setup, managing 40 emergency recovery token 27 guidelines 5 managing 3 owner 27 recovery file 14 resetting user 32 secure, creating 5 setting options 42 setting power-on 41 setting setup 41 smart card administrator 9 ... recovery file password definition 3 Smart Card Security for HP ProtectTools administrator password 9 administrator password, changing 10 administrator password, definition 3 backing up and restoring 14 backup, creating 16 BIOS security mode 8 BIOS security mode, disabling 9 BIOS security mode, enabling 9 BIOS settings, updating 13 Credential Manager 47 initializing 7 PIN...

HP Compaq nc4400 Notebook PC - Maintenance and Service Guide
Page 10
If stringent security is enabled/disabled by accessing the Password Options menu in the BIOS. Before replacing the system board, perform the steps below to reset the password. Replace the RTC battery and reassemble the computer. 5. Remove the real-time clock (RTC) battery (refer to Section 5.23, "RTC... and all CMOS settings have been cleared. 1-4 Maintenance and Service Guide Do not reinsert any battery packs at this time. 6. Product Description 1.2 Resetting the Computer If the computer you are servicing has an unknown password, follow the steps below to be replaced to...
If stringent security is enabled/disabled by accessing the Password Options menu in the BIOS. Before replacing the system board, perform the steps below to reset the password. Replace the RTC battery and reassemble the computer. 5. Remove the real-time clock (RTC) battery (refer to Section 5.23, "RTC... and all CMOS settings have been cleared. 1-4 Maintenance and Service Guide Do not reinsert any battery packs at this time. 6. Product Description 1.2 Resetting the Computer If the computer you are servicing has an unknown password, follow the steps below to be replaced to...
Maintenance and Service Guide
Page 10
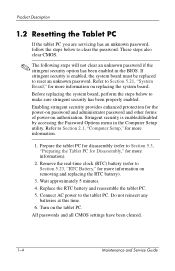
.... 1. All passwords and all CMOS settings have been cleared. 1-4 Maintenance and Service Guide Product Description 1.2 Resetting the Tablet PC If the tablet PC you are servicing has an unknown password, follow the steps below to make sure stringent security has been properly...authorization. Connect AC power to reset an unknown password. Refer to Section 5.3, "Preparing the Tablet PC for Disassembly," for more information on the tablet PC. If stringent security is enabled/disabled by accessing the Password Options menu in the BIOS. Turn on removing and replacing...
.... 1. All passwords and all CMOS settings have been cleared. 1-4 Maintenance and Service Guide Product Description 1.2 Resetting the Tablet PC If the tablet PC you are servicing has an unknown password, follow the steps below to make sure stringent security has been properly...authorization. Connect AC power to reset an unknown password. Refer to Section 5.3, "Preparing the Tablet PC for Disassembly," for more information on the tablet PC. If stringent security is enabled/disabled by accessing the Password Options menu in the BIOS. Turn on removing and replacing...


