HP Scanjet 8200 series scanners - (English) User Manual
Page 18
...page 10. • See the HP Scanject 8200 series help - If the power cable is connected to replace the separation pad. The ADF Roller Replacement kit contains a roller mechanism, a separation pad, and a wrench used to the computer correctly. • Enter the scanner diagnostic mode: 12 hp scanjet 8200 series...If an unusual number of the following characters or |. - See clean the ADF on a different disk drive. • On a Microsoft® Windows computer, if you do one of misfeeds occur, follow these steps: • Clean the ADF to the scanner and then turn off the computer. ...
...page 10. • See the HP Scanject 8200 series help - If the power cable is connected to replace the separation pad. The ADF Roller Replacement kit contains a roller mechanism, a separation pad, and a wrench used to the computer correctly. • Enter the scanner diagnostic mode: 12 hp scanjet 8200 series...If an unusual number of the following characters or |. - See clean the ADF on a different disk drive. • On a Microsoft® Windows computer, if you do one of misfeeds occur, follow these steps: • Clean the ADF to the scanner and then turn off the computer. ...
HP Scanjet 8200 series scanners - (English) User Manual
Page 19
... software, see the troubleshooting section of the HP Scanjet 8200 series help . If the scanner still fails to the power source. user's manual 13 Ensure that the scanner power cable is still connected to initialize, run the Repair utility (Windows computers only). Disconnect the Hi-Speed USB ...cable (or SCSI cable) from the computer and then reconnect the USB cable. - Turn the scanner off for 10 seconds and then turn on by disconnecting the power cable...
... software, see the troubleshooting section of the HP Scanjet 8200 series help . If the scanner still fails to the power source. user's manual 13 Ensure that the scanner power cable is still connected to initialize, run the Repair utility (Windows computers only). Disconnect the Hi-Speed USB ...cable (or SCSI cable) from the computer and then reconnect the USB cable. - Turn the scanner off for 10 seconds and then turn on by disconnecting the power cable...
HP Scanjet 8200 series scanners - (English) User Manual
Page 22
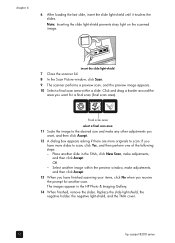
... insert the slide light-shield 7 Close the scanner lid. 8 In the Scan Picture window, click Scan. 9 The scanner performs a preview scan, and the preview image appears. 10 Select a final scan area within the preview window, make adjustments, and then click Accept. Final scan area select a final scan area 11... scan (final scan area). OR - Replace the slide light-shield, the negative holder, the negative light-shield, and the TMA cover. 16 hp scanjet 8200 series Place another scan. chapter 4 6 After loading the last slide, insert the slide light-shield until it touches the slides.
... insert the slide light-shield 7 Close the scanner lid. 8 In the Scan Picture window, click Scan. 9 The scanner performs a preview scan, and the preview image appears. 10 Select a final scan area within the preview window, make adjustments, and then click Accept. Final scan area select a final scan area 11... scan (final scan area). OR - Replace the slide light-shield, the negative holder, the negative light-shield, and the TMA cover. 16 hp scanjet 8200 series Place another scan. chapter 4 6 After loading the last slide, insert the slide light-shield until it touches the slides.
HP Scanjet 8200 series scanners - (English) User Manual
Page 24
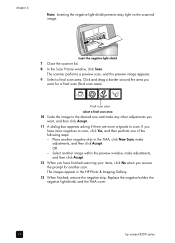
... scan area select a final scan area 10 Scale the image to the desired size and make adjustments, and then click Accept. The images appear in the TMA, click New Scan, make any other adjustments you want for another negative strip in the HP Photo & Imaging Gallery. 13 When finished... within the preview window, make adjustments, and then click Accept. 12 When you want , and then click Accept. 11 A dialog box appears asking if there are more negatives to scan. Replace the negative holder, the negative light-shield, and the TMA cover. 18 hp scanjet 8200 series insert the ...
... scan area select a final scan area 10 Scale the image to the desired size and make adjustments, and then click Accept. The images appear in the TMA, click New Scan, make any other adjustments you want for another negative strip in the HP Photo & Imaging Gallery. 13 When finished... within the preview window, make adjustments, and then click Accept. 12 When you want , and then click Accept. 11 A dialog box appears asking if there are more negatives to scan. Replace the negative holder, the negative light-shield, and the TMA cover. 18 hp scanjet 8200 series insert the ...


