User Manual
Page 1
S1931a, S2031/S2031a, S2231/S2231a, S2331/ S2331a , S2321a, LCD Monitors User Guide
S1931a, S2031/S2031a, S2231/S2231a, S2331/ S2331a , S2321a, LCD Monitors User Guide

User Manual
Page 2
... photocopied, reproduced, or translated to another language without the prior written consent of Microsoft Corporation in the express warranty statements accompanying such products and services. HP shall not be construed as constituting an additional warranty. Second Edition (March 2010) Document Part Number: 603307-002 Nothing herein should be liable for...
... photocopied, reproduced, or translated to another language without the prior written consent of Microsoft Corporation in the express warranty statements accompanying such products and services. HP shall not be construed as constituting an additional warranty. Second Edition (March 2010) Document Part Number: 603307-002 Nothing herein should be liable for...

User Manual
Page 3
It may cause damage to qualified service engineer. 13. Otherwise, it will be abused by persons walking on the monitor. 9. e. Please read all servicing to the circuit or liquid crystal molecules inside the monitor and poor display. 11. Do not push the surface of the LCD screen with any clothing or sheath. Do not locate the power cord where it may fall, causing serious damage to clean the surface of the monitor to dangerous voltage or other hazards. Never spill liquid of the monitor for a long time. 12. Avoid displaying the same image on the screen of any hard ...
It may cause damage to qualified service engineer. 13. Otherwise, it will be abused by persons walking on the monitor. 9. e. Please read all servicing to the circuit or liquid crystal molecules inside the monitor and poor display. 11. Do not push the surface of the LCD screen with any clothing or sheath. Do not locate the power cord where it may fall, causing serious damage to clean the surface of the monitor to dangerous voltage or other hazards. Never spill liquid of the monitor for a long time. 12. Avoid displaying the same image on the screen of any hard ...

User Manual
Page 4
Compatible with your dealer for future transport. 2 The monitor (and the pedestal) Lower stand Power cord Signal cord User manual Fast installation manual Warranty certificate Audio cable (select models) DVI Cable (select models) If any setting. Plug-and-play VESA DDC1/ 2B Standard. Note: Be sure to save original box and all packing materials for technical support and custom service. Chapter I. Introduction 1.1 Features Multilingual OSD adjustment Compatible with IBM VGA, extended VGA, VESA VGA, SVGA, XGA, and SXGA modes Wide range of applicable voltages (AC 100-240V 50/60Hz ) ...
Compatible with your dealer for future transport. 2 The monitor (and the pedestal) Lower stand Power cord Signal cord User manual Fast installation manual Warranty certificate Audio cable (select models) DVI Cable (select models) If any setting. Plug-and-play VESA DDC1/ 2B Standard. Note: Be sure to save original box and all packing materials for technical support and custom service. Chapter I. Introduction 1.1 Features Multilingual OSD adjustment Compatible with IBM VGA, extended VGA, VESA VGA, SVGA, XGA, and SXGA modes Wide range of applicable voltages (AC 100-240V 50/60Hz ) ...

User Manual
Page 5
Step 1 Step 2 3 Chapter II. Installation 2.1 Install the pedestal Please follow the steps illustrated below to install the pedestal.
Step 1 Step 2 3 Chapter II. Installation 2.1 Install the pedestal Please follow the steps illustrated below to install the pedestal.

User Manual
Page 6
Overview of the ports of the signal cable. 3. Audio signal input (select models) 3. Connect the power cords of your hand at its center of gravity to avoid dropping and damaging the monitor. Cautions: 1. AC power supply input 2. DVI signal input 4. During installation, please support the front frame with select models). 4 Power on your monitor displays an image, the installation has been successfully done. If your computer and monitor. Secure the screws on the back of the signal cable to the nearest electrical outlet. 4. For installation, please complete ...
Overview of the ports of the signal cable. 3. Audio signal input (select models) 3. Connect the power cords of your hand at its center of gravity to avoid dropping and damaging the monitor. Cautions: 1. AC power supply input 2. DVI signal input 4. During installation, please support the front frame with select models). 4 Power on your monitor displays an image, the installation has been successfully done. If your computer and monitor. Secure the screws on the back of the signal cable to the nearest electrical outlet. 4. For installation, please complete ...

User Manual
Page 7
2.3 Disconnect the pedestal 1. Note: This monitor uses VESA-compatible 100mmx100mm installation ports. 5 Press the clip button on the stand and remove the pedestal from the stand. 2. Press the clip button on the pedestal and remove the pedestal from your LCD monitor.
2.3 Disconnect the pedestal 1. Note: This monitor uses VESA-compatible 100mmx100mm installation ports. 5 Press the clip button on the stand and remove the pedestal from the stand. 2. Press the clip button on the pedestal and remove the pedestal from your LCD monitor.

User Manual
Page 8
Select Button -(minus) 3. Select Button +(plus) 4. OK Button (OK) 5. Power Button (POWER) 6 Monitor overview Overview of front panel controls 1. Menu Button (MENU) 2. Chapter III.
Select Button -(minus) 3. Select Button +(plus) 4. OK Button (OK) 5. Power Button (POWER) 6 Monitor overview Overview of front panel controls 1. Menu Button (MENU) 2. Chapter III.

User Manual
Page 9
Chapter IV. If the monitor runs in blue when the monitor operates normally. If your monitor to scroll up or the "-" to scroll down to the bottom of the menu, it returns to exit from the main menu. 6. When the highlight scrolls up in power-saving mode, this button to power on screen menu (OSD) system. 1. To adjust the selected option, press the "+" or "-" button. 5. To completely disconnect the main voltage, please remove the power plug from the main voltage. Press the "Menu" button to bottom of your monitor can be displayed. 3. Operational Instruction 4.1 Power ON/OFF ...
Chapter IV. If the monitor runs in blue when the monitor operates normally. If your monitor to scroll up or the "-" to scroll down to the bottom of the menu, it returns to exit from the main menu. 6. When the highlight scrolls up in power-saving mode, this button to power on screen menu (OSD) system. 1. To adjust the selected option, press the "+" or "-" button. 5. To completely disconnect the main voltage, please remove the power plug from the main voltage. Press the "Menu" button to bottom of your monitor can be displayed. 3. Operational Instruction 4.1 Power ON/OFF ...

User Manual
Page 10
To adjust the contrast level of an image (only applicable to VGA input). To adjust the image on the screen (only applicable to VGA input). The ambient brightness sensor can also be enabled or disabled (only applicable to some models) Brightness Contrast Image control Auto-adjustment Horizontal position Vertical position Clock Clock phase Note When the monitor is connected to two active and valid video sources, switching between the video input sources is available. To adjust the horizontal position of the screen. Adjusting the clock will change the horizontal image on the ...
To adjust the contrast level of an image (only applicable to VGA input). To adjust the image on the screen (only applicable to VGA input). The ambient brightness sensor can also be enabled or disabled (only applicable to some models) Brightness Contrast Image control Auto-adjustment Horizontal position Vertical position Clock Clock phase Note When the monitor is connected to two active and valid video sources, switching between the video input sources is available. To adjust the horizontal position of the screen. Adjusting the clock will change the horizontal image on the ...

User Manual
Page 11
To select and adjust the color range: R - to adjust the visual position of the screen. OSD horizontal position - to set the level of blue To set the level of green B - To enable the energy-saving function Please select On off The factory default setting is "English". to comply with color standards used in seconds) after the last button is 50. The factory default setting is On. 9 To adjust the position of the OSD menu displayed on the model of the screen to set the color of your monitor. to adjust the visual position of the OSD menu to set the level of power ...
To select and adjust the color range: R - to adjust the visual position of the screen. OSD horizontal position - to set the level of blue To set the level of green B - To enable the energy-saving function Please select On off The factory default setting is "English". to comply with color standards used in seconds) after the last button is 50. The factory default setting is On. 9 To adjust the position of the OSD menu displayed on the model of the screen to set the color of your monitor. to adjust the visual position of the OSD menu to set the level of power ...

User Manual
Page 12
The operational status of your monitor will be displayed when you power on the power button. This feature can be set the current time in hours and minutes. The factory default setting is "Off". Power indicator on the front panel Power on/off the indicator (LED) on your monitor. The following timer adjustment menu options are available: Set the current time - Set the opening time - Set "On' or "Off" status for your monitor works under the sleeping mode. Controlling some OSD menu functions, such DDC/CI support as "Off", it will be off setting, depending on the model of...
The operational status of your monitor will be displayed when you power on the power button. This feature can be set the current time in hours and minutes. The factory default setting is "Off". Power indicator on the front panel Power on/off the indicator (LED) on your monitor. The following timer adjustment menu options are available: Set the current time - Set the opening time - Set "On' or "Off" status for your monitor works under the sleeping mode. Controlling some OSD menu functions, such DDC/CI support as "Off", it will be off setting, depending on the model of...

User Manual
Page 13
The default signal input is connected to two active and valid video sources, select one of them as the default video input. Information Restore factory settings Default video input When the monitor is DVI. To select and display important information about your computer is restarted. The factory default settings will be restored. 11 The change you made will be activated after your monitor.
The default signal input is connected to two active and valid video sources, select one of them as the default video input. Information Restore factory settings Default video input When the monitor is DVI. To select and display important information about your computer is restarted. The factory default settings will be restored. 11 The change you made will be activated after your monitor.

User Manual
Page 14
....363 45 60 63.98 47.71 Vertical frequency 59.94 70.087 60.317 60.004 60 60.00 60.02 59.79 S2031 / S2031a Models Criteria 1 2 3 4 5 6 7 8 Resolution 640X480 @60 Hz 720X400 @70 Hz 800X600 @60 Hz 1024X768 @60 Hz 1280X720 @60 Hz 1280X1024 @ 60 Hz 1440X900 @60 Hz 1600X900...
....363 45 60 63.98 47.71 Vertical frequency 59.94 70.087 60.317 60.004 60 60.00 60.02 59.79 S2031 / S2031a Models Criteria 1 2 3 4 5 6 7 8 Resolution 640X480 @60 Hz 720X400 @70 Hz 800X600 @60 Hz 1024X768 @60 Hz 1280X720 @60 Hz 1280X1024 @ 60 Hz 1440X900 @60 Hz 1600X900...

User Manual
Page 15
humidity: 10% ~ 85% 13 resolution Recommended resolution Horizontal frequency Vertical frequency Viewable size Viewable angle Pitching angle Pixel frequency OSD functions Size (Packing) Net weight/ Gross weight Power supply Altitude (under operational condition) Altitude (under storing condition) Input signal Contrast Brightness Response time Color displayed Power Operational environment Storing environment 18.5" wide screen 1366x768 @ 60 Hz 1366x768 @ 60 Hz 24-83 kHz 50-76 Hz 409.8x 230.4 mm 170 -5º to 15º 170 MHz Brightness, Contrast, Image Control, Languages, Color, Management, ...
humidity: 10% ~ 85% 13 resolution Recommended resolution Horizontal frequency Vertical frequency Viewable size Viewable angle Pitching angle Pixel frequency OSD functions Size (Packing) Net weight/ Gross weight Power supply Altitude (under operational condition) Altitude (under storing condition) Input signal Contrast Brightness Response time Color displayed Power Operational environment Storing environment 18.5" wide screen 1366x768 @ 60 Hz 1366x768 @ 60 Hz 24-83 kHz 50-76 Hz 409.8x 230.4 mm 170 -5º to 15º 170 MHz Brightness, Contrast, Image Control, Languages, Color, Management, ...

User Manual
Page 16
.../60Hz 0 to 3048 m(0 to10000 feet) 0 to 12192 m(0 to 40,000 feet) DVI/VGA 1000 : 1 250 cd/m2 5 ms 16.7 M 25/28 W Temperature: 5-35℃; S2031 / S2031a Models Size Max. humidity: 10% ~ 85% 14
.../60Hz 0 to 3048 m(0 to10000 feet) 0 to 12192 m(0 to 40,000 feet) DVI/VGA 1000 : 1 250 cd/m2 5 ms 16.7 M 25/28 W Temperature: 5-35℃; S2031 / S2031a Models Size Max. humidity: 10% ~ 85% 14

User Manual
Page 17
Humidity: 10% ~ 85% 15 Humidity: 20% ~ 80% Temperature: -20-60℃; S2231 / S2231a Models Size Max resolution Recommended resolution Horizontal frequency Vertical frequency Viewable size Pitching angle Viewable angle Pixel frequency OSD functions Size (Packing) Net weight/ Gross weight Power supply Altitude (under operational condition) Altitude (under storing condition) Input signal Contrast Brightness Response time Color displayed Power Operational environment Storing environment 21.5" wide screen 1920 X 1080 @60 Hz 1920 X 1080 @60 Hz 24-94 kHz 50-76 Hz 476.64*268.11 mm -5º to...
Humidity: 10% ~ 85% 15 Humidity: 20% ~ 80% Temperature: -20-60℃; S2231 / S2231a Models Size Max resolution Recommended resolution Horizontal frequency Vertical frequency Viewable size Pitching angle Viewable angle Pixel frequency OSD functions Size (Packing) Net weight/ Gross weight Power supply Altitude (under operational condition) Altitude (under storing condition) Input signal Contrast Brightness Response time Color displayed Power Operational environment Storing environment 21.5" wide screen 1920 X 1080 @60 Hz 1920 X 1080 @60 Hz 24-94 kHz 50-76 Hz 476.64*268.11 mm -5º to...

User Manual
Page 18
resolution Recommended resolution Horizontal frequency Vertical frequency Viewable size Pitching angle Viewable angle Pixel frequency OSD functions Size (Packing) Net weight/ Gross weight Power supply Altitude (under operational condition) Altitude (under storing condition) Input signal Contrast Brightness Response time Color displayed Power Operational environment Storing environment 23" wide screen 1920 X 1080 @60 Hz 1920 X 1080 @60 Hz 24-94 kHz 50-76 Hz 509.18 × 286.42 mm -5º to 15º 160 170 MHz Brightness, Contrast, Image Control, Languages, Color, Management, Information,...
resolution Recommended resolution Horizontal frequency Vertical frequency Viewable size Pitching angle Viewable angle Pixel frequency OSD functions Size (Packing) Net weight/ Gross weight Power supply Altitude (under operational condition) Altitude (under storing condition) Input signal Contrast Brightness Response time Color displayed Power Operational environment Storing environment 23" wide screen 1920 X 1080 @60 Hz 1920 X 1080 @60 Hz 24-94 kHz 50-76 Hz 509.18 × 286.42 mm -5º to 15º 160 170 MHz Brightness, Contrast, Image Control, Languages, Color, Management, Information,...

User Manual
Page 19
S2321a Model Size Max. Humidity: 10% ~ 85% Note: The above specifications are subject to 40,000 feet) DVI/VGA 1000 : 1 300 cd/m2 5 ms 16.7 M 55 W Temperature: 5-35℃; resolution Recommended resolution Horizontal frequency Vertical frequency Viewable size Pitching angle Viewable angle Pixel frequency OSD functions Size (Packing) Net weight/ Gross weight Power supply Altitude (under operational condition) Altitude (under storing condition) Input signal Contrast Brightness Response time Color displayed Power Operational environment Storing environment 23" wide screen 1920 X 1080 @60 Hz...
S2321a Model Size Max. Humidity: 10% ~ 85% Note: The above specifications are subject to 40,000 feet) DVI/VGA 1000 : 1 300 cd/m2 5 ms 16.7 M 55 W Temperature: 5-35℃; resolution Recommended resolution Horizontal frequency Vertical frequency Viewable size Pitching angle Viewable angle Pixel frequency OSD functions Size (Packing) Net weight/ Gross weight Power supply Altitude (under operational condition) Altitude (under storing condition) Input signal Contrast Brightness Response time Color displayed Power Operational environment Storing environment 23" wide screen 1920 X 1080 @60 Hz...
User Manual
Page 20
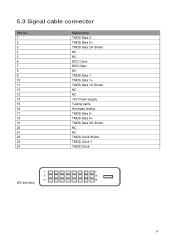
DVI Interface 18 5.3 Signal cable connector PIN No. 1 2 3 4 5 6 7 8 9 10 11 12 13 14 15 16 17 18 19 20 21 22 23 24 Signal name TMDS Data 2TMDS Data 2+ TMDS Data 2/4 Shield NC NC DDC Clock DDC Data NC TMDS Data 1TMDS Data 1+ TMDS Data 1/3 Shield NC NC +5V Power supply Testing cable Hot-swap testing TMDS Data 0TMDS Data 0+ TMDS Data 0/5 Shield NC NC TMDS Clock Shield TMDS Clock + TMDS Clock -
DVI Interface 18 5.3 Signal cable connector PIN No. 1 2 3 4 5 6 7 8 9 10 11 12 13 14 15 16 17 18 19 20 21 22 23 24 Signal name TMDS Data 2TMDS Data 2+ TMDS Data 2/4 Shield NC NC DDC Clock DDC Data NC TMDS Data 1TMDS Data 1+ TMDS Data 1/3 Shield NC NC +5V Power supply Testing cable Hot-swap testing TMDS Data 0TMDS Data 0+ TMDS Data 0/5 Shield NC NC TMDS Clock Shield TMDS Clock + TMDS Clock -
