HP Notebook Reference Guide
Page 68
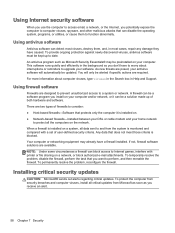
... sharing on a system, all critical updates from the system is blocked. You will automatically be alerted if specific actions are two types of firewalls to upgrade your computer. There are required.
... sharing on a system, all critical updates from the system is blocked. You will automatically be alerted if specific actions are two types of firewalls to upgrade your computer. There are required.
HP Notebook Reference Guide
Page 82
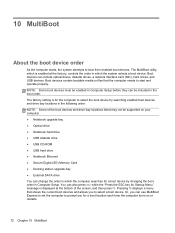
...device order As the computer starts, the system attempts to prompt you for a boot location each time the computer turns on your computer. ● Notebook upgrade bay ● Optical drive ● Notebook hard drive ● USB diskette drive ● USB CD-ROM ● USB hard drive ● ...Notebook Ethernet ● Secure Digital (SD) Memory Card ● Docking station upgrade bay ● External SATA drive You can use MultiBoot Express to set the computer to boot from enabled boot devices. Boot devices can be supported...
...device order As the computer starts, the system attempts to prompt you for a boot location each time the computer turns on your computer. ● Notebook upgrade bay ● Optical drive ● Notebook hard drive ● USB diskette drive ● USB CD-ROM ● USB hard drive ● ...Notebook Ethernet ● Secure Digital (SD) Memory Card ● Docking station upgrade bay ● External SATA drive You can use MultiBoot Express to set the computer to boot from enabled boot devices. Boot devices can be supported...
HP ProtectTools Getting Started
Page 109
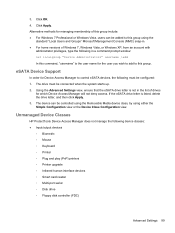
Alternative methods for managing membership of this group. The drive must be configured: 1. Unmanaged Device Classes HP ProtectTools Device Access Manager does not manage the following in the list of Windows 7, Windows Vista, or Windows XP, from an ...device classes: ● Input/output devices ◦ Biometric ◦ Mouse ◦ Keyboard ◦ Printer ◦ Plug and play (PnP) printers ◦ Printer upgrade ◦ Infrared human interface devices ◦ Smart card reader ◦ Multi-port serial ◦ Disk drive ◦ Floppy disk controller (FDC) Advanced Settings 99 ...
Alternative methods for managing membership of this group. The drive must be configured: 1. Unmanaged Device Classes HP ProtectTools Device Access Manager does not manage the following in the list of Windows 7, Windows Vista, or Windows XP, from an ...device classes: ● Input/output devices ◦ Biometric ◦ Mouse ◦ Keyboard ◦ Printer ◦ Plug and play (PnP) printers ◦ Printer upgrade ◦ Infrared human interface devices ◦ Smart card reader ◦ Multi-port serial ◦ Disk drive ◦ Floppy disk controller (FDC) Advanced Settings 99 ...
Getting Started HP Notebook
Page 6
...service door 34 Removing the service door 34 Replacing the service door 34 Replacing or upgrading the hard drive 36 Removing the hard drive ...36 Installing a hard drive ...36 Replacing a drive in the upgrade bay 37 Replacing a hard drive ...37 Replacing an optical drive 39 Adding or ... the display 44 Cleaning the sides and cover 44 Cleaning the TouchPad and keyboard 45 6 Backup and recovery ...46 Creating recovery media with HP Recovery Disc Creator 47 Creating recovery media ...47 Backing up your information ...47 Performing a system recovery ...48 Using the Windows recovery tools ...
...service door 34 Removing the service door 34 Replacing the service door 34 Replacing or upgrading the hard drive 36 Removing the hard drive ...36 Installing a hard drive ...36 Replacing a drive in the upgrade bay 37 Replacing a hard drive ...37 Replacing an optical drive 39 Adding or ... the display 44 Cleaning the sides and cover 44 Cleaning the TouchPad and keyboard 45 6 Backup and recovery ...46 Creating recovery media with HP Recovery Disc Creator 47 Creating recovery media ...47 Backing up your information ...47 Performing a system recovery ...48 Using the Windows recovery tools ...
Getting Started HP Notebook
Page 19
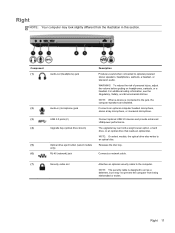
... optional computer headset microphone, stereo array microphone, or monaural microphone. (3) USB 3.0 ports (2) Connect optional USB 3.0 devices and provide enhanced USB power performance. (4) Upgrade bay (optical drive shown) The upgrade bay can hold a weight-saver option, a hard drive, or an optical drive that reads an optical disc. NOTE: On select models, the optical...
... optional computer headset microphone, stereo array microphone, or monaural microphone. (3) USB 3.0 ports (2) Connect optional USB 3.0 devices and provide enhanced USB power performance. (4) Upgrade bay (optical drive shown) The upgrade bay can hold a weight-saver option, a hard drive, or an optical drive that reads an optical disc. NOTE: On select models, the optical...

Getting Started HP Notebook
Page 44
... remove the drive (4) from the illustration in Hibernation, turn the computer on , in the Sleep state, or in this section. 36 Chapter 5 Maintenance Replacing or upgrading the hard drive CAUTION: To prevent information loss or an unresponsive system: Shut down the computer through the operating system. Do not remove the hard...
... remove the drive (4) from the illustration in Hibernation, turn the computer on , in the Sleep state, or in this section. 36 Chapter 5 Maintenance Replacing or upgrading the hard drive CAUTION: To prevent information loss or an unresponsive system: Shut down the computer through the operating system. Do not remove the hard...

Getting Started HP Notebook
Page 45
... display. Save your work. 2. Insert the hard drive into the hard drive bay at an angle (1), and then lay the hard drive flat in the upgrade bay 37 Replace the service door (see Inserting or removing the battery on the computer. To remove a hard drive from the... in the hard drive bay (2). 2. To install the hard drive: 1. Do not remove the hard drive while the computer is off or in the upgrade bay The upgrade bay can hold either a hard drive or an optical drive. If you are not sure whether the computer is on page 34). 5. Tighten the...
... display. Save your work. 2. Insert the hard drive into the hard drive bay at an angle (1), and then lay the hard drive flat in the upgrade bay 37 Replace the service door (see Inserting or removing the battery on the computer. To remove a hard drive from the... in the hard drive bay (2). 2. To install the hard drive: 1. Do not remove the hard drive while the computer is off or in the upgrade bay The upgrade bay can hold either a hard drive or an optical drive. If you are not sure whether the computer is on page 34). 5. Tighten the...

Getting Started HP Notebook
Page 46
Turn the computer upside down on page 32). 7. Loosen the upgrade bay screw (1). 10. Remove the hard drive from the upgrade bay. 9. Remove the hard drive screws from the upgrade bay (3). 38 Chapter 5 Maintenance Remove the battery (see Removing the service door on page 34). 8. Disconnect all external hardware devices connected to... 11. Unplug the power cord from the AC outlet. 5. Remove the service door (see Inserting or removing the battery on a flat surface, with the upgrade bay toward you. 6. 3. Using a flat-bladed screwdriver, gently push the tab to the computer. 4.
Turn the computer upside down on page 32). 7. Loosen the upgrade bay screw (1). 10. Remove the hard drive from the upgrade bay. 9. Remove the hard drive screws from the upgrade bay (3). 38 Chapter 5 Maintenance Remove the battery (see Removing the service door on page 34). 8. Disconnect all external hardware devices connected to... 11. Unplug the power cord from the AC outlet. 5. Remove the service door (see Inserting or removing the battery on a flat surface, with the upgrade bay toward you. 6. 3. Using a flat-bladed screwdriver, gently push the tab to the computer. 4.

Getting Started HP Notebook
Page 47
...door (see Inserting or removing the battery on page 32). 5. Do not remove the optical drive while the computer is off or in the upgrade bay 39 If you are not sure whether the computer is on by pressing the power button. Replace the hard drive screws. 3. Turn the...computer. 6. Replacing a drive in Hibernation, turn the computer on , in the Sleep state, or in the upgrade bay: 1. Then shut down the computer before removing the optical drive from the upgrade bay. Replacing an optical drive CAUTION: To prevent information loss or an unresponsive system: Shut down the computer ...
...door (see Inserting or removing the battery on page 32). 5. Do not remove the optical drive while the computer is off or in the upgrade bay 39 If you are not sure whether the computer is on by pressing the power button. Replace the hard drive screws. 3. Turn the...computer. 6. Replacing a drive in Hibernation, turn the computer on , in the Sleep state, or in the upgrade bay: 1. Then shut down the computer before removing the optical drive from the upgrade bay. Replacing an optical drive CAUTION: To prevent information loss or an unresponsive system: Shut down the computer ...

Getting Started HP Notebook
Page 48
..., gently push the tab to the computer. 4. Insert the optical drive into the upgrade bay (1). 40 Chapter 5 Maintenance Save your work. 2. Unplug the power cord from the upgrade bay: 1. Loosen the upgrade bay screw (1). 9. Remove the optical drive from the upgrade bay (3). Disconnect all external hardware devices connected to release the optical drive (2). 10...
..., gently push the tab to the computer. 4. Insert the optical drive into the upgrade bay (1). 40 Chapter 5 Maintenance Save your work. 2. Unplug the power cord from the upgrade bay: 1. Loosen the upgrade bay screw (1). 9. Remove the optical drive from the upgrade bay (3). Disconnect all external hardware devices connected to release the optical drive (2). 10...
Getting Started HP Notebook
Page 49
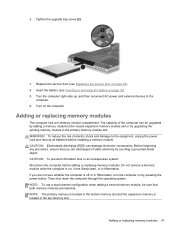
... components. NOTE: To use a dual-channel configuration when adding a second memory module, be upgraded by adding a memory module to the vacant expansion memory module slot or by upgrading the existing memory module in Hibernation, turn the computer on by touching a grounded metal object....in the Sleep state, or in the top memory slot. The capacity of static electricity by pressing the power button. 2. Tighten the upgrade bay screw (2). 3. Adding or replacing memory modules The computer has one memory module compartment. Insert the battery (see Replacing the service door...
... components. NOTE: To use a dual-channel configuration when adding a second memory module, be upgraded by adding a memory module to the vacant expansion memory module slot or by upgrading the existing memory module in Hibernation, turn the computer on by touching a grounded metal object....in the Sleep state, or in the top memory slot. The capacity of static electricity by pressing the power button. 2. Tighten the upgrade bay screw (2). 3. Adding or replacing memory modules The computer has one memory module compartment. Insert the battery (see Replacing the service door...
Getting Started HP Notebook
Page 64
Windows applications 9 Windows logo 9 L labels Bluetooth 52 HP Mobile Broadband Module 52 Microsoft Certificate of Authenticity 52 regulatory 52 service 52 SIM 52 wireless certification 52 WLAN 52 latch, battery release 17 latches, ... buttons 4, 5 on/off button 4, 7 using 27 TouchPad gestures pinching 30 scrolling 30 zooming 30 TouchPad light, identifying 6 TouchPad zone identifying 4 traveling with the computer 52 U upgrade bay 11 replacing a hard drive 37 replacing an optical drive 39 USB 3.0 port 11 USB ports, identifying 11, 12, 13 eSATA port 13 V vents, identifying...
Windows applications 9 Windows logo 9 L labels Bluetooth 52 HP Mobile Broadband Module 52 Microsoft Certificate of Authenticity 52 regulatory 52 service 52 SIM 52 wireless certification 52 WLAN 52 latch, battery release 17 latches, ... buttons 4, 5 on/off button 4, 7 using 27 TouchPad gestures pinching 30 scrolling 30 zooming 30 TouchPad light, identifying 6 TouchPad zone identifying 4 traveling with the computer 52 U upgrade bay 11 replacing a hard drive 37 replacing an optical drive 39 USB 3.0 port 11 USB ports, identifying 11, 12, 13 eSATA port 13 V vents, identifying...


