HP Notebook Reference Guide
Page 75
... a menu item, use the tab key and the keyboard arrow keys and then press enter, or use a pointing device to click the item. ● To scroll up and down, click the up arrow or the down arrow in the upper-right corner of the screen, or use either a pointing device... (TouchPad, pointing stick, or USB mouse) or the keyboard to the main Computer Setup screen, press esc, and then follow these steps: 1. Errors can prevent the ...
... a menu item, use the tab key and the keyboard arrow keys and then press enter, or use a pointing device to click the item. ● To scroll up and down, click the up arrow or the down arrow in the upper-right corner of the screen, or use either a pointing device... (TouchPad, pointing stick, or USB mouse) or the keyboard to the main Computer Setup screen, press esc, and then follow these steps: 1. Errors can prevent the ...
Getting Started HP Notebook
Page 6
...numeric keypad 28 Using pointing devices ...29 Setting pointing device preferences 29 Using the TouchPad ...29 Turning the TouchPad off and on 30 Navigating ...30 Selecting ...31 Using TouchPad gestures 31 Scrolling 32 Pinching/Zooming 32 5 Maintenance ...33 Inserting or removing the battery ...33 Using...45 Cleaning procedures ...45 Cleaning the display 45 Cleaning the sides and cover 46 Cleaning the TouchPad and keyboard 46 6 Backup and recovery ...47 Creating recovery media with HP Recovery Disc Creator 48 Creating recovery media ...48 Backing up your information ...49 Performing a ...
...numeric keypad 28 Using pointing devices ...29 Setting pointing device preferences 29 Using the TouchPad ...29 Turning the TouchPad off and on 30 Navigating ...30 Selecting ...31 Using TouchPad gestures 31 Scrolling 32 Pinching/Zooming 32 5 Maintenance ...33 Inserting or removing the battery ...33 Using...45 Cleaning procedures ...45 Cleaning the display 45 Cleaning the sides and cover 46 Cleaning the TouchPad and keyboard 46 6 Backup and recovery ...47 Creating recovery media with HP Recovery Disc Creator 48 Creating recovery media ...48 Backing up your information ...49 Performing a ...
Getting Started HP Notebook
Page 40
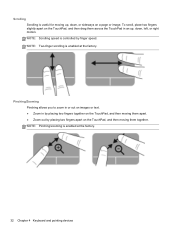
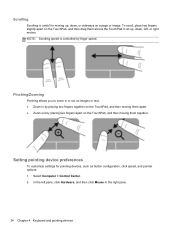
... on images or text. ● Zoom in an up, down , or sideways on the TouchPad, and then drag them across the TouchPad in by placing two fingers together on the TouchPad, and then moving them apart. ● Zoom out by finger speed. Scrolling Scrolling is useful for moving up, down , left, or right motion. To...
... on images or text. ● Zoom in an up, down , or sideways on the TouchPad, and then drag them across the TouchPad in by placing two fingers together on the TouchPad, and then moving them apart. ● Zoom out by finger speed. Scrolling Scrolling is useful for moving up, down , left, or right motion. To...
Getting Started HP Notebook
Page 66
L labels Bluetooth 54 HP Mobile Broadband Module 54 Microsoft Certificate of Authenticity 54 regulatory 54 serial number 54 SIM 54 wireless certification 54 WLAN 54 lights AC adapter 13, 16 caps lock 5, 6 drive 12 optical drive 13, 14 power 5, 6 TouchPad 5, 6 Web browser 5, 6 ...15, 16 speakers, identifying 7, 9 system repair disc 47 system restore points 47 T TouchPad buttons 4 using 29 TouchPad gestures pinching 32 scrolling 32 zooming 32 TouchPad light, identifying 5, 6 TouchPad on/off button 4 TouchPad zone identifying 4 traveling with the computer 54 U USB ports, identifying 13, 14, 15...
L labels Bluetooth 54 HP Mobile Broadband Module 54 Microsoft Certificate of Authenticity 54 regulatory 54 serial number 54 SIM 54 wireless certification 54 WLAN 54 lights AC adapter 13, 16 caps lock 5, 6 drive 12 optical drive 13, 14 power 5, 6 TouchPad 5, 6 Web browser 5, 6 ...15, 16 speakers, identifying 7, 9 system repair disc 47 system restore points 47 T TouchPad buttons 4 using 29 TouchPad gestures pinching 32 scrolling 32 zooming 32 TouchPad light, identifying 5, 6 TouchPad on/off button 4 TouchPad zone identifying 4 traveling with the computer 54 U USB ports, identifying 13, 14, 15...
HP Notebook User Guide - Linux
Page 6
... numeric keypad 31 Using the integrated numeric keypad 31 Using an optional external numeric keypad 31 Using the TouchPad ...32 Turning the TouchPad off and on 32 Navigating ...32 Selecting ...33 Using TouchPad gestures 33 Scrolling ...34 Pinching/Zooming 34 Setting pointing device preferences 34 5 Multimedia ...35 Using the audio features ...35 Adjusting the...
... numeric keypad 31 Using the integrated numeric keypad 31 Using an optional external numeric keypad 31 Using the TouchPad ...32 Turning the TouchPad off and on 32 Navigating ...32 Selecting ...33 Using TouchPad gestures 33 Scrolling ...34 Pinching/Zooming 34 Setting pointing device preferences 34 5 Multimedia ...35 Using the audio features ...35 Adjusting the...
HP Notebook User Guide - Linux
Page 44
... device preferences To customize settings for moving up , down , or sideways on a page or image. To scroll, place two fingers slightly apart on the TouchPad, and then drag them across the TouchPad in an up , down , left pane, click Hardware, and then click Mouse in by placing two fingers... together on the TouchPad, and then moving them apart. ● Zoom out by finger speed. NOTE: Scrolling speed is useful for pointing devices, such as button configuration, click speed, and pointer options: 1. In the...
... device preferences To customize settings for moving up , down , or sideways on a page or image. To scroll, place two fingers slightly apart on the TouchPad, and then drag them across the TouchPad in an up , down , left pane, click Hardware, and then click Mouse in by placing two fingers... together on the TouchPad, and then moving them apart. ● Zoom out by finger speed. NOTE: Scrolling speed is useful for pointing devices, such as button configuration, click speed, and pointer options: 1. In the...
HP Notebook User Guide - Linux
Page 109
... wireless certification labels 91 RJ-45 (network) jack, identifying 15, 16 S screen brightness keys 29 screen image, switching 29 scrolling TouchPad gesture 34 security cable 73 security cable slot, identifying 15, 16 security screw 50 security, wireless 25 serial number, computer 91..., 16 speakers, identifying 7, 9 storing battery 46 Suspend exiting 41 initiating 41 T temperature 46 TouchPad buttons 4 setting preferences 34 TouchPad gestures pinching 34 scrolling 34 zooming 34 TouchPad zone identifying 4 traveling with the computer 46, 91 tray-load optical drive 57 troubleshooting disc burning...
... wireless certification labels 91 RJ-45 (network) jack, identifying 15, 16 S screen brightness keys 29 screen image, switching 29 scrolling TouchPad gesture 34 security cable 73 security cable slot, identifying 15, 16 security screw 50 security, wireless 25 serial number, computer 91..., 16 speakers, identifying 7, 9 storing battery 46 Suspend exiting 41 initiating 41 T temperature 46 TouchPad buttons 4 setting preferences 34 TouchPad gestures pinching 34 scrolling 34 zooming 34 TouchPad zone identifying 4 traveling with the computer 46, 91 tray-load optical drive 57 troubleshooting disc burning...
HP ProBook 4540s Notebook PC HP ProBook 4440s Notebook PC HP ProBook 4441s Notebook PC - Maintenance and Service Guide
Page 12
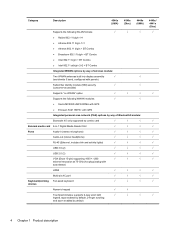
Category Description 4540s (UMA) 4540s (Disc) 4440s (UMA) Supports the following WLAN formats: √ √ √ ● Ralink 802.11 b/g/n 1×1 ● Atheros 802.11 b/g/n 1×1 &#... Multi-pin AC port √ √ √ Keyboard/pointing Full-sized keyboard devices √ √ √ Numeric keypad √ √ Touchpad includes: supports 2-way scroll with √ √ √ legend, taps enabled by default, 2-finger scrolling and zoom enabled by default 4440s/ 4441s (Disc) √ √ √ 4 Chapter 1 Product description
Category Description 4540s (UMA) 4540s (Disc) 4440s (UMA) Supports the following WLAN formats: √ √ √ ● Ralink 802.11 b/g/n 1×1 ● Atheros 802.11 b/g/n 1×1 &#... Multi-pin AC port √ √ √ Keyboard/pointing Full-sized keyboard devices √ √ √ Numeric keypad √ √ Touchpad includes: supports 2-way scroll with √ √ √ legend, taps enabled by default, 2-finger scrolling and zoom enabled by default 4440s/ 4441s (Disc) √ √ √ 4 Chapter 1 Product description

HP ProBook 4540s Notebook PC HP ProBook 4440s Notebook PC HP ProBook 4441s Notebook PC - Maintenance and Service Guide
Page 113
... port can be used with Computer Setup only if USB legacy support is displayed at the bottom of the screen, or use either a pointing device (TouchPad, pointing stick, or USB mouse) or the keyboard to enter Computer Setup. To start Computer Setup, follow these steps: 1. NOTE: You can prevent the computer... a menu item, use the tab key and the keyboard arrow keys and then press enter, or use a pointing device to click the item. ● To scroll up and down, click the up arrow or the down arrow in Computer Setup.
... port can be used with Computer Setup only if USB legacy support is displayed at the bottom of the screen, or use either a pointing device (TouchPad, pointing stick, or USB mouse) or the keyboard to enter Computer Setup. To start Computer Setup, follow these steps: 1. NOTE: You can prevent the computer... a menu item, use the tab key and the keyboard arrow keys and then press enter, or use a pointing device to click the item. ● To scroll up and down, click the up arrow or the down arrow in Computer Setup.


