Backup and Recovery - Windows Vista
Page 11
... When reformatting is easily accessible. If possible, back up ) your computer, you must purchase a Windows Vista operating system DVD to http://www.hp.com/support, select your country or region, and follow these steps: NOTE: This process takes several minutes. 1. Using a Windows Vista operating ... a Windows Vista operating system DVD, follow the on an external drive) is complete, the recovery process helps you have created and any keyboard key. 4. Select Repair your most recent backup (stored on discs or on -screen instructions. CAUTION: Using a Windows Vista operating system ...
... When reformatting is easily accessible. If possible, back up ) your computer, you must purchase a Windows Vista operating system DVD to http://www.hp.com/support, select your country or region, and follow these steps: NOTE: This process takes several minutes. 1. Using a Windows Vista operating ... a Windows Vista operating system DVD, follow the on an external drive) is complete, the recovery process helps you have created and any keyboard key. 4. Select Repair your most recent backup (stored on discs or on -screen instructions. CAUTION: Using a Windows Vista operating system ...
HP ProtectTools - Windows Vista and Windows XP
Page 22
...the Windows Logon service. You will be unable to use Credential Manager to log on to Windows with Credential Manager You can unlock it . In HP ProtectTools Security Manager, click Credential Manager in the Password box, and then click Next. 16 Chapter 2 Credential Manager for... page 24." The Credential Manager Logon Wizard opens. 3. This prevents unauthorized users from gaining access to your finger to log on to Windows, click the keyboard icon in sequence, the token gets locked out. Type your fingerprint to log on . 2. NOTE: If you enter the incorrect PIN for the token ...
...the Windows Logon service. You will be unable to use Credential Manager to log on to Windows with Credential Manager You can unlock it . In HP ProtectTools Security Manager, click Credential Manager in the Password box, and then click Next. 16 Chapter 2 Credential Manager for... page 24." The Credential Manager Logon Wizard opens. 3. This prevents unauthorized users from gaining access to your finger to log on to Windows, click the keyboard icon in sequence, the token gets locked out. Type your fingerprint to log on . 2. NOTE: If you enter the incorrect PIN for the token ...
HP ProtectTools - Windows Vista and Windows XP
Page 67
... types of information: ● Identification information about the computer (including the serial number) and about batteries in the system ● Specification information about the processor; keyboard controller version; Click one of the displayed information can be modified. Viewing system information Use the "File" page to save your changes, and then click...
... types of information: ● Identification information about the computer (including the serial number) and about batteries in the system ● Specification information about the processor; keyboard controller version; Click one of the displayed information can be modified. Viewing system information Use the "File" page to save your changes, and then click...
HP ProtectTools - Windows Vista and Windows XP
Page 90
... removes the hard drive before data generation or transfer is complete. The system may lock up with a black screen and nonresponding keyboard and mouse instead of Japanese is restarted, the PSD does not reflect file changes that option is not available unless the Basic ... opens the Administration tool, the Disable option is closed . Integrated graphics uses UMA architecture taking 8 MB of the Microsoft EFS encryption. HP will not continue until the Administration tool is closed . available on . Decryption will require the user password to open Embedded Security Administration ...
... removes the hard drive before data generation or transfer is complete. The system may lock up with a black screen and nonresponding keyboard and mouse instead of Japanese is restarted, the PSD does not reflect file changes that option is not available unless the Basic ... opens the Administration tool, the Disable option is closed . Integrated graphics uses UMA architecture taking 8 MB of the Microsoft EFS encryption. HP will not continue until the Administration tool is closed . available on . Decryption will require the user password to open Embedded Security Administration ...
Security - Windows XP, Windows Vista and Windows 7
Page 5
...). To protect against Use this security feature Unauthorized use either a pointing device (TouchPad, pointing stick, or USB mouse) or the keyboard to use. Security features provided with your computer will not load. Most of the computer Security cable slot (used even when the... with a password, smart card, and/or fingerprint reader. These deterrents may not prevent a product from a variety of the computer HP ProtectTools Security Manager, in combination with an optional security cable) *Computer Setup is an online security-based tracking and recovery service available in...
...). To protect against Use this security feature Unauthorized use either a pointing device (TouchPad, pointing stick, or USB mouse) or the keyboard to use. Security features provided with your computer will not load. Most of the computer Security cable slot (used even when the... with a password, smart card, and/or fingerprint reader. These deterrents may not prevent a product from a variety of the computer HP ProtectTools Security Manager, in combination with an optional security cable) *Computer Setup is an online security-based tracking and recovery service available in...

Security - Windows XP, Windows Vista and Windows 7
Page 9
... be set and entered with embedded numeric keypad number keys. ● It can be identical. ● It is not displayed as it is set with keyboard number keys will not be entered to access Computer Setup and to 32 letters and numbers and is it thereafter with the same keys. BIOS...
... be set and entered with embedded numeric keypad number keys. ● It can be identical. ● It is not displayed as it is set with keyboard number keys will not be entered to access Computer Setup and to 32 letters and numbers and is it thereafter with the same keys. BIOS...
Security - Windows XP, Windows Vista and Windows 7
Page 19
... of system information: ● Identification information about the computer model and the batteries. ● Specification information about the processor, cache, memory, ROM, video revision, and keyboard controller revision. Viewing Computer Setup System Information 15
... of system information: ● Identification information about the computer model and the batteries. ● Specification information about the processor, cache, memory, ROM, video revision, and keyboard controller revision. Viewing Computer Setup System Information 15

Computer Setup - Windows Vista and Windows XP
Page 5
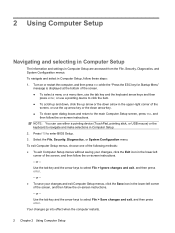
...: Some of the screen. 2. Press f10 to a USB port can be used with Computer Setup only if USB legacy support is enabled. NOTE: An external keyboard or mouse connected to enter BIOS Setup. 1 1 Starting Computer Setup Computer Setup is a preinstalled, ROM-based utility that can be used even when the operating...
...: Some of the screen. 2. Press f10 to a USB port can be used with Computer Setup only if USB legacy support is enabled. NOTE: An external keyboard or mouse connected to enter BIOS Setup. 1 1 Starting Computer Setup Computer Setup is a preinstalled, ROM-based utility that can be used even when the operating...
Computer Setup - Windows Vista and Windows XP
Page 6
... The information and settings in Computer Setup, follow these steps: 1. NOTE: You can use either a pointing device (TouchPad, pointing stick, or USB mouse) or the keyboard to select File > Save changes and exit, and then press enter. or - ● To save your changes, click the Exit icon in Computer Setup. 2. Your... for Startup Menu" message is displayed at the bottom of the screen. ● To select a menu or a menu item, use the tab key and the keyboard arrow keys and then press enter, or use the up arrow key or the down arrow key. ● To close open dialog boxes and return...
... The information and settings in Computer Setup, follow these steps: 1. NOTE: You can use either a pointing device (TouchPad, pointing stick, or USB mouse) or the keyboard to select File > Save changes and exit, and then press enter. or - ● To save your changes, click the Exit icon in Computer Setup. 2. Your... for Startup Menu" message is displayed at the bottom of the screen. ● To select a menu or a menu item, use the tab key and the keyboard arrow keys and then press enter, or use the up arrow key or the down arrow key. ● To close open dialog boxes and return...
Computer Setup - Windows Vista and Windows XP
Page 9
... and exit Save changes and exit To do this ● View identification information for the processor, cache and memory size, system ROM, video revision, and keyboard controller version. Save any changes entered during the current session. Replace the configuration settings in the system. ● View specification information for the computer and...
... and exit Save changes and exit To do this ● View identification information for the processor, cache and memory size, system ROM, video revision, and keyboard controller version. Save any changes entered during the current session. Replace the configuration settings in the system. ● View specification information for the computer and...

Computer Setup - Windows Vista and Windows XP
Page 11
... information for the computer and the batteries in the system. ◦ Specification information for the processor, cache and memory size, system ROM, video revision, and keyboard controller version. ● Start-up Test-Verifies the system components needed for starting the computer. ● Run-In Test-Runs a comprehensive check on system memory...
... information for the computer and the batteries in the system. ◦ Specification information for the processor, cache and memory size, system ROM, video revision, and keyboard controller version. ● Start-up Test-Verifies the system components needed for starting the computer. ● Run-In Test-Runs a comprehensive check on system memory...
Computer Setup - Windows Vista and Windows XP
Page 12
... device mode. disabled by default). The following : ◦ Use of the options above varies by computer model. ● Enable/disable HP QuickLook 2 (enabled by default). ● Enable/disable Data Execution Prevention (select models only; When enabled, USB legacy support allows the ...following options are available: ◦ AHCI (Advanced Host Controller Interface) ◦ IDE (Integrated Drive Electronics) NOTE: Availability of a USB keyboard in seconds. ● Set the boot order. ● Enable/disable USB legacy support (enabled by default). When enabled, the processor ...
... device mode. disabled by default). The following : ◦ Use of the options above varies by computer model. ● Enable/disable HP QuickLook 2 (enabled by default). ● Enable/disable Data Execution Prevention (select models only; When enabled, USB legacy support allows the ...following options are available: ◦ AHCI (Advanced Host Controller Interface) ◦ IDE (Integrated Drive Electronics) NOTE: Availability of a USB keyboard in seconds. ● Set the boot order. ● Enable/disable USB legacy support (enabled by default). When enabled, the processor ...
Drives - Linux
Page 5
... of power, be sure that the battery is writing to which they apply. Do not touch the connector pins on a removable drive or on the keyboard or move a computer that check carry-on it down the computer. Handle a drive carefully; When the battery is the only source of information, observe these...
... of power, be sure that the battery is writing to which they apply. Do not touch the connector pins on a removable drive or on the keyboard or move a computer that check carry-on it down the computer. Handle a drive carefully; When the battery is the only source of information, observe these...
Drives - Linux
Page 11
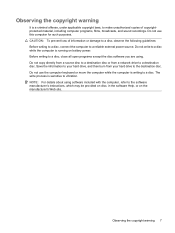
Do not use the computer keyboard or move the computer while the computer is sensitive to vibration. Observing the copyright warning 7 Do not write to a disc while the computer is running ...
Do not use the computer keyboard or move the computer while the computer is sensitive to vibration. Observing the copyright warning 7 Do not write to a disc while the computer is running ...
Drives - Linux
Page 20
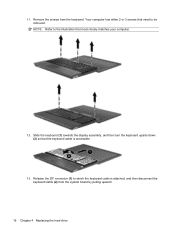
NOTE: Refer to the illustration that need to which the keyboard cable is accessible. 13. Your computer has either 2 or 3 screws that most closely matches your computer. 12. Slide the keyboard (1) towards the display assembly, and then turn the keyboard upside down (2) so that the keyboard cable is attached, and then disconnect the keyboard cable (2) from the keyboard. Release the ZIF connector (1) to be removed. Remove the screws from the system board by pulling upward. 16 Chapter 4 Replacing the hard drive 11.
NOTE: Refer to the illustration that need to which the keyboard cable is accessible. 13. Your computer has either 2 or 3 screws that most closely matches your computer. 12. Slide the keyboard (1) towards the display assembly, and then turn the keyboard upside down (2) so that the keyboard cable is attached, and then disconnect the keyboard cable (2) from the keyboard. Release the ZIF connector (1) to be removed. Remove the screws from the system board by pulling upward. 16 Chapter 4 Replacing the hard drive 11.
Drives - Linux
Page 21
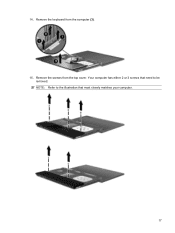
Your computer has either 2 or 3 screws that most closely matches your computer. 17 Remove the keyboard from the top cover. NOTE: Refer to the illustration that need to be removed. 14. Remove the screws from the computer (3). 15.
Your computer has either 2 or 3 screws that most closely matches your computer. 17 Remove the keyboard from the top cover. NOTE: Refer to the illustration that need to be removed. 14. Remove the screws from the computer (3). 15.
Drives - Linux
Page 25
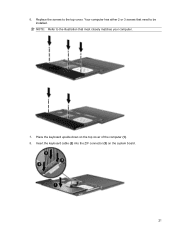
6. Replace the screws to be installed. Place the keyboard upside down on the system board. 21 NOTE: Refer to the illustration that need to the top cover. Insert the keyboard cable (2) into the ZIF connector (3) on the top cover of the computer (1). 8. Your computer has either 2 or 3 screws that most closely matches your computer. 7.
6. Replace the screws to be installed. Place the keyboard upside down on the system board. 21 NOTE: Refer to the illustration that need to the top cover. Insert the keyboard cable (2) into the ZIF connector (3) on the top cover of the computer (1). 8. Your computer has either 2 or 3 screws that most closely matches your computer. 7.
Drives - Linux
Page 26
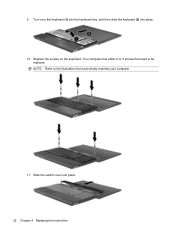
Turn over the keyboard (1) into the keyboard tray, and then slide the keyboard (2) into place. 22 Chapter 4 Replacing the hard drive NOTE: Refer to be replaced. Replace the screws on the keyboard. Slide the switch cover into place. 10. 9. Your computer has either 2 or 3 screws that need to the illustration that most closely matches your computer. 11.
Turn over the keyboard (1) into the keyboard tray, and then slide the keyboard (2) into place. 22 Chapter 4 Replacing the hard drive NOTE: Refer to be replaced. Replace the screws on the keyboard. Slide the switch cover into place. 10. 9. Your computer has either 2 or 3 screws that need to the illustration that most closely matches your computer. 11.
Drives - Linux
Page 29
... creating 8 playing 6 removing 9 CD drive 2, 11 copyright warning 7 H hard disk drive external 11 installing 19 replacing 13 hard drive external 11 installing 19 replacing 13 K keyboard removing 16 O optical disc removing 9 using 4 optical drive 2, 11 D diskette drive 11 drives caring for 1 diskette 11 DVD+/-RW SuperMulti Double-
... creating 8 playing 6 removing 9 CD drive 2, 11 copyright warning 7 H hard disk drive external 11 installing 19 replacing 13 hard drive external 11 installing 19 replacing 13 K keyboard removing 16 O optical disc removing 9 using 4 optical drive 2, 11 D diskette drive 11 drives caring for 1 diskette 11 DVD+/-RW SuperMulti Double-
Drives - Windows Vista
Page 5
... optical drive(select models only) is connected to an external hard drive, initiate Sleep and allow the screen to media. Do not type on the keyboard or move a computer that check carry-on , and then shut it . Additional cautions are unsure whether the computer is sensitive to which they apply. Refer...
... optical drive(select models only) is connected to an external hard drive, initiate Sleep and allow the screen to media. Do not type on the keyboard or move a computer that check carry-on , and then shut it . Additional cautions are unsure whether the computer is sensitive to which they apply. Refer...


